Today, I faced Daemons. An interesting game - I definitely learned a lot about how they play. Read on for the full report!
:: Denizens of the Warp ::
My new list:
Shadow Archmage, Vortex Shard
Std. Prince
Mounted BSB, Radiant Gem of Hoeth, Luckstone (True Magic)
35 Spearelves, Gleaming Pennant
14 Archers, musician
11 Archers
17 Phoenix Guard, standard bearer, Banner of Sorcery, musician
8 Silver Helms, champion, musician
10 Dragon Princes, standard bearer, musician, Banner of Eternal Flame
2 Eagles
1 Repeater
His list:
Bloodthirster, dispel scroll, hatred, killing blow, 3+/5++
Khorne Herald, BSB, Stubborn Banner, 1+/5++, Killing Blow, Mount (Juggernaut?)
Tzeentch Herald, Disc, Lore of Heavens, Dispel Scroll, Loremaster
24 Bloodletters, champ
24 Bloodletters, champ
5 Chaos Furies
5 Chaos Furies
6 Flamers of Tzeentch
6 Flamers of Tzeentch
6 Hounds (Flesh Hounds?)
:: Pre-battle thoughts & deployment::
Magic: I got Steed, Enfeebling, Pendulum, Pit. Great, neither Withering NOR Okkam's. I swapped Steed for Miasma. Naenor rolled a 1 for Shield of Saphery. His caster knew everything from Heavens.
A solid list indeed, but not the worst I've seen. He switches up between Lord of Change and Bloodthirster.
We rolled Meeting Engagement and I had to deploy first. I rolled a '1' for my Phoenix Guard, Spearelves and small Archer unit. Curses, why would all my crucial infantry be off the table like that? I decided to deploy defensively since I couldn't send my cavalry off on its own. He didn't roll a single '1' so got a pretty good deployment. Normally, I would've played more aggressively but I don't think that's a good idea with both infantry units lagging behind.
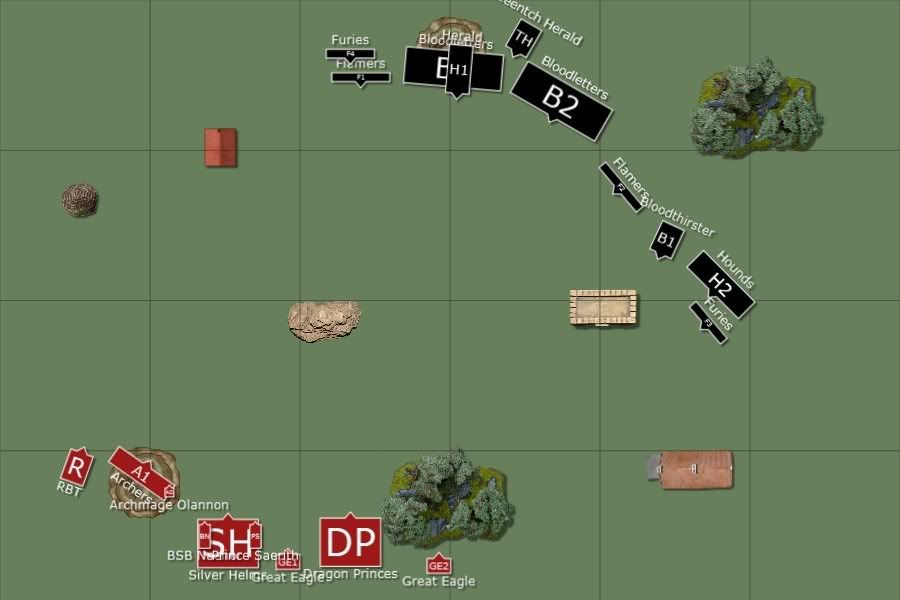
I got first turn, him failing to roll a '6'. I was worried that I hadn't got my usual deployment advantage (quite the contrary!) and that my spell selection was very poor. Regardless, I was intending to put up a fight!
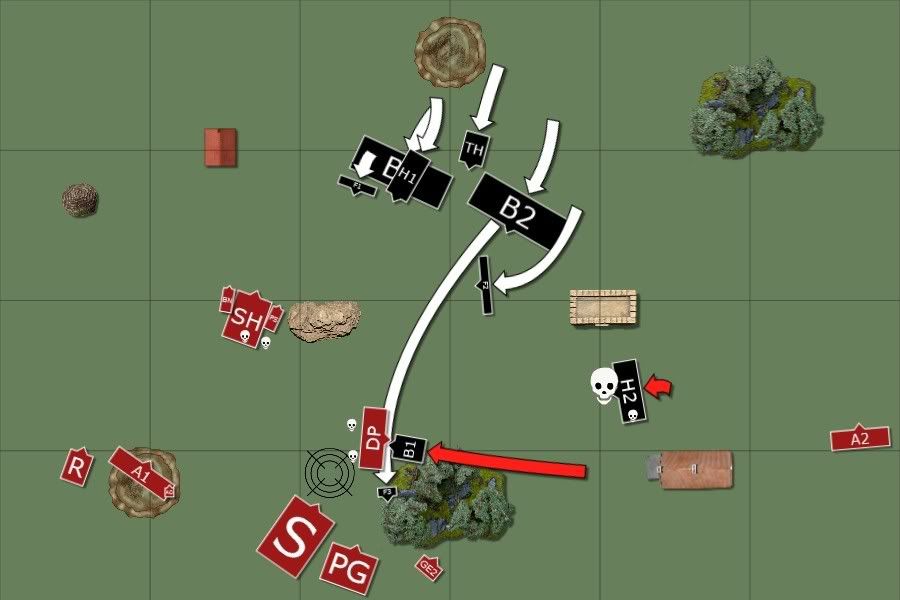
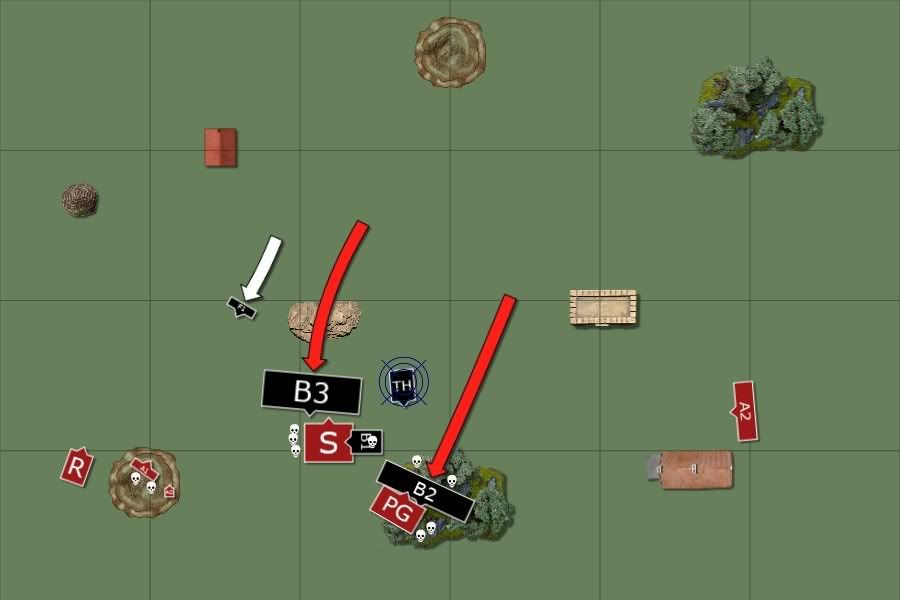
:: High Elves Turn 1 ::
I move up cautiously, letting my infantry follow suit. I was hoping to be able to isolate some of his units with my cavalry and engage his blocks later on with combined units. As for the Bloodthirster, I didn't really have a clear plan: I'd try to get my infantry against him for at least a round or two, then come in with charges and maybe finish him off.
Magic is 8 v 4. I try enfeebling on a block but fail on 3D6. I cast the rest at Drain Magic, which is scrolled by his Thirster.
Shooting's a bit better with 3 furies going down and a flamer dying.
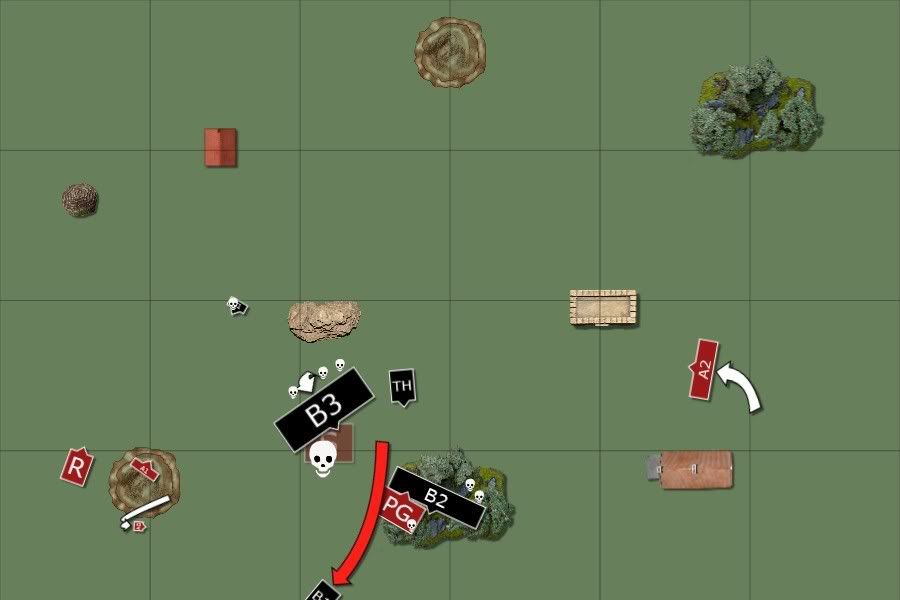
 :: Daemons Turn 1 ::
Bloodthirster moves up on my flank and furies and flamers advance. His movement is kind of poor with his blocks being boxed in at the time being.
Magic is 5 v 4 and he casts it all at Comet, which I dispel.
Shooting puts 2 wounds on the Eagle, the cover helping out greatly against the Flamers! Truth be told, it didn't matter too much whether it had 1 or 3 wounds for the tasks I had in mind.
Overall, I was happy so far. 1 turn completed and I had a somewhat better position than after deployment, with magic and shooting having done nothing important yet.
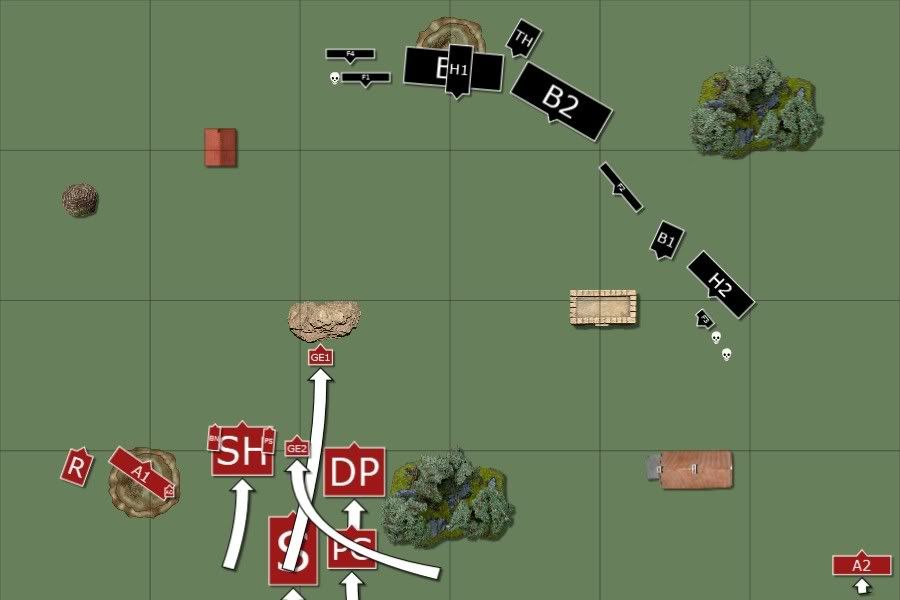
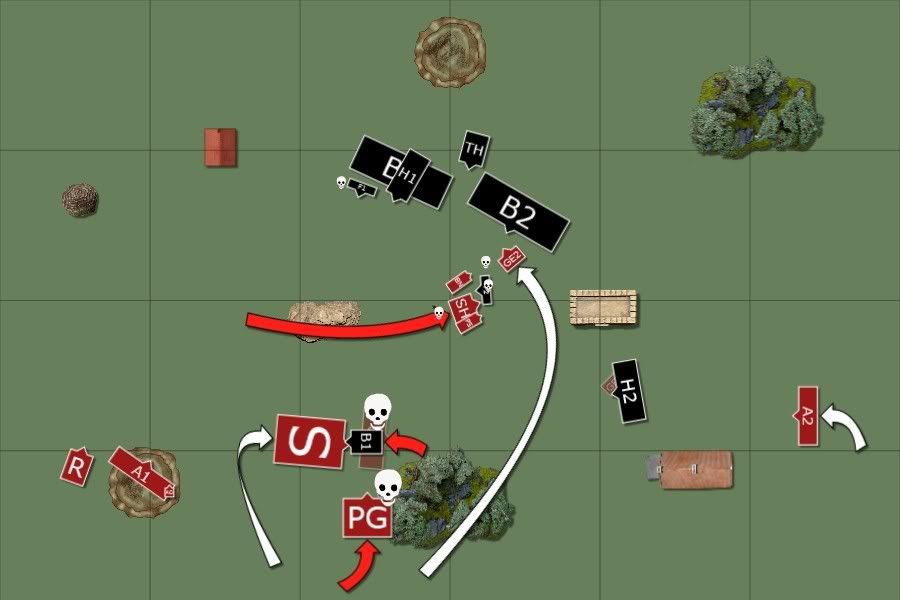
 :: High Elves Turn 2 ::
My Dragon Princes are 16" away from his central furies. The beauty here is that I can overrun into the Flamers, with nothing being able to counter-charge me! I figure it's a pretty good shot, it's hard for him to adapt to this situation without exposing his Bloodthirster and surrendering the central control, or his other block of Bloodletters.
Naturally, I roll a '4', '3' and '3' for a miserable failed charge. Bloodthirster coming in against me next turn you say? The Helms charge the other Furies.
Magic sees boosted Miasma on his left-most flamers (I roll a '6'!). I then cast Enfeebling on his Thirster with a very good roll on 4D6. He scrolls it.
Shooting kills a Flamer.
Combat sees my Cavalry decimate his Furies and I reform to face the middle. Tough call turning away from the Thirster, but I decided I had to keep the pressure up against his Flamers.
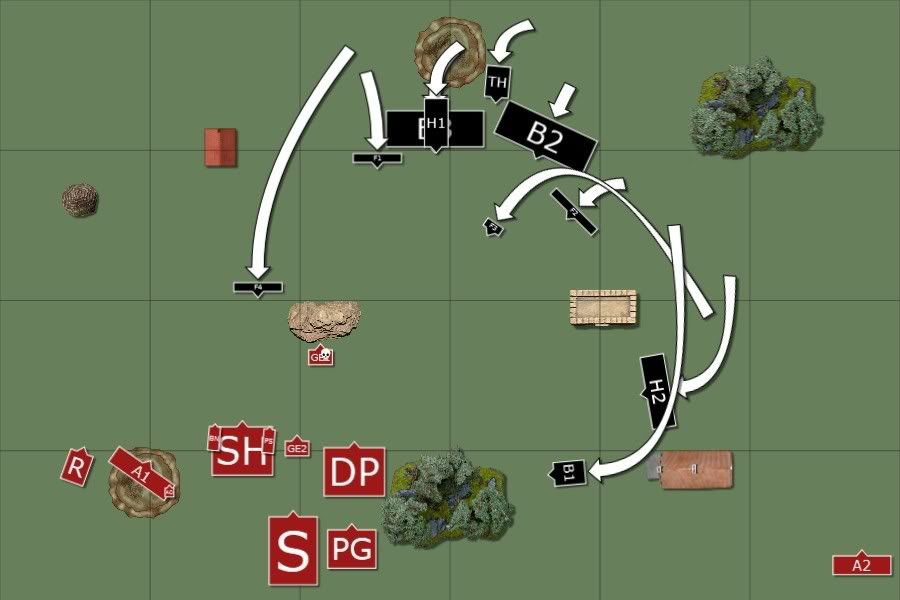
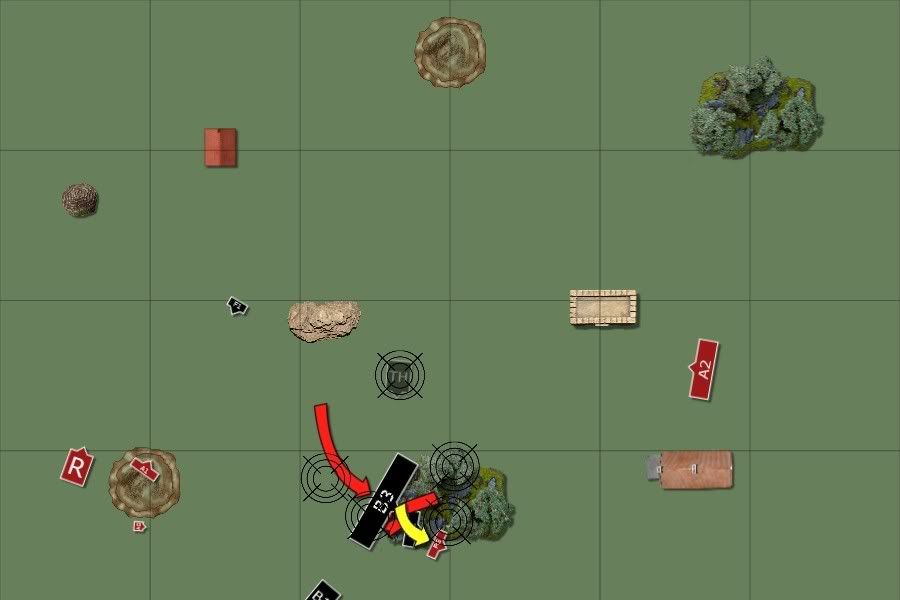
 :: Daemons Turn 2 ::
Bloodthirster charges Dragon Princes. Hounds charge my blocking Eagle. Blocks move up, Flamers trying to get out of the way. His Furies cover my Phoenix Guard, angling so that an overrun is impossible (as it stands currently).
Magic is 8 v 4. He starts with an IF Comet (see the black mark for placement). He loses a single D6 with the miscast and I dispel the rest.
Shooting kills a couple of Silver Helms, his Flamers cursing Miasma for limiting their potential.
Combat - Thirster kills 4 Dragon Princes, lose 1 wound due to dangerous terrain test. I hold on Steadfast and combat reform. I wasn't thinking clearly as I didn't ensure this reform would allow my Phoenix Guard to overrun properly.
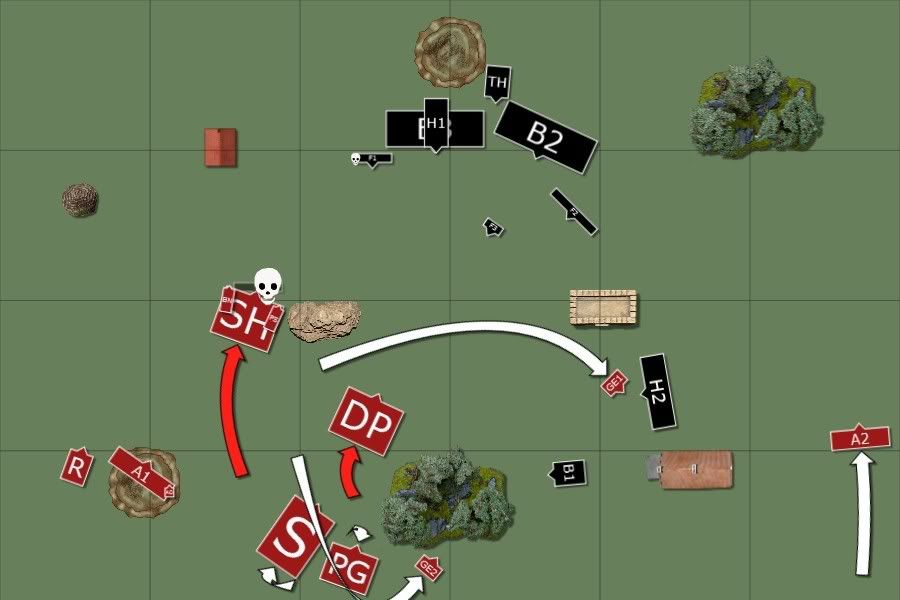
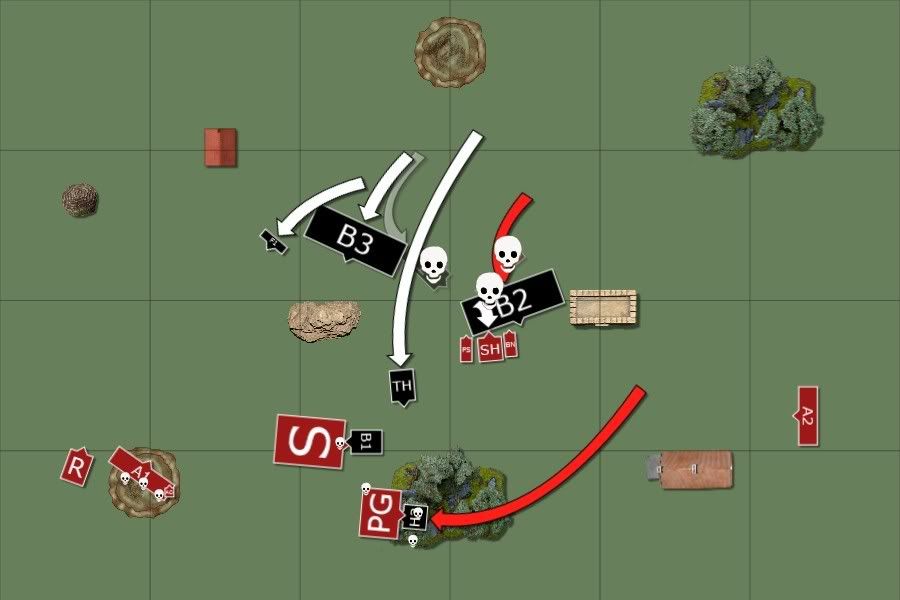
 :: High Elves Turn 3 ::
My Helms charge his central Flamers, since various angles etc mean no blocks can counter-charge me. Also, if I could win big enough and crumble them in 2 turns, I could reform to face his Thirster in my Turn 4! Phoenix Guard charge the Furies, the Spearelves move up to receive a pursuing Thirster. The remaining Eagle move to take care of the last angle to leave my cavalry alone.
Magic sees him dispel Enfeebling on the Thirster and I get a poor Miasma (-1) off on his Flamers again. Comet does not arrive.
Shooting does nothing, his 5+ saves proving too hard to get by.
Combat - my Dragon Princes are all killed save for 2, which flee (the Banner auto-dies). The Thirster catches them but overruns into Spearelves. The Phoenix Guard kill the Furies. I reformed the Phoenix Guard to face his Thirster. The Helms lose a couple to stand and shoot but the cavalry kill off 3 Flamers in melee. The unit is now down to the Helms Champion and the characters. He would've lost more but had a stubborn banner on his Herald which saved a lot of them from crumbling.
 :: Daemons Turn 3 ::
His Bloodletters charge my Eagle, his Herald charges my Cavalry from out of his block. Winds of magic are 3-3 and I choose to use Vortex as I can't afford any more advantages from him at the moment. Comet does not arrive. Shooting kills some Archers. His Hounds charge my Phoenix Guard.
In combat, my Spearelves' Champion challenge him and is promptly stomped to death. I pass my steadfast test. His Herald challenges and reveals Obsidian Armour. My Prince accepted but had activated Loec. I manage 3 wounds with Loec and he has a 1+ save to make. He fails 1, and re-rolls the other 2, failing another! He then rolls for 5+ ward, making 1. He must re-roll that one as well, and fails! Lucky catch for me

The Flamers die to the rest of the attacks and combat resolution, sorely missing their banner. I reform to face his Thirster. This reform however means I am just barely clipping the edge of his Bloodletters which proceed to kill the Eagle and overrun to catch my Cavalry. Ouch, poor reform: I should've turned against the Herald instead. Phoenix Guard shake off the worst of the Hounds and reform to face them.
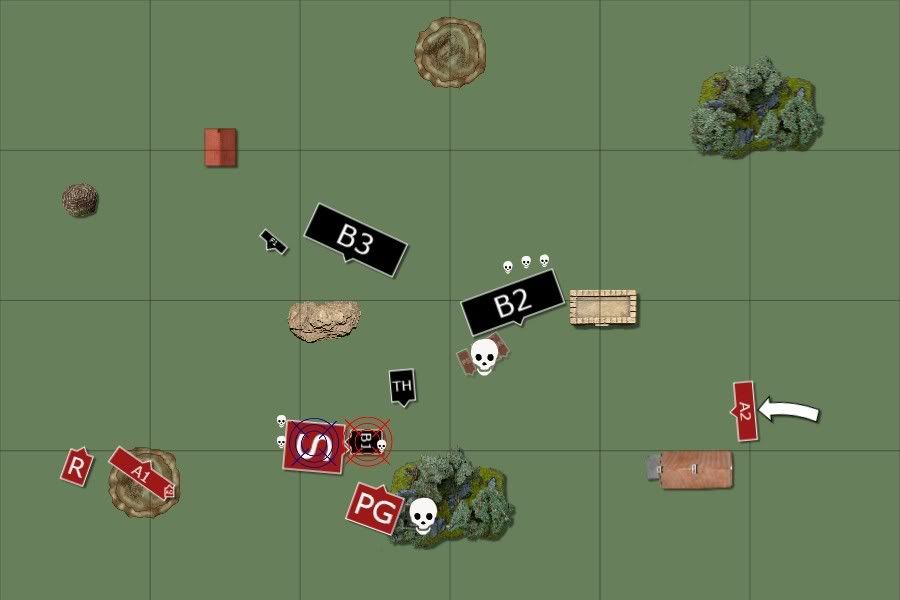
 :: High Elves Turn 4 ::
Virtually no movement to speak of.
Magic sees me get -2S on his Thirster and Shield on the Spears. I figured it would help them more than the Cavalry since I considered them doomed anyways. Comet AGAIN does not arrive.
Shooting again doesn't do too much and we're off to combat. The Cavalry kill off a handful of Bloodletters before he shows me an amazing amount of Killing Blows, leaving no elf alive. The Phoenix Guard put up a way better display as they kill off all the Hounds and reform to face the centre. The Spearelves manage to put a wound on his Thirster and lose a few in return, though the Shield & Enfeebling saved quite a few of them.
 :: Daemons Turn 4 ::
His Bloodletters both declare charges: one against the Spearelves, the other against the Phoenix Guard. Magic sees him get off Harmonic Convergence. Now, he claimed this spell allows re-roll for every failed to-hit and to-wound roll, while only failed armour saves rolls of a '1' could be re-rolled. He said that he'd seen it FAQ'd. In my opinion, this sounded pretty insane but I didn't have a good argument against it so that's how we played it. Comet still did not arrive...
Shooting saw his Flamers, with the aid of Harmonic Convergence, bring down a lot of Archers from Olannon's unit, downing them to only 3 left. They passed their panic test.
Combat saw my Spearelves down to 21 models, though they put another wound on the Thirster (he now had 2 left) and managed to combat reform (Steadfast!) to face the Bloodletters. In hindsight, I should've prayed for them to kill the Thirster instead. The Phoenix Guard hold their own against the Bloodletters, with a good display of 4+ rolling on my behalf.
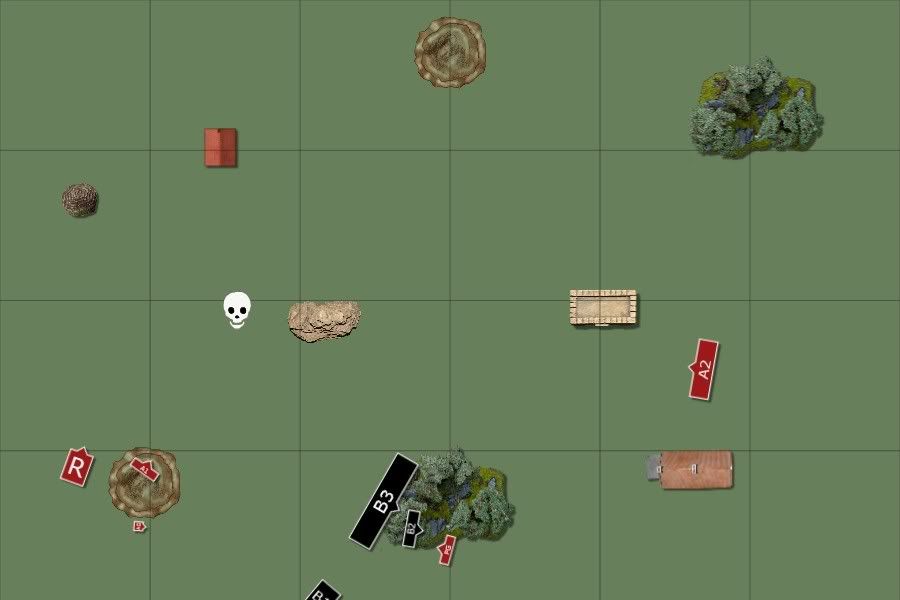
 :: High Elves Turn 5 ::
Olannon moves behind the hill to obtain hard cover against his Flamers. Magic does nothing useful as I try to pit his Herald but he passes his I test. Shooting takes down another Flamer, bringing them to only 2 remaining models. Comet still does not arrive, and the amount of Markers is growing pretty large.
Combat sees my Spearelves lose badly and run. The Thirster pursues them off the table with the Bloodletters reforming to face Phoenix Guard. The Wardens of Asuryan manage to win against the Letters in the meantime, and it looks like they'll all die in a turn or two if the rolls are roughly average. I'm still impressed by this unit!
 :: Daemons Turn 5 ::
Bloodletters charge Phoenix Guard. In the magic phase he tries to cast Chain Lightning on Olannon but I dispel it barely. The Comet arrives finally and it's quite devastating: his Bloodletters each lose a lot, leaving the smaller one at only 6 models. My Phoenix Guard lose 5 and they're down to 7 left. His Herald dies but his Thirster is off the table - lucky for him! With 2 wounds left and all those markers, he probably would've died and cost him the game.
Shooting sees his 2 Flamers target Olannon but they only manage a single wound due to hard cover.
In combat I kill off 3 Bloodletters, leaving only 3 alive. I lose 3 in return and break, though they're not run down.
 :: High Elves Turn 6 ::
I rally the Phoenix Guard. Magic sees me try to Pit and Pendulum him to death but his 3 remaining Bloodletters just won't die. Shooting kills the last 2 Flamers (3 wounds). He says that he won't charge my Phoenix Guard so the game's over!
 :: Victory Points ::
The remaining points on the table were roughly 1200 to 1050 in his favour. However, due to banners and Saerith being dead, he was comfortably ahead. Sadly enough, a loss for the High Elves
:: Evaluation ::
The mission hurt me, the 1's hurt me, the magic selection hurt me. While I'm pretty sure my movement wasn't optimal, I had such a big disadvantage from the get-go that everything I tried to accomplish felt impossible. I caught a couple of breaks when Saerith killed his Herald and the Spears put a couple of wounds on his Thirster, but also made a couple of bad mistakes (Dragon Princes combat reform and Silver Helms combat reform having defeated the Flamers).
The Vortex Shard was, in this game, probably not the best item. With Silver Wand I would've almost certainly got Okkam's which would've altered the game drastically. However, being able to shut him down when I needed to was a big asset and I suppose it can be put to good use. Most of the time, a level 4's spell selection and the Lore of Shadows is enough for a really strong magic phase so this is probably the worst I could ever get.
Phoenix Guard really impressed me again. The Spearelves also did very well here. With Withering and/or Okkam's it would've been a lot better, too.
For now, I haven't analyzed my decisions thoroughly so comments regarding this is most welcome. How would you deploy given the two 1's? What do you think of my movement, placement, choice of battles etc?