Edit - this is now the official thread for all your basing needs.
How do you base your models? What materials do you use? What colours do you use? Even if all you do is painted sand, please contribute. Pictures are appreciated, but not required.
Also, if anyone has any awesome basing-related links, advice, whatever - post it here!
The Official Basing Thread
Moderators: The Heralds, The Loremasters
The Official Basing Thread
Last edited by Kiyohira on Mon Oct 15, 2007 11:16 am, edited 1 time in total.
[i][size=75]Awake, angels of lunacy
Arise, avatars of khaos
Incinerate yourselves
In the blaze of Babylon
Heirophants of the hurricane
We invoke the eidolon
Unleash the storm[/i][/size]
Arise, avatars of khaos
Incinerate yourselves
In the blaze of Babylon
Heirophants of the hurricane
We invoke the eidolon
Unleash the storm[/i][/size]
-
Tijminator
- Posts: 28
- Joined: Wed Jan 10, 2007 12:34 pm
- Location: The Den of Boredom
For my Dark Eldar I'll be using the stuff from tennis fields, gravel or something it's called. Mostly by chance, as I found at least 6 cubic meter was just lying on the ground near my school. After school I got back with a bucket, now I have a lifetime supply of red flakey sand-stoney stuff.. Just fitting for my Dark Eldar, who I imagine fight about everywhere.
Clicketyclick!
I'll add in more URLs when I find them.
Tijminator
Clicketyclick!
I'll add in more URLs when I find them.
Tijminator
[22:00] <Ferretsnarf> I got my share of being raped too
Back in 'The Days' things where all better. Yeah sure. The air was clean and sex was dirty. Only difference.
Back in 'The Days' things where all better. Yeah sure. The air was clean and sex was dirty. Only difference.
-
Galengalad

- Posts: 65
- Joined: Wed Apr 13, 2005 2:16 pm
- Location: Moscow
Dwarfs - sand, small pebbles (I use at least two for each base). I glue the stuff to the base, spray the model and the base with Chaos black.
Drybrush it with codex grey and then fortress grey. So you get a "mountain" base. To make them look better I add some "standing" static grass (Noch and some other railroad models producers make it). This grass is ca 8 mm high.
Slayers - the above-described base is covered with snow, made from PVA, salt, and baking soda.
High Elves/Brets - same sand and pebbles, black spray, bestial brown/graveyard earth/commando khaki or bleached bone. Wash of brown ink or flesh wash. Two types of grass - Noch and GW static. Some foilage for foresters (i.e skirmishing bowmen, shadow warriors.
Woodies - as I'm making water-themed army, I use HE/Bret variant for certain parts of the bases, the rest of the bases I paint regal blue/enchanted blue/ice blue and then cover with GW water effects....
-
SV_Harlequin

- Posts: 208
- Joined: Sat Aug 06, 2005 10:25 pm
- Location: London
Druchii = Sand as they are raiders so on beaches a lot.
Asur = Mountains, so greys and rocks and a fir bit of grass after all they are Caledorian.
Asrai = Grass, dead trees, mud, leaves. Spring Elves.
Eldar = Ruins
I.G = Urban, so roads, pavement, inside of bulidings. Made using lots of things, a fiar bit sculpted with Milliput/Epoxy Putty.
Chaos = Haven't made my mind up yet will base when finished army.
Jayne: "Do you know what the chain of command is here? It's the chain I go get and beat you with to show you who's in command."
[img]http://i22.photobucket.com/albums/b342/SV_Harlequin/Caledor_bannercopy.jpg[/img]
[img]http://i22.photobucket.com/albums/b342/SV_Harlequin/Caledor_bannercopy.jpg[/img]
-
LochNESS

- Posts: 26
- Joined: Sun Jun 06, 2004 1:14 pm
- Location: Leyden, South Holland, Netherlands, EU, Eurasia, Earth, System Sol
- Contact:
I wrote a short article about how I base my bases. However, I vary these from army to army. My Hochland is based basicly the same but uses more flock. The Orks a different variaty of brown and some armies have different bases all together. However, this is the standard way.
http://www.dicetroll.com/forum/DiceTrol ... fm?id=6542
http://www.dicetroll.com/forum/DiceTrol ... fm?id=6542
Count of Averland my blog on games, minis and more!
Rotterdam is increasingly to Architecture what Paris is to Fashion or Los Angeles to Entertainment -NY Times
Design stays, however, according to my opinion, at least partially something miraculous. -J. Bakema (Architect)
Rotterdam is increasingly to Architecture what Paris is to Fashion or Los Angeles to Entertainment -NY Times
Design stays, however, according to my opinion, at least partially something miraculous. -J. Bakema (Architect)

Lucky me, somebody else has started with PVA. I have got a question concerning PVA, too. Is it possible to create a watery effect with it, if applied on a shaded blue surface? I am thinking of building a terrain piece with a pond, so creating something watery will be of importance. Same for small puddles on my cavalry bases.
-
Prince Eldarion
- Posts: 110
- Joined: Wed Mar 08, 2006 8:43 pm
- Location: Love it
Im not too sure, but experiment. Why not buy the GW water basing set?Xvim wrote:Lucky me, somebody else has started with PVA. I have got a question concerning PVA, too. Is it possible to create a watery effect with it, if applied on a shaded blue surface? I am thinking of building a terrain piece with a pond, so creating something watery will be of importance. Same for small puddles on my cavalry bases.
A question from me. Are the hero basing sets still around?
[i][b]LORD COMMANDER ELDARION - WOLVES OF ULTHUAN[/b][/i]
[img]http://i155.photobucket.com/albums/s292/Eldarion_album/medz-7.jpg[/img]
[img]http://i155.photobucket.com/albums/s292/Eldarion_album/wolvesofulthuanbanner.jpg[/img]
[img]http://i155.photobucket.com/albums/s292/Eldarion_album/medz-7.jpg[/img]
[img]http://i155.photobucket.com/albums/s292/Eldarion_album/wolvesofulthuanbanner.jpg[/img]
Most certainly, good sir! It's been a staple of scenery-makers since the earliest days, and it's perfect for making quick, simple and inexpensive water features. The water effect stuff GW started selling a while ago is great, but it's really designed for large pieces and is, if you ask me, overkill for water on cavalry/monster bases and the like.Xvim wrote:Is it possible to create a watery effect with it, if applied on a shaded blue surface?
Sadly not. There were only a few of them made - so few, in fact, that GW mail order took more orders for them than they had hero basing kits. In my local store, they were all gone before the day of release. Not a single one hit the shelves, and they had to apologize to/compensate people who had ordered them and didn't recieve them.Prince Eldarion wrote:A question from me. Are the hero basing sets still around?
Why the hell GW don't simply start selling slate and brown static grass in tubs is beyond me. It would sell really well.
[i][size=75]Awake, angels of lunacy
Arise, avatars of khaos
Incinerate yourselves
In the blaze of Babylon
Heirophants of the hurricane
We invoke the eidolon
Unleash the storm[/i][/size]
Arise, avatars of khaos
Incinerate yourselves
In the blaze of Babylon
Heirophants of the hurricane
We invoke the eidolon
Unleash the storm[/i][/size]
-
Prince Eldarion
- Posts: 110
- Joined: Wed Mar 08, 2006 8:43 pm
- Location: Love it
Thanks for the quick replie, do you know of any other alternatives?Kiyohira wrote:Most certainly, good sir! It's been a staple of scenery-makers since the earliest days, and it's perfect for making quick, simple and inexpensive water features. The water effect stuff GW started selling a while ago is great, but it's really designed for large pieces and is, if you ask me, overkill for water on cavalry/monster bases and the like.Xvim wrote:Is it possible to create a watery effect with it, if applied on a shaded blue surface?
Sadly not. There were only a few of them made - so few, in fact, that GW mail order took more orders for them than they had hero basing kits. In my local store, they were all gone before the day of release. Not a single one hit the shelves, and they had to apologize to/compensate people who had ordered them and didn't recieve them.Prince Eldarion wrote:A question from me. Are the hero basing sets still around?
Why the hell GW don't simply start selling slate and brown static grass in tubs is beyond me. It would sell really well.
[i][b]LORD COMMANDER ELDARION - WOLVES OF ULTHUAN[/b][/i]
[img]http://i155.photobucket.com/albums/s292/Eldarion_album/medz-7.jpg[/img]
[img]http://i155.photobucket.com/albums/s292/Eldarion_album/wolvesofulthuanbanner.jpg[/img]
[img]http://i155.photobucket.com/albums/s292/Eldarion_album/medz-7.jpg[/img]
[img]http://i155.photobucket.com/albums/s292/Eldarion_album/wolvesofulthuanbanner.jpg[/img]
Alternatives to the hero basing kit? Yes, unless you were after one for the resin skulls. As far as I know there are no equivalents to those, but the rest of the materials (and more) aren't difficult to come by.
Antenociti's Workshop Make a very good basing kit which actually has a lot more in it than the GW one, and for a very reasonable price. Of particular novelty are the scatter materials - I can vouch for their leaf litter, it's most exellent. If the base box is out of stock (which it sometimes is) they sell most of the contents in individual packets. Larger chips of slate, like the ones in the GW basing kit can be bought from aquarium stores... just be sure to wash it before you use it, as it typically comes covered in dust.
Antenociti's Workshop Make a very good basing kit which actually has a lot more in it than the GW one, and for a very reasonable price. Of particular novelty are the scatter materials - I can vouch for their leaf litter, it's most exellent. If the base box is out of stock (which it sometimes is) they sell most of the contents in individual packets. Larger chips of slate, like the ones in the GW basing kit can be bought from aquarium stores... just be sure to wash it before you use it, as it typically comes covered in dust.
[i][size=75]Awake, angels of lunacy
Arise, avatars of khaos
Incinerate yourselves
In the blaze of Babylon
Heirophants of the hurricane
We invoke the eidolon
Unleash the storm[/i][/size]
Arise, avatars of khaos
Incinerate yourselves
In the blaze of Babylon
Heirophants of the hurricane
We invoke the eidolon
Unleash the storm[/i][/size]

My DE(newer generation) stand on dark rock with some plants attached to it. I do the surface with ready mixed filler. When dry I paint it black then drybrushing carefully(as said it is dark rock!) with grey and then white.

HE however being the good guys are on rich grass, sometimes some earth is showing through or some stone. For my Caledorion Dragonprinces however I adopted the surface I usually give the DE.
Example for the HE base theme:

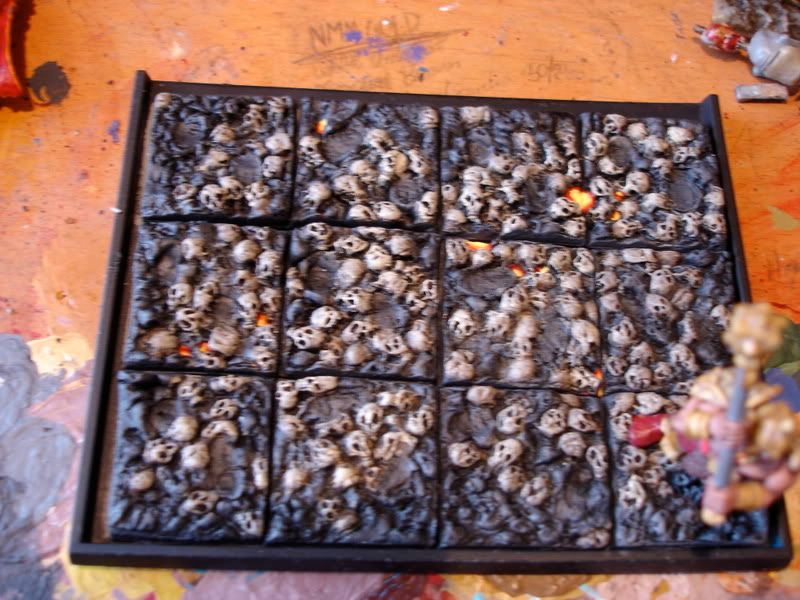
For my Demonettes it is rocky surface with some small stream of lava running through. When finished the lava will run through all the models bases, to strengthen their optical coherency.

Beneath is shown on of my chariots with a scrap built base on which you can see the watery effects of PVA:

HE however being the good guys are on rich grass, sometimes some earth is showing through or some stone. For my Caledorion Dragonprinces however I adopted the surface I usually give the DE.
Example for the HE base theme:
For my Demonettes it is rocky surface with some small stream of lava running through. When finished the lava will run through all the models bases, to strengthen their optical coherency.
Beneath is shown on of my chariots with a scrap built base on which you can see the watery effects of PVA:
[img]http://www.pix8.net/pro/pic/12773xsl7R/1042373.jpg[/img]

Those are some amazing bases Kelorion, especially since you have managed to use different ones for each army. All these recent base threads have got me eyeing my goblin green and glued on sand bases with considerable disapproval. Looks like I have 4000 points of work ahead of me! 
[img]http://www.abload.de/img/bg11hc95.gif[/img][img]http://www.abload.de/img/lw6ecde.gif[/img][img]http://www.abload.de/img/mora3q5k.gif[/img]
[i]Dread Lord Zakhital Goremane the Incompetent, 181 kills 5/22/11
[color=red][b]Vaul's Vengeful Villain[/b][/color]
[url=http://img3.abload.de/img/paraicamonueiq.jpg]Paraicamon, I choose you![/url][/i]
[i]Dread Lord Zakhital Goremane the Incompetent, 181 kills 5/22/11
[color=red][b]Vaul's Vengeful Villain[/b][/color]
[url=http://img3.abload.de/img/paraicamonueiq.jpg]Paraicamon, I choose you![/url][/i]
-
LochNESS
- Posts: 26
- Joined: Sun Jun 06, 2004 1:14 pm
- Location: Leyden, South Holland, Netherlands, EU, Eurasia, Earth, System Sol
- Contact:
Btw, if you want the water effects, you can better buy Water Effects from Woodland Scenics, same stuff, but double the amount of stuff you get for the same price (I payed ?16 for more then half a liter)
PvA (or woodglue) can be used also. But I'd recommend to apply a layer of glossvarnish over it after the glue has dried to make it a bit more shiny.
PvA (or woodglue) can be used also. But I'd recommend to apply a layer of glossvarnish over it after the glue has dried to make it a bit more shiny.
Count of Averland my blog on games, minis and more!
Rotterdam is increasingly to Architecture what Paris is to Fashion or Los Angeles to Entertainment -NY Times
Design stays, however, according to my opinion, at least partially something miraculous. -J. Bakema (Architect)
Rotterdam is increasingly to Architecture what Paris is to Fashion or Los Angeles to Entertainment -NY Times
Design stays, however, according to my opinion, at least partially something miraculous. -J. Bakema (Architect)
I base my minions with standard black sand-type base. Painted over with bestial brown which is then drybrushed with bleached bone.
Then I go over certain areas in GW snow flock, giving it 2 coats of the flock so you don't see through it, as it's quite thin.
Then go over with GW static grass, 1 coat should be fine.
Paint the base bestial brown, dull-coat to keep everything stuck to the base and they're finished!
Examples


Then I go over certain areas in GW snow flock, giving it 2 coats of the flock so you don't see through it, as it's quite thin.
Then go over with GW static grass, 1 coat should be fine.
Paint the base bestial brown, dull-coat to keep everything stuck to the base and they're finished!
Examples
-
Sexy Druchii
- Posts: 17
- Joined: Mon Dec 06, 2004 3:49 am
- Location: Minneapolis, MN
I use two different techniques. Either a brown one going from beastial down to bone and touching up with some static grass. This is the way both my High Elves and Blood Angels are based. Some models, preferable characters and other important models have other stuff modelled into the bases, like Chaos helmets, rubble or the odd tree trunk.
The other alternative is going from charred brown in the bottom, through dark grey and light grey with a final highlight of bone. It gives a kind of eerie feel to the model, a nice trait for my Cryx army as well as my sisters of battle and fantasy Chaos.
The other alternative is going from charred brown in the bottom, through dark grey and light grey with a final highlight of bone. It gives a kind of eerie feel to the model, a nice trait for my Cryx army as well as my sisters of battle and fantasy Chaos.
-
Alith_Anar

- Posts: 4
- Joined: Mon Jun 11, 2007 11:22 am
At the request of our esteemed host Kiyo, I am proud to bring you...
Urban Bases for Dummies
The complete beginner's guide to making rubble-strewn bases.
Ever wanted your minis to look like they're fighting in the rubble of a ruined city, be it Mordheim, Skavenblight or a bombed-out imperial world on the eastern fringe? Well, now you can! In 10 easy, illustrated steps I'll walk you through the entire process, hopefully ending up with something like this:

The aim here is to make a guide that anyone, including the complete beginner, can understand and follow. Some of the steps may seem obvious to some experienced modellers, but they're in there to make the guide accessible to someone who might never even have ventured into the bland and unstimulating world of pre-coloured flock and PVA glue. Hopefully I succeeded. Thanks!
Before we start, you'll need a base, some sand, PVA glue, some old plastic sprues, a pair of clippers, and of course a selection of brushes and paints. A well-stocked bits box is also a plus. The most important thing however, is filler or spackle, commonly referred to as Polyfilla. You'll want the cheapest brand available though, as it'll dry slower and thus be easier to work with! This is the magic ingredient. Go fetch some now!
Right, now you should have everything you need. Let's get this show on the road!
Step 1
Pour some filler onto the base, like so:

Step 2
Spread it out with an old brush (other tools could work as well, I suppose. I've just been doing it with a brush) in the shape that you want. The consistency of the stuff is somewhat like mashed potatoes, so it should be easy. You should end up with something like this:

Step 3
This is the fun part, adding stuff! You'll want to add some rubble to get the whole 'urban' thing across. Produce this by cutting off (roughly) similarly sized bits from your old plastic sprues. I've found that just under a centimeter in length works well. Don't bother cleaning the edges of the bits, it'll look fine anyway. When you've got a few, stick 'em in the filler and watch the magic happen! There are two things you should keep in mind when you're doing this. 1: don't overdo it, and 2: bricks look best in patterns. Don't just throw them down randomly, it looks better if some of them are lined up as it'll give the impression of a toppled building.
You can also stick other bits in there as well to spice things up a bit. I call my piece "Rat Finds Snack."
Another thing you need to do is decide where the mini will go, and press it down into the goo to make impressions of its feet/claws/boots/whatever. You want to make sure that when this stuff hardens, there's room for your trooper to stand there. If you're doing a lot of minis, some sort of numbering system might be in order. In this case though, I'm doing a Tau Crisis suit in mid-air, so I just made room for a plastic flying rod.

And now, YOU LEAVE THE THING ALONE OVERNIGHT! It needs to harden!
Step 4
It should be firm in consistency now. Not rock-hard, but close enough, yes? Good.
Spray the whole thing with black basecoat.

Step 5
Using the aforementioned old brush, cover the 'ground' part of the base with slightly watered down PVA glue. Make sure to get some in there around the plastic bricks. You can add a bit on top of them as well, but like before, don't overdo it! If you've got some feet/claws/boots/whatever-impressions in your base, make sure to keep the glue away from them. If sand gets in there it's not the end of the word, but it sure is annoying to have to bother with removing it.
When you've got the glue on it, you turn the base upside down and stick it in your basing sand. Shake it around a bit, pull it up, and hopefully a sight somewhat like this will greet you:

Step 6
Paint the entire base with black ink! You might ask why we bothered with spraying it before, and the answer is that the ink wouldn't cover the bare plastic bits (like the bricks) which would then have to be painted manually with regular black paint. And why bother when you can just spray it?

Step 7
When the ink has dried completely, paint some of the base with scorched brown. You can use as much or as little as you like, depending on your preferred rubble-to-dirt ratio. I like about 50/50.
Also, if you've got some bits on the base, now is the time to paint them. I've got a zombie arm, which has been painted with dead flesh (notice how unreasonably sloppy the paintjob is, and marvel when it somehow comes out well anyway!).

Step 8
When the paint is dry, fetch your drybrush and a rather dark grey, and drybrush the whole base, including the brown bits, the bricks, any bits... everything!

Step 9
Repeat the above step with a medium grey, focussing on raised areas and stuff you want to draw attention to.

Step 10
Finally, do a light drybrushing with a light grey, concentrating on the edges of the base, and very highly raised areas (compared to the rest of the base).
I also painted the flesh parts of the rat at this stage, as I wanted them to stand out a bit from all the grey.
Paint the edge of the base in the colour of your choise. I like Charadon Granite from GW's Foundation range, but it's up to you, of course. And viola!

Now you just add your miniature of choise (pre-painted, I recommend) and you're ready to go fight in the name of the emperor, hive mind, warlord or space pope (Tau players will know what I'm talking about).
* * *
A note of caution: I've only used this technique with plastic minis so far. I don't know if it's strong enough to bear the weight of metal minis. If not, I recommend pinning the mini to the plastic base with a piece of wire. This is simply done by drilling a hole in the foot of the mini, drilling another down through the base, and gluing a piece of wire in place going all the way through. No problemo.
...guide satisfactory, Kiyo?
Edit: in case you like to paint your minis after they're glued to the bases, just use shabby glue and you can snap them right off afterwards. If for some reason you can't just do that, you could even cut or saw them off without ruining the look, since the lowest part of the mini will be hidden by the filler on the base anyway.
Urban Bases for Dummies
The complete beginner's guide to making rubble-strewn bases.
Ever wanted your minis to look like they're fighting in the rubble of a ruined city, be it Mordheim, Skavenblight or a bombed-out imperial world on the eastern fringe? Well, now you can! In 10 easy, illustrated steps I'll walk you through the entire process, hopefully ending up with something like this:
The aim here is to make a guide that anyone, including the complete beginner, can understand and follow. Some of the steps may seem obvious to some experienced modellers, but they're in there to make the guide accessible to someone who might never even have ventured into the bland and unstimulating world of pre-coloured flock and PVA glue. Hopefully I succeeded. Thanks!
Before we start, you'll need a base, some sand, PVA glue, some old plastic sprues, a pair of clippers, and of course a selection of brushes and paints. A well-stocked bits box is also a plus. The most important thing however, is filler or spackle, commonly referred to as Polyfilla. You'll want the cheapest brand available though, as it'll dry slower and thus be easier to work with! This is the magic ingredient. Go fetch some now!
Right, now you should have everything you need. Let's get this show on the road!
Step 1
Pour some filler onto the base, like so:
Step 2
Spread it out with an old brush (other tools could work as well, I suppose. I've just been doing it with a brush) in the shape that you want. The consistency of the stuff is somewhat like mashed potatoes, so it should be easy. You should end up with something like this:
Step 3
This is the fun part, adding stuff! You'll want to add some rubble to get the whole 'urban' thing across. Produce this by cutting off (roughly) similarly sized bits from your old plastic sprues. I've found that just under a centimeter in length works well. Don't bother cleaning the edges of the bits, it'll look fine anyway. When you've got a few, stick 'em in the filler and watch the magic happen! There are two things you should keep in mind when you're doing this. 1: don't overdo it, and 2: bricks look best in patterns. Don't just throw them down randomly, it looks better if some of them are lined up as it'll give the impression of a toppled building.
You can also stick other bits in there as well to spice things up a bit. I call my piece "Rat Finds Snack."
Another thing you need to do is decide where the mini will go, and press it down into the goo to make impressions of its feet/claws/boots/whatever. You want to make sure that when this stuff hardens, there's room for your trooper to stand there. If you're doing a lot of minis, some sort of numbering system might be in order. In this case though, I'm doing a Tau Crisis suit in mid-air, so I just made room for a plastic flying rod.
And now, YOU LEAVE THE THING ALONE OVERNIGHT! It needs to harden!
Step 4
It should be firm in consistency now. Not rock-hard, but close enough, yes? Good.
Spray the whole thing with black basecoat.
Step 5
Using the aforementioned old brush, cover the 'ground' part of the base with slightly watered down PVA glue. Make sure to get some in there around the plastic bricks. You can add a bit on top of them as well, but like before, don't overdo it! If you've got some feet/claws/boots/whatever-impressions in your base, make sure to keep the glue away from them. If sand gets in there it's not the end of the word, but it sure is annoying to have to bother with removing it.
When you've got the glue on it, you turn the base upside down and stick it in your basing sand. Shake it around a bit, pull it up, and hopefully a sight somewhat like this will greet you:
Step 6
Paint the entire base with black ink! You might ask why we bothered with spraying it before, and the answer is that the ink wouldn't cover the bare plastic bits (like the bricks) which would then have to be painted manually with regular black paint. And why bother when you can just spray it?
Step 7
When the ink has dried completely, paint some of the base with scorched brown. You can use as much or as little as you like, depending on your preferred rubble-to-dirt ratio. I like about 50/50.
Also, if you've got some bits on the base, now is the time to paint them. I've got a zombie arm, which has been painted with dead flesh (notice how unreasonably sloppy the paintjob is, and marvel when it somehow comes out well anyway!).
Step 8
When the paint is dry, fetch your drybrush and a rather dark grey, and drybrush the whole base, including the brown bits, the bricks, any bits... everything!
Step 9
Repeat the above step with a medium grey, focussing on raised areas and stuff you want to draw attention to.
Step 10
Finally, do a light drybrushing with a light grey, concentrating on the edges of the base, and very highly raised areas (compared to the rest of the base).
I also painted the flesh parts of the rat at this stage, as I wanted them to stand out a bit from all the grey.
Paint the edge of the base in the colour of your choise. I like Charadon Granite from GW's Foundation range, but it's up to you, of course. And viola!
Now you just add your miniature of choise (pre-painted, I recommend) and you're ready to go fight in the name of the emperor, hive mind, warlord or space pope (Tau players will know what I'm talking about).
* * *
A note of caution: I've only used this technique with plastic minis so far. I don't know if it's strong enough to bear the weight of metal minis. If not, I recommend pinning the mini to the plastic base with a piece of wire. This is simply done by drilling a hole in the foot of the mini, drilling another down through the base, and gluing a piece of wire in place going all the way through. No problemo.
...guide satisfactory, Kiyo?
Edit: in case you like to paint your minis after they're glued to the bases, just use shabby glue and you can snap them right off afterwards. If for some reason you can't just do that, you could even cut or saw them off without ruining the look, since the lowest part of the mini will be hidden by the filler on the base anyway.
Last edited by Alith_Anar on Thu Dec 06, 2007 1:21 pm, edited 2 times in total.
- Alith
"Friend of mine got one of those. Gave it to his girlfriend to paint for him and she painted it pink. Most sissy defiler i've ever seen."
"Friend of mine got one of those. Gave it to his girlfriend to paint for him and she painted it pink. Most sissy defiler i've ever seen."
-
Elias Kalderon

- Prince of Shades
- Posts: 296
- Joined: Fri Jun 11, 2004 12:26 pm
- Location: The Netherworld
Now that is incredibly helpful. Basing is a skill I haven't mastered yet and usually postpone, which means I can have my whole army painted and still have to do the bases.
Especially for my characters I'd like to make the base a bit more detailed. There is one problem, however, which is that I'm used to painting my models with the base already glued on them.
By the way, Alith, did I welcome you back to the site already? Where have you been all this time?
Especially for my characters I'd like to make the base a bit more detailed. There is one problem, however, which is that I'm used to painting my models with the base already glued on them.
By the way, Alith, did I welcome you back to the site already? Where have you been all this time?
[size=75]I'll think of something[/size]
-
Alith_Anar
- Posts: 4
- Joined: Mon Jun 11, 2007 11:22 am
Elias,
no you didn't but since I skipped the usual 'I'm back!' post, I can't blame you. Nice to know that someone remembers me! I lost interest in the hobby for a few years, and as a consequense thereof lost interest in WH boards. It seems that the Warhammer flame was just gathering strength, 'cause it's burning bright as ever now
Regarding the guide,
I usually paint my minis on their bases as well, but there's an easy way around it: use bad glue. When you're done painting them, you just snap them right off the base and get creative. Easy as that.
And both of you, if you're serious about giving the guide a try, please give me some feedback when you're done. I'd like to know if it's as useful in practice as it is in theory
- Alith
"Friend of mine got one of those. Gave it to his girlfriend to paint for him and she painted it pink. Most sissy defiler i've ever seen."
"Friend of mine got one of those. Gave it to his girlfriend to paint for him and she painted it pink. Most sissy defiler i've ever seen."

-
Stormbringer
- Posts: 1
- Joined: Sun Oct 21, 2007 11:25 pm
- Location: U.S.A.
Hello!
I must say, it looks brilliant!
I have 1 problem though.. My sand wont seem to stick to the base after I've used the slightly watered down PVA glue.. Whenever I try to ink it, some of it falls of and it makes it difficult.. I can't imagine how much will fall off when I start the drybrushing..
Is this what usually happens, or do I need some other sand, glue?
Thanks,
Tetters
-
The Call of the Hunt

- Posts: 28
- Joined: Mon Dec 03, 2007 3:47 pm
This is a common problem. Typically this is caused by diluting the glue with too much water - you only need a tiny amount.Tetters wrote:My sand wont seem to stick to the base after I've used the slightly watered down PVA glue.. Whenever I try to ink it, some of it falls of and it makes it difficult.. I can't imagine how much will fall off when I start the drybrushing..
Is this what usually happens, or do I need some other sand, glue?
You're always going to lose some sand from your bases when you drybrush, though, whatever you do. My advice - run a completely empty brush (a decent size one, like you'd use for drybrushing) oer the sanded base before you start inking it; this will strip off the loosest material. If you end up with sand that's too thin, glue on another layer (this will give you a deeper texture, too).
Another good idea is to seal the base around the edges by glazing it with extremely thinned down PVA before you start the undercoat.
As a final note, sand adheres best when it has something to clump around. Try mixing a few small rocks into it, you'll be surprised how well this anchors the lighter material.
[size=75][b]Azreghai Wormkin, Ghöl of the North, Eater of the Dead, Plague-Wight of Onogal[/b]
30/4/5 : 387 kills
[i]Maggot Fetus, rapture of the conqueror worm,
Blackest Venom, the ghost in the carcass womb
Teeth like thorns, carrier of plague and filth
Spine crawler, plague-bearing virus-child[/size][/i]
30/4/5 : 387 kills
[i]Maggot Fetus, rapture of the conqueror worm,
Blackest Venom, the ghost in the carcass womb
Teeth like thorns, carrier of plague and filth
Spine crawler, plague-bearing virus-child[/size][/i]
-
Doombreeze
- Posts: 39
- Joined: Tue Feb 10, 2009 8:17 pm
for my bases I'm doing something like this:
1.Gluing some sand with PVA
2.Painting it with Bestial Brown
3.Badab Black glaze
4.Graveyard Earth drybrush
5.G. Earth [75%] and Skull White [25%] mix light drybrush
6.I add some common GW static grass and paint edges with Graveyard Earth
it takes quite a long time but the effect is very natural
sorry for no pics but my camera has refused to work today