Hey Solith
Another quality battle report to read for my Tuesday morning, great way to start the day!
A good solid game and I believe you are improving with each game you play. I have to ask however are you trying to develop an all comers 1500 point list or just a fun garage hammer list?
On deployment, I’m a big advocate for not bunching all of your shooting/war machine units together. It’s basically the end of your shooting support should a single enemy unit such as the Gorebeast get into combat with them. Always spread them out. In this case if one had remained on the hill and another behind the house, it would have been a nightmare for your opponent to come to terms with, sure he’s got the cover of the building to protect from fire but at no stage can he charge at it without taking damage or a potential charge.
I’m surprised your opponent didn’t completely ignore your Cavalry with his Chimera and position the beast closer to your White Lions, that would have put immense pressure on you but it appears all that armour on the Silver helms was far too shiny to pass up.
@Gandalf – Most ranks.
Solith's Battle Blog: Game 18 - 2000 HE vs WE - 26/04
Moderators: The Heralds, The Loremasters
Re: Solith's Battle Blog: Game 9 - 1500 HE vs WoC - 10/03
That's precisely the sort of thing I'm trying to get better at. Reading BatReps and playing games is the only way to do it for me, but slowly I think these things sink in.solith wrote: The biggest thing though is that I need to pay more attention to the exact placement of units. Moving my Archers forwards just half an inch more in turn 3 would have kept my Bolt Throwers alive for a turn more. Reforming my cavalry to be 2 wide in my turn 2 would have left them able to see past the building to be able to charge the Warrior unit in the rear. Not only that, it would have kept the final two Silver Helms out of combat and let my tougher characters take the hits. Very simple changes that would have helped me immensely.
This is actually a big problem IMO with the CavPrince list - the BSB (and fantastic Ld10 general for that matter) are often away from the rest of your gang. They're not really a Ld bump but a combat force. I don't think you can afford to dilute that as they'd cease to be the threat they are...it's just a sad consequence of that particular list design IMO, especially at this points level with a static fire-base in support. Gleaming banner would mitigate. A radical alternative might be a foot BSB, but keeping him safe would be tricky and the points for a second noble at this points level is exorbitant.The other thing this game highlights is how much I could use my BSB being closer to the rest of my army. I could take him off his horse and give him the Reaver Bow, but I really like having him in the cavalry unit with this list. It adds more non-charging punch to the unit, gives them The Other Trickster's Shard and puts someone in the unit that can accept challenges away from my Prince that is more durable than a champion.
The 9th Age: Alumni
Former Roles: Advisory Board, HR, Moderator and Highborn Elves Army Support
Former Roles: Advisory Board, HR, Moderator and Highborn Elves Army Support

Re: Solith's Battle Blog: Game 9 - 1500 HE vs WoC - 10/03
Lovely reports Solith - haven't got to the WoC one just yet, but the WE Stagbus looks like it was pretty difficult to stop! Hopefully read some more later this week if I get a chance
[url=http://www.ulthuan.net/forum/viewtopic.php?f=51&t=62719]Rise of the Anointed - Battle Reports[/url]
W 1 : L 0 : D 0
W 1 : L 0 : D 0
Re: Solith's Battle Blog: Game 9 - 1500 HE vs WoC - 10/03
@Gandalf_82
It was a very fun game. Quite refreshing to have a game that was so light on magic.
Yep, I'll definitely swap the banners around. I sometimes feel like I have a habit of failing leadership tests which does get quite frustrating, but it's funny at the same time.
As Jimmy says, it's the most ranks. In this case neither unit had any ranks so it's randomized. The one thing I'm not completely sure of is exactly when you work this out. I normally play it as working out the direction of flight before any flee or pursuit rolls are taken, but that could be wrong.
@Jimmy
Thank you!
Overall I may be improving, but I certainly have games where I have absolutely no idea what I'm doing and make terrible choices. I'm not super competitive when it comes to list writing. I think I'll normally pick something I want to include - because I want to use it in a game more than because it's the best choice - and then build the rest of the list around that to be fairly strong. I'm also limited by the models I have more than I'd like which is why you see the same unit sizes in all my reports. I will certainly refine lists, although I'm not specifically searching for my ultimate list.
I thought about putting one Bolt Thrower onto my right flank, but with the building and forest there I thought it would be too limited in terms of line of sight. I think you're right though, and I should have spent more time considering it and properly checking the lines of sight. It also means the Bolt Throwers would be able to cover each other quite well as attacking one would leave my opponent's units vulnerable to the other.
In my opponent's turn 2 he could have moved the Chimera up to breathe on my White Lions, but it would have most likely left it open to all my shooting and magic in return. Also, my cavalry unit at full strength is quite a threat to the rest of his army so perhaps he wanted to tie them up/reduce their numbers while he could.
@Ferny
I think at times I either rush my playing a bit too much or I get too focused on one thing and don't pay attention to everything else.
I like how the ranged damage this list has and the speedy combat power of the cavalry work together. Against opponents who can outshoot me I have the speed to engage them in combat early on. Against opponents who can't outshoot me they're forced to advance towards my cavalry unit. I think keeping the cavalry unit closer to my White Lions will help. This may mean leaving my firebase out of leadership bubble range but I'm okay with that. With High Magic, my Mage is most useful in the early few turns so if he dies/runs off later on that's not such a big deal.
The only way to fit a 2nd Noble into this list would mean dropping the Mage and I think that's a bad idea. I'll see how the Gleaming Pennant works out - along with being more conscious of where my leadership bubble is running off to that might be enough. Alternately I could swap to Light magic and hope for Light of Battle.
@korabas
Thank you!
It's interesting looking over these reports. The few times I've used my Loremaster as a pure caster she's done really well for me. In other games (not done as battle reports sadly) I've tried using her more as a combat-caster and she ends up dying far too often. Something of a wake up call on how to use the Loremaster properly that I'd never have picked up on without these reports.
I have a game against The Empire from Sunday that I still need to write up, and I should be getting a game in tomorrow - although I have no idea which army I'll be up against.
It was a very fun game. Quite refreshing to have a game that was so light on magic.
Yep, I'll definitely swap the banners around. I sometimes feel like I have a habit of failing leadership tests which does get quite frustrating, but it's funny at the same time.
As Jimmy says, it's the most ranks. In this case neither unit had any ranks so it's randomized. The one thing I'm not completely sure of is exactly when you work this out. I normally play it as working out the direction of flight before any flee or pursuit rolls are taken, but that could be wrong.
@Jimmy
Thank you!
Overall I may be improving, but I certainly have games where I have absolutely no idea what I'm doing and make terrible choices.
I thought about putting one Bolt Thrower onto my right flank, but with the building and forest there I thought it would be too limited in terms of line of sight. I think you're right though, and I should have spent more time considering it and properly checking the lines of sight. It also means the Bolt Throwers would be able to cover each other quite well as attacking one would leave my opponent's units vulnerable to the other.
In my opponent's turn 2 he could have moved the Chimera up to breathe on my White Lions, but it would have most likely left it open to all my shooting and magic in return. Also, my cavalry unit at full strength is quite a threat to the rest of his army so perhaps he wanted to tie them up/reduce their numbers while he could.
@Ferny
I think at times I either rush my playing a bit too much or I get too focused on one thing and don't pay attention to everything else.
I like how the ranged damage this list has and the speedy combat power of the cavalry work together. Against opponents who can outshoot me I have the speed to engage them in combat early on. Against opponents who can't outshoot me they're forced to advance towards my cavalry unit. I think keeping the cavalry unit closer to my White Lions will help. This may mean leaving my firebase out of leadership bubble range but I'm okay with that. With High Magic, my Mage is most useful in the early few turns so if he dies/runs off later on that's not such a big deal.
The only way to fit a 2nd Noble into this list would mean dropping the Mage and I think that's a bad idea. I'll see how the Gleaming Pennant works out - along with being more conscious of where my leadership bubble is running off to that might be enough. Alternately I could swap to Light magic and hope for Light of Battle.
@korabas
Thank you!
It's interesting looking over these reports. The few times I've used my Loremaster as a pure caster she's done really well for me. In other games (not done as battle reports sadly) I've tried using her more as a combat-caster and she ends up dying far too often. Something of a wake up call on how to use the Loremaster properly that I'd never have picked up on without these reports.
I have a game against The Empire from Sunday that I still need to write up, and I should be getting a game in tomorrow - although I have no idea which army I'll be up against.
[url=http://www.ulthuan.net/forum/viewtopic.php?f=5&t=44644]My painting log[/url]
[url=http://www.ulthuan.net/forum/viewtopic.php?f=51&t=51340]My battle reports[/url]
[url=http://www.ulthuan.net/forum/viewtopic.php?f=51&t=51340]My battle reports[/url]
Re: Solith's Battle Blog: Game 9 - 1500 HE vs WoC - 10/03
Good learning indeed! I know that Swordmaster has before referred to the Loremaster as a 'toolbox' caster, a mage with a spell for every situation. I thought this was quite an interesting way of looking at it.solith wrote:@korabas
Thank you!
It's interesting looking over these reports. The few times I've used my Loremaster as a pure caster she's done really well for me. In other games (not done as battle reports sadly) I've tried using her more as a combat-caster and she ends up dying far too often. Something of a wake up call on how to use the Loremaster properly that I'd never have picked up on without these reports.
-
My comments are running a little behind the reports - I just read the first WoC game. A glorious sacrifice of White Lions to take down that nasty BSB! Shame they were toasted afterwards, but that happens I guess. As others have said, quite a bit of a stand off developed and it was great that you took the initiative and advanced aggressively.
Cavalry Prince is working out well - you're not tempted to make an all-cav list?
[url=http://www.ulthuan.net/forum/viewtopic.php?f=51&t=62719]Rise of the Anointed - Battle Reports[/url]
W 1 : L 0 : D 0
W 1 : L 0 : D 0
Re: Solith's Battle Blog: Game 9 - 1500 HE vs WoC - 10/03
I think you can build the Loremaster to be more of a combat-caster. Give him a Dispel Scroll, the Armour of Caledor and the Dawnstone and he does okay - especially if he's casting Earthblood on his unit. The problem with this is that he really need the Book of Hoeth which eats too much into his item cost. With the Book he's an incredible caster with multiple tools for every situation; without the Book he's just a bit lacking.
I probably should have been more aggressive in that game, but all the same I'm pleased with my patience during that game. Far too often I can rush ahead without thinking things through properly and I suffer for it, but in that game I played far more cautiously and it paid off.
I'd like to try an all cav list, but I just don't have the models - even for a 1500 point cavalry list. I think I'd need some more Silver Helms and/or Dragon Princes, a mounted Mage and a Frost Phoenix to be able to give that a proper try.
[url=http://www.ulthuan.net/forum/viewtopic.php?f=5&t=44644]My painting log[/url]
[url=http://www.ulthuan.net/forum/viewtopic.php?f=51&t=51340]My battle reports[/url]
[url=http://www.ulthuan.net/forum/viewtopic.php?f=51&t=51340]My battle reports[/url]
Re: Solith's Battle Blog: Game 10 - 2000 HE vs Empire - 12/03
Game 10: Rolling Steel – High Elves vs The Empire – 2000
This game was against Oscar and his army of 1+ armour saves. Oh and he brought some men of The Empire along as well.
My List:
Prince – barded steed, heavy armour, shield, Giant Blade, Dragonhelm, Dawnstone, Potion of Foolhardiness (276)
Noble – barded steed, dragon armour, Sword of Might, Enchanted Shield, Golden Crown of Atrazar, The Other Trickster’s Shard (170)
Mage – level 2, Khaine’s Ring of Fury, Dispel Scroll – Lore of Heavens (170)
10 Silver Helms – shields, full command (260)
5 Reavers – bows only, musician (95)
18 Archers – standard, musician (200)
5 Dragon Princes – musician (155)
21 Phoenix Guard – full command, Razor Standard (390)
Repeater Bolt Thrower
Repeater Bolt Thrower
10 Sisters of Avelorn
Total: 1996
His List:
General of the Empire: Dragonhelm; Runefang; Potion of Foolhardiness; Imperial Griffon (Bloodroar; Two Heads); full plate armour; shield. (432)
Captain of the Empire: Enchanted Shield; Crown of Command; Imperial Pegasus; lance; full plate armour; Battle Standard. (183)
Warrior Priest: Helm of the Skavenslayer; Tormentor Sword; Ironcurse Icon; Warhorse (barding); heavy armour; shield. (110)
13 Inner Circle Knights: Inner Circle Preceptor; musician; standard bearer (Banner of Swiftness). (370)
5 Empire Knights: standard bearer. (120)
5 Empire Knights: standard bearer. (120)
6 Demigryph Knights: Inner Circle Preceptor; musician; standard bearer (Steel Standard). (413)
Steam Tank
Total: 1,998 points
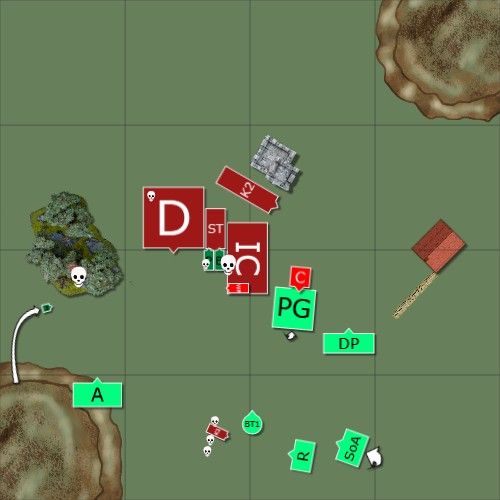
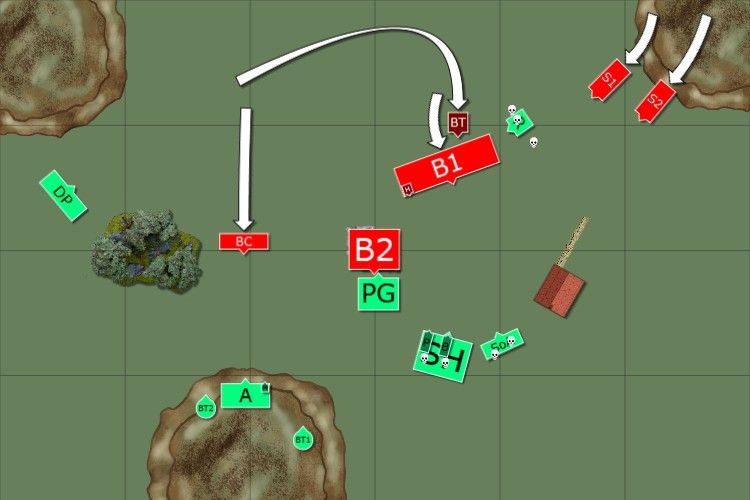
Deployment: (The pictures are slightly less accurate than they normally are. Please bear with me, I'm tired!)
We rolled up Dawn Attack which I think hampered both of our deployments. Add to that the 4’ table we were playing on and I found deployment to be particularly cramped. I do know I could have done a much better job of it. I’m fairly sure I should have swapped the deployment of the Phoenix Guard and my Silver Helms.
I ended up with Chain Lighting and Iceshard Blizzard. The Empire won the first turn.
Empire turn 1:
The tide of steel pushed forwards. The Steam Tank was particularly eager to get to grips, pushing forward ~13”.
In the shooting phase the Steam Tank aimed for my Prince but was only able to kill two Silver Helms.
High Elves turn 1:
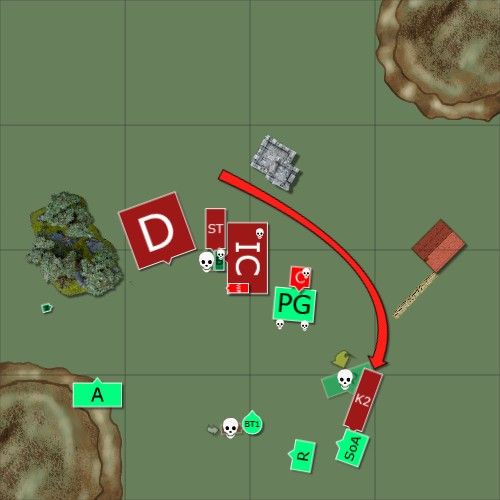
I must have been drinking Potions of Foolhardiness in real life as well, because I charged my cavalry into the Steam Tank. My Dragon Prince tried to charge the small unit of Knights close to them but they failed the charge.
With my Dragon Princes now sitting in easy counter-charge range and with my Sisters stuck behind them stopping me from fleeing, I ran my Reavers over the fence to hold up the Inner Circle Knights for a turn. At least, that was the plan. Two of my Reavers failed to jump the fence and I promptly failed their panic test. *sigh* With no ranged attacks to worry me, I ran my mage out of his unit and out of charge arc of either the Griffon or the Knights.
My dice favoured me in the magic phase however. A Chain Lighting put ~3 wounds onto the Griffon and killed a single Knight. I was also able to put an Iceshard Blizzard onto the Demigryphs.
Between them my Archers and both Bolt Throwers took out the Griffon!
In combat I did nothing to the Steam Tank. Five strength 7 attacks and ten strength 5 attacks and my opponent was able to pass every armour save he was required to take. I certainly wasn’t expecting to kill the thing right out but I was hoping to do some wounds to reduce it’s effectiveness.
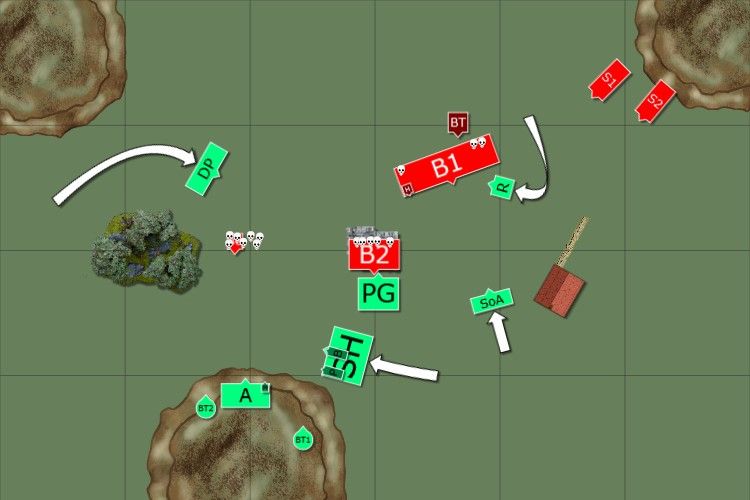
Empire turn 2:
Counter-charges! The Inner Circle Knights, Demigryphs and General all charged my cavalry, but thankfully the General failed his charge. The small unit of Knights were also able to charge my Bolt Thrower with an overrun path into the second. (I need to learn more from Jimmy!) I probably would have been able to move my Phoenix Guard up an extra inch or so in my first turn which would have stopped the Inner Circle Knights from being able to charge, but I hadn’t even considered that they might charge my Silver Helms…
The Captain showed me how it was done and flew in front of my Phoenix Guard.
In combat I was able to kill a single Knight and do 4 wounds to the Demigryphs, but my Prince lost a wound and I was reduced to a single Silver Helm remaining. Thanks to half the wounds being caused by the Steam Tank in the movement phase I only lost combat by 1 or 2 so I easily held.
The small unit of Knights killed my Bolt Thrower but failed to overrun into the 2nd by one inch.
High Elves turn 2:
I charged my Phoenix Guard into the Captain. My Dragon Princes weren’t able to do anything constructive so I reformed to hopefully engage later on. My Reavers rallied.
In the magic phase a Chain Lightning put a single wound onto the General, but Iceshard Blizzard was dispelled.
My shooting was able to finish off the General for a hefty amount of victory points to me. I was also able to reduce the Knights terrorizing my shooting base down to a single model.
In combat my Prince and the Demigryphs exchanged wounds and the Knights killed the final Silver Helm. My Phoenix Guard put ~1 wound onto the Captain only to find he had the stubborn hat and wasn’t going to be running anywhere soon.
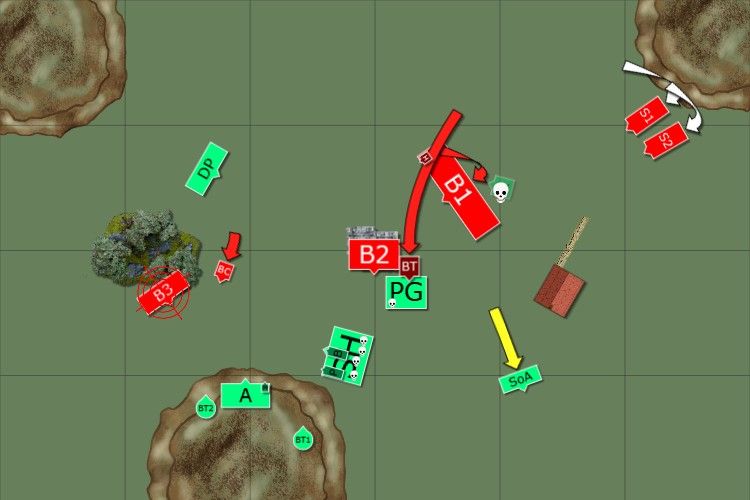
Empire turn 3:
The single Knight charged my Bolt Thrower, while the other unit charged my Dragon Princes. My Sisters were still in the way so I had to hold.
Then disaster struck! The Steam Tank’s grind attacks killed my Prince and dropped my BSB down to one wound remaining. This actually put the Demigryphs out of combat.
In combat my BSB was able to kill a single Knight without dying. This cost my opponent his rank bonus and he only won by musician.
The Knights killed a Dragon Prince or two, broke them and overran into the flank of my Sisters. My Phoenix Guard performed a minor magic trick and turned 12 hits into 3 wounds, only one getting through the armour save of the Captain. In return, two died. My Bolt Thrower crew managed to kill the Knight attacking them however!
High Elves turn 3:
Between my magic and shooting I was able to finish off another Demigryph.
My Sisters were predictably driven off the table. My Phoenix Guard finally finished off the Captain and reformed to face the Inner Circle Knights. My BSB was again able to kill a single Knight without taking any wounds in return.
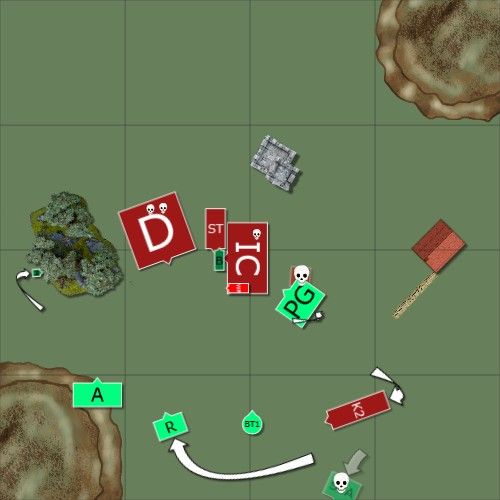
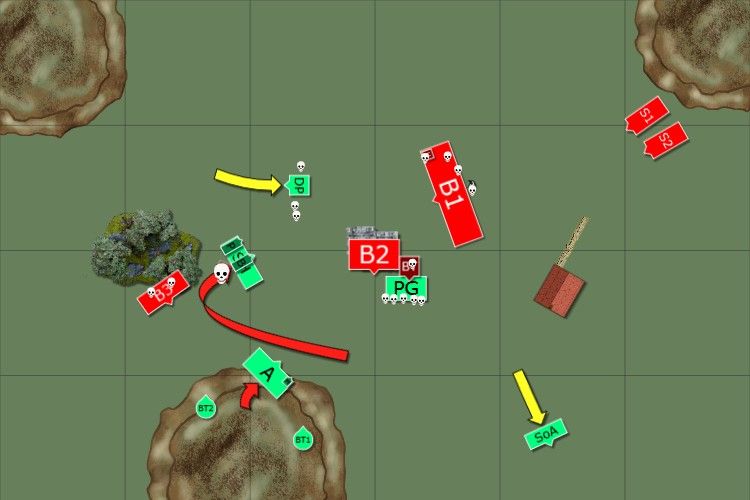
Empire turn 4:
After movement.
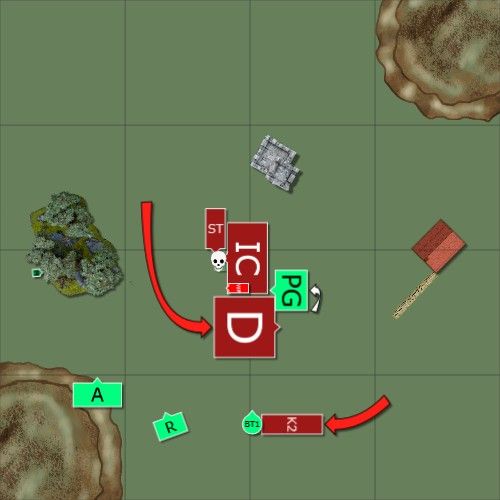
The Demigryphs charged into my Phoenix Guard, but due to the intervening combat only a few models got into base contact and I even had to close the door to him. The Knights ran into my Bolt Thrower. Then my BSB was ground into paste by the Steam Tank.
By the end of the turn.
My Phoenix Guard however finally proved their worth! Even with only ~10 attacks they cut down an entire Demigryph before they could attack and so I only lost two Phoenix Guard. The Demigryphs fled and although I failed to catch them I did pursue into the rear of the Inner Circle Knights.
High Elves turn 4:
Unfortunately my notes get particularly sketchy at this point. I charged at the Demigryphs to push them further way from my lines. I tried to blast them with my mage but couldn’t bring them to under 25%. I was able to cast an Iceshard Blizard onto the Inner Circle Knights.
In combat either the Inner Circle Knights held or they fled and I was unable to catch them, either way I didn’t manage to get any victory points off them.
Unfortunately at that point we ran out of time and had to end the game. Adding up the victory points it was a resounding victory to The Empire!
Even if we had managed to play the game to the end I don’t think I could have done much more by then.
Well what can I say; “how not to play High Elves”? I’m fairly sure I messed up my deployment. I certainly messed up my turn 1. I constantly created ideal overruns for the small units of Empire Knights in by back lines. (I don’t think I could have done a better job at this if I’d tried!)
And that’s just the obvious things that were outright wrong. I probably could have used my Archer unit to greater effect by using them more aggressively rather than hoping their shooting would do much. My Sisters were somewhat wasted against this army with no good targets to shoot, but I could have used them more creatively as a redirector or to flank charge for combat res.
I think the only thing I can say that I did right in this game was my Mage. He was never in danger and was able to move forward to keep in Soul Quench range whenever he wanted to cast it.
Despite the Prince finally dying in a game, his time is not yet over!
Edit: Are there any presentational things anybody would like me to improve on/change with these reports? Changes in layout, changes in the pictures etc?
This game was against Oscar and his army of 1+ armour saves. Oh and he brought some men of The Empire along as well.
My List:
Prince – barded steed, heavy armour, shield, Giant Blade, Dragonhelm, Dawnstone, Potion of Foolhardiness (276)
Noble – barded steed, dragon armour, Sword of Might, Enchanted Shield, Golden Crown of Atrazar, The Other Trickster’s Shard (170)
Mage – level 2, Khaine’s Ring of Fury, Dispel Scroll – Lore of Heavens (170)
10 Silver Helms – shields, full command (260)
5 Reavers – bows only, musician (95)
18 Archers – standard, musician (200)
5 Dragon Princes – musician (155)
21 Phoenix Guard – full command, Razor Standard (390)
Repeater Bolt Thrower
Repeater Bolt Thrower
10 Sisters of Avelorn
Total: 1996
His List:
General of the Empire: Dragonhelm; Runefang; Potion of Foolhardiness; Imperial Griffon (Bloodroar; Two Heads); full plate armour; shield. (432)
Captain of the Empire: Enchanted Shield; Crown of Command; Imperial Pegasus; lance; full plate armour; Battle Standard. (183)
Warrior Priest: Helm of the Skavenslayer; Tormentor Sword; Ironcurse Icon; Warhorse (barding); heavy armour; shield. (110)
13 Inner Circle Knights: Inner Circle Preceptor; musician; standard bearer (Banner of Swiftness). (370)
5 Empire Knights: standard bearer. (120)
5 Empire Knights: standard bearer. (120)
6 Demigryph Knights: Inner Circle Preceptor; musician; standard bearer (Steel Standard). (413)
Steam Tank
Total: 1,998 points
Deployment: (The pictures are slightly less accurate than they normally are. Please bear with me, I'm tired!)
We rolled up Dawn Attack which I think hampered both of our deployments. Add to that the 4’ table we were playing on and I found deployment to be particularly cramped. I do know I could have done a much better job of it. I’m fairly sure I should have swapped the deployment of the Phoenix Guard and my Silver Helms.
I ended up with Chain Lighting and Iceshard Blizzard. The Empire won the first turn.
Empire turn 1:
The tide of steel pushed forwards. The Steam Tank was particularly eager to get to grips, pushing forward ~13”.
In the shooting phase the Steam Tank aimed for my Prince but was only able to kill two Silver Helms.
High Elves turn 1:
I must have been drinking Potions of Foolhardiness in real life as well, because I charged my cavalry into the Steam Tank. My Dragon Prince tried to charge the small unit of Knights close to them but they failed the charge.
With my Dragon Princes now sitting in easy counter-charge range and with my Sisters stuck behind them stopping me from fleeing, I ran my Reavers over the fence to hold up the Inner Circle Knights for a turn. At least, that was the plan. Two of my Reavers failed to jump the fence and I promptly failed their panic test. *sigh* With no ranged attacks to worry me, I ran my mage out of his unit and out of charge arc of either the Griffon or the Knights.
My dice favoured me in the magic phase however. A Chain Lighting put ~3 wounds onto the Griffon and killed a single Knight. I was also able to put an Iceshard Blizzard onto the Demigryphs.
Between them my Archers and both Bolt Throwers took out the Griffon!
In combat I did nothing to the Steam Tank. Five strength 7 attacks and ten strength 5 attacks and my opponent was able to pass every armour save he was required to take. I certainly wasn’t expecting to kill the thing right out but I was hoping to do some wounds to reduce it’s effectiveness.
Empire turn 2:
Counter-charges! The Inner Circle Knights, Demigryphs and General all charged my cavalry, but thankfully the General failed his charge. The small unit of Knights were also able to charge my Bolt Thrower with an overrun path into the second. (I need to learn more from Jimmy!) I probably would have been able to move my Phoenix Guard up an extra inch or so in my first turn which would have stopped the Inner Circle Knights from being able to charge, but I hadn’t even considered that they might charge my Silver Helms…
The Captain showed me how it was done and flew in front of my Phoenix Guard.
In combat I was able to kill a single Knight and do 4 wounds to the Demigryphs, but my Prince lost a wound and I was reduced to a single Silver Helm remaining. Thanks to half the wounds being caused by the Steam Tank in the movement phase I only lost combat by 1 or 2 so I easily held.
The small unit of Knights killed my Bolt Thrower but failed to overrun into the 2nd by one inch.
High Elves turn 2:
I charged my Phoenix Guard into the Captain. My Dragon Princes weren’t able to do anything constructive so I reformed to hopefully engage later on. My Reavers rallied.
In the magic phase a Chain Lightning put a single wound onto the General, but Iceshard Blizzard was dispelled.
My shooting was able to finish off the General for a hefty amount of victory points to me. I was also able to reduce the Knights terrorizing my shooting base down to a single model.
In combat my Prince and the Demigryphs exchanged wounds and the Knights killed the final Silver Helm. My Phoenix Guard put ~1 wound onto the Captain only to find he had the stubborn hat and wasn’t going to be running anywhere soon.
Empire turn 3:
The single Knight charged my Bolt Thrower, while the other unit charged my Dragon Princes. My Sisters were still in the way so I had to hold.
Then disaster struck! The Steam Tank’s grind attacks killed my Prince and dropped my BSB down to one wound remaining. This actually put the Demigryphs out of combat.
In combat my BSB was able to kill a single Knight without dying. This cost my opponent his rank bonus and he only won by musician.
The Knights killed a Dragon Prince or two, broke them and overran into the flank of my Sisters. My Phoenix Guard performed a minor magic trick and turned 12 hits into 3 wounds, only one getting through the armour save of the Captain. In return, two died. My Bolt Thrower crew managed to kill the Knight attacking them however!
High Elves turn 3:
Between my magic and shooting I was able to finish off another Demigryph.
My Sisters were predictably driven off the table. My Phoenix Guard finally finished off the Captain and reformed to face the Inner Circle Knights. My BSB was again able to kill a single Knight without taking any wounds in return.
Empire turn 4:
After movement.
The Demigryphs charged into my Phoenix Guard, but due to the intervening combat only a few models got into base contact and I even had to close the door to him. The Knights ran into my Bolt Thrower. Then my BSB was ground into paste by the Steam Tank.
By the end of the turn.
My Phoenix Guard however finally proved their worth! Even with only ~10 attacks they cut down an entire Demigryph before they could attack and so I only lost two Phoenix Guard. The Demigryphs fled and although I failed to catch them I did pursue into the rear of the Inner Circle Knights.
High Elves turn 4:
Unfortunately my notes get particularly sketchy at this point. I charged at the Demigryphs to push them further way from my lines. I tried to blast them with my mage but couldn’t bring them to under 25%. I was able to cast an Iceshard Blizard onto the Inner Circle Knights.
In combat either the Inner Circle Knights held or they fled and I was unable to catch them, either way I didn’t manage to get any victory points off them.
Unfortunately at that point we ran out of time and had to end the game. Adding up the victory points it was a resounding victory to The Empire!
Even if we had managed to play the game to the end I don’t think I could have done much more by then.
Well what can I say; “how not to play High Elves”? I’m fairly sure I messed up my deployment. I certainly messed up my turn 1. I constantly created ideal overruns for the small units of Empire Knights in by back lines. (I don’t think I could have done a better job at this if I’d tried!)
And that’s just the obvious things that were outright wrong. I probably could have used my Archer unit to greater effect by using them more aggressively rather than hoping their shooting would do much. My Sisters were somewhat wasted against this army with no good targets to shoot, but I could have used them more creatively as a redirector or to flank charge for combat res.
I think the only thing I can say that I did right in this game was my Mage. He was never in danger and was able to move forward to keep in Soul Quench range whenever he wanted to cast it.
Despite the Prince finally dying in a game, his time is not yet over!
Edit: Are there any presentational things anybody would like me to improve on/change with these reports? Changes in layout, changes in the pictures etc?
[url=http://www.ulthuan.net/forum/viewtopic.php?f=5&t=44644]My painting log[/url]
[url=http://www.ulthuan.net/forum/viewtopic.php?f=51&t=51340]My battle reports[/url]
[url=http://www.ulthuan.net/forum/viewtopic.php?f=51&t=51340]My battle reports[/url]
Re: Solith's Battle Blog: Game 10 - 2000 HE vs Empire - 12/03
Hey Sol
Another great read. I really do enjoy your list and of course the other lists your opponents bring, nothing typical about them and there is great variety to be had.
I honestly think this game was lost in deployment alone. What advantage does deploying as close as possible to the enemy net you in a game like this against a heavily armoured opponent as well? Sitting back allows you to use those RBT’s to greater economy, magic will still be in range and it might buy you another turn of those elements to inflict damage.
Charging the Steam Tank didn’t help at all either but I guess on math-hammer alone you should have at least done a few wounds right? Perhaps charging the Knights (K1) would have been a better option initially? Had he held an overrun would have likely taken your Main hammer unit out of charge arcs allowing for some Turn 3 carnage and double team action from either PG/DP. Had he fled then you still have the option of taking on the Steam Tank.
Either way, you’re playing more games than I currently so hats off to you sir. Well done. When’s the next game likely?
Re: Solith's Battle Blog: Game 10 - 2000 HE vs Empire - 12/03
I find your presentation to be fine, very easy to read.solith wrote: Edit: Are there any presentational things anybody would like me to improve on/change with these reports? Changes in layout, changes in the pictures etc?
Thanks again for the reports.
Seems like that prince got a little overconfident here
Re: Solith's Battle Blog: Game 10 - 2000 HE vs Empire - 12/03
Great presentation, part of what makes these a joy to read.
Sad that this game was over so quickly, but well done on holding your back-field together as well as you did given that you had knights running around in it. Also, nice to see PG and a more 'filled out' list now that you've got a game in at plus 1,500.
Sad that this game was over so quickly, but well done on holding your back-field together as well as you did given that you had knights running around in it. Also, nice to see PG and a more 'filled out' list now that you've got a game in at plus 1,500.
The 9th Age: Alumni
Former Roles: Advisory Board, HR, Moderator and Highborn Elves Army Support
Former Roles: Advisory Board, HR, Moderator and Highborn Elves Army Support
Re: Solith's Battle Blog: Game 10 - 2000 HE vs Empire - 12/03
Thanks for you battle reports.
Looking at you games i think you should give you BSB a Star Lance - you play against alot of armour so it would give you unit a much better charge and make him more of a threat against opponents heroes and to finnish e.g a wounted chariot.
Noble – barded steed, dragon armour, Star Lance, Enchanted Shield, The Other Trickster’s Shard (170)
Why not take metal on you Mage ? Searing doom would be great in most you games.
Also how often do you use Khaine’s Ring of Fury is it worth the points ?
Love making army lists
Don't believe MSU
Don't believe MSU
Re: Solith's Battle Blog: Game 10 - 2000 HE vs Empire - 12/03
@Jimmy
Thank you!
You're absolutely right about the deployment. I think it's the area of my game play that I'm most lacking in to be honest.
I'm not sure if charging the small unit of Knights was an option, but if it was possible it would have been a much better option. I think they'd have likely fled, but either that would let me re-direct and make the unit a non-issue for a turn or two, or I'd have simply failed the charge and held back for a turn which would have been a much better option.
@gaz
Thank you!
Yup! It's funny, A few weeks ago I wrote up some fluff about him that said he was reckless, then I start playing like this....
@Ferny
Thank you!
I think I'll have to disagree with you on the back-field thing, it was pure blind luck that kept my shooting units alive for as long as they did.
@qwe50
Thank you!
I'm actually tempted by that BSB build. I've used it in a single game before and it served me well. However, it does leave him rather vulnerable. I'll probably give it a try at some point to see how much the extra charge-damage helps.
I didn't take Metal because I thought that my Prince and the Bolt Throwers would be enough against armour, but they certainly aren't enough against a list like this Empire one! I like Heavens with this list however - Iceshard Blizzard is just amazing and most of the lore is good.
If I'm taking a Mage as my only caster I'll almost always give him the Ring of Fury. If I only have 2 spells available to cast I find that I'm hoping for small magic phases. If I roll high on the winds of magic my opponent has too many dispel dice which forces me to use too many dice on my spells and risk miscasting. The Ring gives me a third spell which goes a long way to solving this issue. It becomes even better with High magic, because then you have the potential to threaten 6D6 strength 4 hits per turn from two Soul Quenches.
Pretty much the only level 2 setup I take that doesn't include the Ring of Fury will be a level 2 Metal mage with the Earthing Rod and Golden Crown of Atrazar for maximum miscast protection. With the high cast values on Searing Doom, Metal magic doesn't suffer from the same problem of only having two spells available.
Thank you!
You're absolutely right about the deployment. I think it's the area of my game play that I'm most lacking in to be honest.
I'm not sure if charging the small unit of Knights was an option, but if it was possible it would have been a much better option. I think they'd have likely fled, but either that would let me re-direct and make the unit a non-issue for a turn or two, or I'd have simply failed the charge and held back for a turn which would have been a much better option.
@gaz
Thank you!
Yup! It's funny, A few weeks ago I wrote up some fluff about him that said he was reckless, then I start playing like this....
@Ferny
Thank you!
I think I'll have to disagree with you on the back-field thing, it was pure blind luck that kept my shooting units alive for as long as they did.
@qwe50
Thank you!
I'm actually tempted by that BSB build. I've used it in a single game before and it served me well. However, it does leave him rather vulnerable. I'll probably give it a try at some point to see how much the extra charge-damage helps.
I didn't take Metal because I thought that my Prince and the Bolt Throwers would be enough against armour, but they certainly aren't enough against a list like this Empire one! I like Heavens with this list however - Iceshard Blizzard is just amazing and most of the lore is good.
If I'm taking a Mage as my only caster I'll almost always give him the Ring of Fury. If I only have 2 spells available to cast I find that I'm hoping for small magic phases. If I roll high on the winds of magic my opponent has too many dispel dice which forces me to use too many dice on my spells and risk miscasting. The Ring gives me a third spell which goes a long way to solving this issue. It becomes even better with High magic, because then you have the potential to threaten 6D6 strength 4 hits per turn from two Soul Quenches.
Pretty much the only level 2 setup I take that doesn't include the Ring of Fury will be a level 2 Metal mage with the Earthing Rod and Golden Crown of Atrazar for maximum miscast protection. With the high cast values on Searing Doom, Metal magic doesn't suffer from the same problem of only having two spells available.
[url=http://www.ulthuan.net/forum/viewtopic.php?f=5&t=44644]My painting log[/url]
[url=http://www.ulthuan.net/forum/viewtopic.php?f=51&t=51340]My battle reports[/url]
[url=http://www.ulthuan.net/forum/viewtopic.php?f=51&t=51340]My battle reports[/url]
Re: Solith's Battle Blog: Game 11 - 2000 HE vs DoC - 14/03
Game 11: Wrath of Khorne – High Elves vs Demons of Chaos - 2000
(Apologies for the groan worthy title)
This game was played on Wednesday against Dave and his Khornate Demons, and we rolled up Watchtower.
My list:
Prince – barded steed, heavy armour, shield, Giant Blade, Dragonhelm, Dawnstone, Potion of Foolhardiness (276)
Noble – barded steed, dragon armour, Sword of Might, Enchanted Shield, Golden Crown of Atrazar, The Other Trickster’s Shard (170)
Mage – level 2, Khaine’s Ring of Fury, Dispel Scroll – Lore of Heavens (170)
10 Silver Helms – shields, full command (260)
5 Reavers – bows only, musician (95)
18 Archers – standard, musician (200)
5 Dragon Princes – musician (155)
21 Phoenix Guard – full command, Razor Standard (390)
Repeater Bolt Thrower
Repeater Bolt Thrower
10 Sisters of Avelorn
Total: 1996
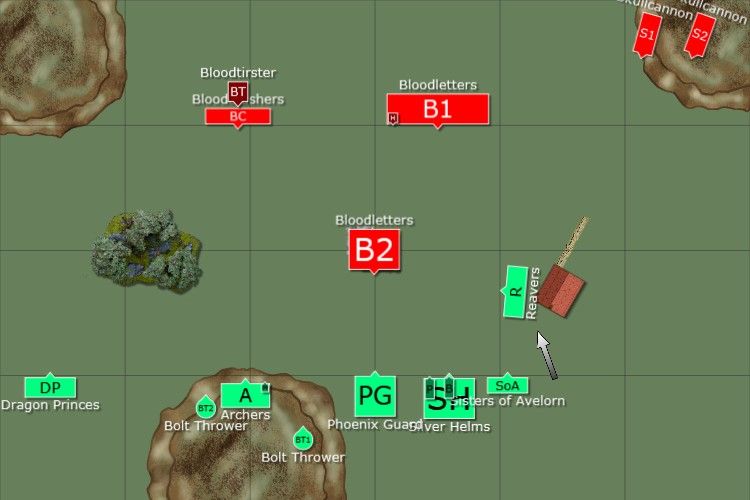
His List: (From memory, I may have made some mistakes)
Bloodthirster – greater gift, 2 x lesser gift
Herald of Khorne – BSB, lesser gift
29 Bloodletters – full command
20 Bloodletters – standard, musician
4 Bloodcrushers – standard, musician
Skullcannon
Skullcannon
Deployment:
I ended up with Harmonic Convergence and Iceshard Blizzard.
The Bloodthirster ended up with the Sword of Swift Slaying, impact hits and +1 wound. The Herald got a sword with +1 strength and killing blow.
This time I remembered about splitting up my Bolt Throwers, but with Harmonic Convergence available I decided to keep them within 12” of my mage.
High Elves turn 1:
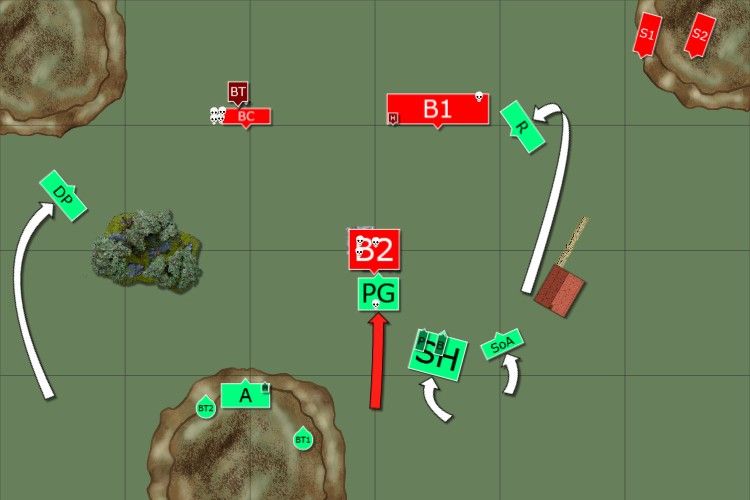
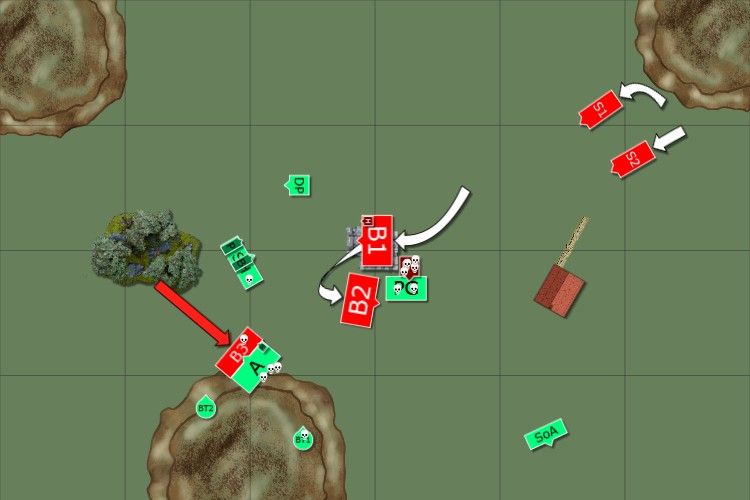
I charged my Phoenix Guard into the Tower. My Reavers ran up to interfere with the Bloodletter horde while my Dragon Princes made it out of anyone’s charge arc.
In the magic phase I was able to cast a bubbled Harmonic Convergence.
With the Bloodcrushers giving hard cover to the Bloodthirster, I decided to shoot them instead and inflicted ~4 wounds. My Sisters killed a single Bloodletter.
My Phoenix Guard killed three Bloodletters for a single casualty in return, but while in the building the Bloodletters were stubborn and even though I won combat none died from instability.
Demons of Chaos turn 1:
The Demons advanced, with the Bloodthirster taking cover from my artillery behind the tower.
The Reign of Chaos result killed off two of my Sisters and failed to wound the one Bolt Thrower that was targeted.
One Skullcannon grapeshotted my Reavers and killed three, but the remainder passed their panic test. The other killed two Silver Helms while trying to snipe my BSB.
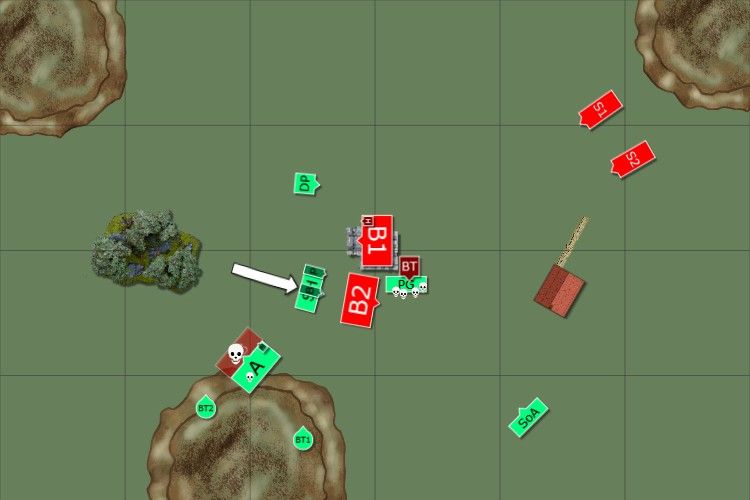
High Elves turn 2:
The Phoenix Guard again charged the tower.
I moved my Reavers to slow down the Bloodletter horde and moved my Sisters up, hoping they might be able to do the same later on. I reformed my cavalry to keep them further away from the Bloodletter horde.
In the magic phase I was able to case a bound Soul Quench onto the Bloodcrushers for ~1 wound and get off an irresistible bubbled Harmonic Convergence which cost my Mage one wound.
With nothing better to shoot, I took the Bloodcrusher unit down to a single wound remaining.
This time in combat my Phoenix Guard were able to take out 5 Bloodletters for no damage in return.
Demons of Chaos turn 2:
The Bloodletter horde charged my two Reavers and I held. Then the Bloodthirster charged my Sisters and I fled rather than letting the beast get a reform after combat; it then redirected right into my Phoenix Guard. Whoops. The Bloodcrusher tried to charge my Bolt Thrower but failed the charge.
In the magic phase Khorne gifted his chosen with a free 9 Bloodletters.
The first Skullcannon took out 4 Silver Helms. Now that I was denied a Look out Sir!, the second removed my BSB’s Golden Crown.
In combat I challenged the Bloodthirster. Needless to say, my champion died but I held and reformed to get attacks. The Herald killed both Reavers before the Bloodletters even got to attack and they reformed to face the tower again.
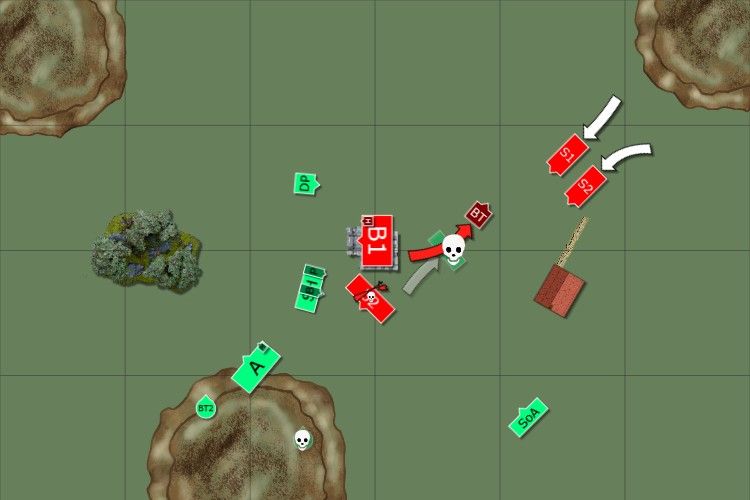
High Elves turn 3:
I charged my Dragon Princes into the Bloodletter horde to try to hold them up. I charged my Silver Helms into the last Bloodcrusher to try to save my shooting base. Finally, needing to make some effort at winning the game, I tried to charge the tower with my Archers, but they failed.
My Sisters failed to rally.
In the magic phase I was able to cast both Harmonic Convergence on my Phoenix Guard and Iceshard Blizzard on the Bloodthirster to give me the best chance possible.
I shot one Bolt Thrower into the newly spawned Bloodletters and killed two. The other was fairly obscured by the hill it was standing on and shot at the tower instead, but did nothing.
Finally the combat phase. My Silver Helms destroyed the remaining Bloodcrusher and reformed. The Dragon Princes put one wound onto the Herald and killed three more Bloodletters, but in return the demons killed three Dragon Prince and they broke from the combat. I was able to put a wound onto the Bloodthirster but it stomped five Phoenix Guard into the ground.
Demons of Chaos turn 3:
The new unit of Bloodletters charged my Archer unit. The small unit of Bloodletters walked out of the building to help their master, while the large unit took their place.
In the magic phase the Demons were granted +1 ward save.
One cannon killed off a single Silver Helm while the other did a single wound to one of my Bolt Throwers.
I killed a single Bloodletter in exchange for three Archers, but I held and reformed to face them. The Bloodthirster killed two Phoenix Guard but I was able to do one wound in return which meant I had won combat. He failed the first break test by 1, was forced to re-roll because of his BSB and failed the second by 3.
High Elves turn 4:
My Sisters of Avelorn and Dragon Princes both rallied. Unfortunately my Silver Helms weren’t able to charge the small Bloodletters so I had to reform to attack them next turn.
In the magic phase I was again able to cast both Harmonic Convergence and Iceshard Blizzard into the Phoenix Guard combat.
My Archers killed four of the Bloodletters and the remainder popped. I failed to hurt the Bloodthirster who slew four more Phoenix Guard.
Demons of Chaos turn 4:
The Bloodletters charged my few remaining Phoenix Guard in the flank.
This time the Reign of Chaos table did nothing.
The Skullcannons were able to finish off my Bolt Thrower.
For a more exciting phase however, I was only able to kill a single Bloodletter. In return I was beaten up, broken and ran down in short order.
Then my opponent went and rolled a 6 to end the game!
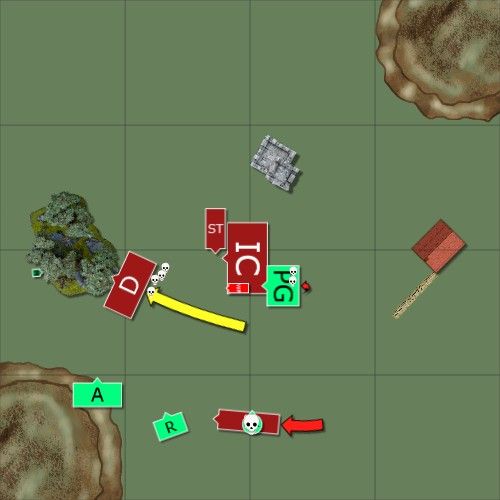
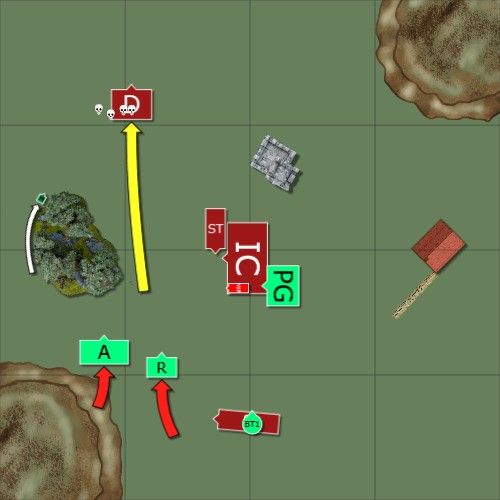
Rather than dwell too much on all of the mistakes I made in this game, I’d prefer to focus on the single one that I think meant I had very little chance of winning this game: my deployment.
I was too distracted by the nice shiny hill in my deployment zone and so forced myself into horrible matchups – with my armour busting Prince opposite a horde of lightly armoured troops with killing blow… I realised this during the game but by then it was too late to properly redeploy my cavalry and so they ended doing almost nothing.
I should have swapped my shooting with my Silver Helms. Given that this was the Watchtower, my cavalry and the Bloodthirster are both far less important than they otherwise would be and I shouldn’t have minded if they hit at each other for a while. Meanwhile, my shooting would have been quite effective against the Bloodletter horde.
Something like this:
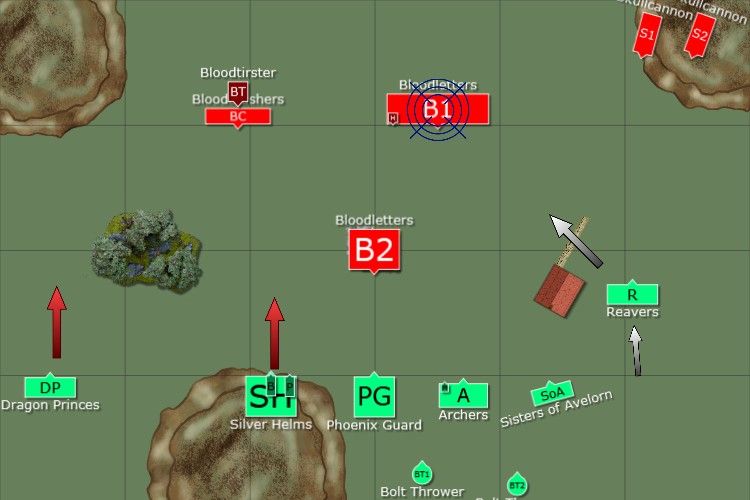
With my Bolt Throwers deployed at the back of my lines they might be out of Harmonic Convergence range, but in this case being more than 6” away from my units would be more important with the cannons possibly being trained upon them. With my Reavers to slow down the Bloodletter horde I think my shooting could have seriously hurt them, hopefully to the point that it’s no longer worth swapping them into the building.
Meanwhile my cavalry would have no trouble dealing with the Bloodcrushers – I’m even fairly free to deploy the Dragon Princes anywhere with this plan. While I have little chance of pinning the Bloodthirster down if it wants to avoid me, my cavalry do present a fairly tempting target for it. If it doesn’t go after them, they’ll soon be free to mop up the Bloodletter horde. This is the one part of the plan I’m not so sure about, but I think the whole idea is a LOT better than my actual playing.
I’m realising more and more that I’m really not deploying all that well and it’s one area of my game play I’d really like to work on. Are there any flaws in this plan that I’ve missed? How would any of you improve upon it further?
I have another game booked on Saturday against some Dwarfs, although I have no idea what points value we’ll be playing at.
(Apologies for the groan worthy title)
This game was played on Wednesday against Dave and his Khornate Demons, and we rolled up Watchtower.
My list:
Prince – barded steed, heavy armour, shield, Giant Blade, Dragonhelm, Dawnstone, Potion of Foolhardiness (276)
Noble – barded steed, dragon armour, Sword of Might, Enchanted Shield, Golden Crown of Atrazar, The Other Trickster’s Shard (170)
Mage – level 2, Khaine’s Ring of Fury, Dispel Scroll – Lore of Heavens (170)
10 Silver Helms – shields, full command (260)
5 Reavers – bows only, musician (95)
18 Archers – standard, musician (200)
5 Dragon Princes – musician (155)
21 Phoenix Guard – full command, Razor Standard (390)
Repeater Bolt Thrower
Repeater Bolt Thrower
10 Sisters of Avelorn
Total: 1996
His List: (From memory, I may have made some mistakes)
Bloodthirster – greater gift, 2 x lesser gift
Herald of Khorne – BSB, lesser gift
29 Bloodletters – full command
20 Bloodletters – standard, musician
4 Bloodcrushers – standard, musician
Skullcannon
Skullcannon
Deployment:
I ended up with Harmonic Convergence and Iceshard Blizzard.
The Bloodthirster ended up with the Sword of Swift Slaying, impact hits and +1 wound. The Herald got a sword with +1 strength and killing blow.
This time I remembered about splitting up my Bolt Throwers, but with Harmonic Convergence available I decided to keep them within 12” of my mage.
High Elves turn 1:
I charged my Phoenix Guard into the Tower. My Reavers ran up to interfere with the Bloodletter horde while my Dragon Princes made it out of anyone’s charge arc.
In the magic phase I was able to cast a bubbled Harmonic Convergence.
With the Bloodcrushers giving hard cover to the Bloodthirster, I decided to shoot them instead and inflicted ~4 wounds. My Sisters killed a single Bloodletter.
My Phoenix Guard killed three Bloodletters for a single casualty in return, but while in the building the Bloodletters were stubborn and even though I won combat none died from instability.
Demons of Chaos turn 1:
The Demons advanced, with the Bloodthirster taking cover from my artillery behind the tower.
The Reign of Chaos result killed off two of my Sisters and failed to wound the one Bolt Thrower that was targeted.
One Skullcannon grapeshotted my Reavers and killed three, but the remainder passed their panic test. The other killed two Silver Helms while trying to snipe my BSB.
High Elves turn 2:
The Phoenix Guard again charged the tower.
I moved my Reavers to slow down the Bloodletter horde and moved my Sisters up, hoping they might be able to do the same later on. I reformed my cavalry to keep them further away from the Bloodletter horde.
In the magic phase I was able to case a bound Soul Quench onto the Bloodcrushers for ~1 wound and get off an irresistible bubbled Harmonic Convergence which cost my Mage one wound.
With nothing better to shoot, I took the Bloodcrusher unit down to a single wound remaining.
This time in combat my Phoenix Guard were able to take out 5 Bloodletters for no damage in return.
Demons of Chaos turn 2:
The Bloodletter horde charged my two Reavers and I held. Then the Bloodthirster charged my Sisters and I fled rather than letting the beast get a reform after combat; it then redirected right into my Phoenix Guard. Whoops. The Bloodcrusher tried to charge my Bolt Thrower but failed the charge.
In the magic phase Khorne gifted his chosen with a free 9 Bloodletters.
The first Skullcannon took out 4 Silver Helms. Now that I was denied a Look out Sir!, the second removed my BSB’s Golden Crown.
In combat I challenged the Bloodthirster. Needless to say, my champion died but I held and reformed to get attacks. The Herald killed both Reavers before the Bloodletters even got to attack and they reformed to face the tower again.
High Elves turn 3:
I charged my Dragon Princes into the Bloodletter horde to try to hold them up. I charged my Silver Helms into the last Bloodcrusher to try to save my shooting base. Finally, needing to make some effort at winning the game, I tried to charge the tower with my Archers, but they failed.
My Sisters failed to rally.
In the magic phase I was able to cast both Harmonic Convergence on my Phoenix Guard and Iceshard Blizzard on the Bloodthirster to give me the best chance possible.
I shot one Bolt Thrower into the newly spawned Bloodletters and killed two. The other was fairly obscured by the hill it was standing on and shot at the tower instead, but did nothing.
Finally the combat phase. My Silver Helms destroyed the remaining Bloodcrusher and reformed. The Dragon Princes put one wound onto the Herald and killed three more Bloodletters, but in return the demons killed three Dragon Prince and they broke from the combat. I was able to put a wound onto the Bloodthirster but it stomped five Phoenix Guard into the ground.
Demons of Chaos turn 3:
The new unit of Bloodletters charged my Archer unit. The small unit of Bloodletters walked out of the building to help their master, while the large unit took their place.
In the magic phase the Demons were granted +1 ward save.
One cannon killed off a single Silver Helm while the other did a single wound to one of my Bolt Throwers.
I killed a single Bloodletter in exchange for three Archers, but I held and reformed to face them. The Bloodthirster killed two Phoenix Guard but I was able to do one wound in return which meant I had won combat. He failed the first break test by 1, was forced to re-roll because of his BSB and failed the second by 3.
High Elves turn 4:
My Sisters of Avelorn and Dragon Princes both rallied. Unfortunately my Silver Helms weren’t able to charge the small Bloodletters so I had to reform to attack them next turn.
In the magic phase I was again able to cast both Harmonic Convergence and Iceshard Blizzard into the Phoenix Guard combat.
My Archers killed four of the Bloodletters and the remainder popped. I failed to hurt the Bloodthirster who slew four more Phoenix Guard.
Demons of Chaos turn 4:
The Bloodletters charged my few remaining Phoenix Guard in the flank.
This time the Reign of Chaos table did nothing.
The Skullcannons were able to finish off my Bolt Thrower.
For a more exciting phase however, I was only able to kill a single Bloodletter. In return I was beaten up, broken and ran down in short order.
Then my opponent went and rolled a 6 to end the game!
Rather than dwell too much on all of the mistakes I made in this game, I’d prefer to focus on the single one that I think meant I had very little chance of winning this game: my deployment.
I was too distracted by the nice shiny hill in my deployment zone and so forced myself into horrible matchups – with my armour busting Prince opposite a horde of lightly armoured troops with killing blow… I realised this during the game but by then it was too late to properly redeploy my cavalry and so they ended doing almost nothing.
I should have swapped my shooting with my Silver Helms. Given that this was the Watchtower, my cavalry and the Bloodthirster are both far less important than they otherwise would be and I shouldn’t have minded if they hit at each other for a while. Meanwhile, my shooting would have been quite effective against the Bloodletter horde.
Something like this:
With my Bolt Throwers deployed at the back of my lines they might be out of Harmonic Convergence range, but in this case being more than 6” away from my units would be more important with the cannons possibly being trained upon them. With my Reavers to slow down the Bloodletter horde I think my shooting could have seriously hurt them, hopefully to the point that it’s no longer worth swapping them into the building.
Meanwhile my cavalry would have no trouble dealing with the Bloodcrushers – I’m even fairly free to deploy the Dragon Princes anywhere with this plan. While I have little chance of pinning the Bloodthirster down if it wants to avoid me, my cavalry do present a fairly tempting target for it. If it doesn’t go after them, they’ll soon be free to mop up the Bloodletter horde. This is the one part of the plan I’m not so sure about, but I think the whole idea is a LOT better than my actual playing.
I’m realising more and more that I’m really not deploying all that well and it’s one area of my game play I’d really like to work on. Are there any flaws in this plan that I’ve missed? How would any of you improve upon it further?
I have another game booked on Saturday against some Dwarfs, although I have no idea what points value we’ll be playing at.
[url=http://www.ulthuan.net/forum/viewtopic.php?f=5&t=44644]My painting log[/url]
[url=http://www.ulthuan.net/forum/viewtopic.php?f=51&t=51340]My battle reports[/url]
[url=http://www.ulthuan.net/forum/viewtopic.php?f=51&t=51340]My battle reports[/url]
Re: Solith's Battle Blog: Game 11 - 2000 HE vs DoC - 14/03
This battle looked painful. Lots of ineffective wounds. I don't know too much about the Bloodthirster, but it was surprising to see it hold up an entire unit of PG.
I might have also tried to use something to shield the PG from bloodthirster charge. Though having a character in the PG unit would have made all the difference when trying to take the tower.
I might have also tried to use something to shield the PG from bloodthirster charge. Though having a character in the PG unit would have made all the difference when trying to take the tower.
Regards,
Brad
------------------------------------------------------
[url=http://www.ulthuan.net/forum/viewtopic.php?f=5&t=53518&start=0]Visit The Nexs-Files Conversion/Painting Log[/url]
Brad
------------------------------------------------------
[url=http://www.ulthuan.net/forum/viewtopic.php?f=5&t=53518&start=0]Visit The Nexs-Files Conversion/Painting Log[/url]
Re: Solith's Battle Blog: Game 11 - 2000 HE vs DoC - 14/03
thanks for the report, keep them coming
though match against the demons, i think you adressed your critical mistakes, but keep in mind that he would perhaps also deploy otherwise.
What was the order of your deployment?
though match against the demons, i think you adressed your critical mistakes, but keep in mind that he would perhaps also deploy otherwise.
What was the order of your deployment?
Re: Solith's Battle Blog: Game 11 - 2000 HE vs DoC - 14/03
@NexS
Bloodthirsters are big scary killing machines. They're not too tough however - T 6, a 5+ armour save and a 5+ ward save to start with. Their upgrades can make quite a difference though depending on what they roll. It also has initiative 9 so we don't get re-rolls from ASF. My Phoenix Guard were hitting on 4's, wounding on 6's and then it had the ward save. With magic support, I think it and my Phoenix Guard should grind each other into ineffectiveness - I'm not sure who survives the combat but the survivor is left too weakened to really do much afterwards.
I think this game highlights a situation where Swordmasters would have been really useful. While they would have died a lot faster, they would have cleared the Bloodletters from the tower a lot faster. (Especially with the flaming banner to give them re-rolls to wound!) You make a good point about adding characters to the Phoenix Guard. Against this Demon army I could actually put my cavalry characters with the Phoenix Guard without any problems. Yes, I would no longer get a Look Out Sir! but with the Skullcannons doing flaming attacks both of my characters get a 2+ ward save.
@siovim
Thank you!
I deployed my Phoenix Guard first, I think the Reavers second and Dragon Princes third; although I could be wrong. Yes, my opponent could have deployed differently; however the position of the Skullcannons is largely irrelevant to me in this scenario and the Bloodletter horde was always going to be deployed close to the tower - the only real question is which side? I have enough deployment drops that I can force him to deploy either the Bloodcrushers or Bloodletter horde before I have to deploy my shooting and/or Silver Helms.
[url=http://www.ulthuan.net/forum/viewtopic.php?f=5&t=44644]My painting log[/url]
[url=http://www.ulthuan.net/forum/viewtopic.php?f=51&t=51340]My battle reports[/url]
[url=http://www.ulthuan.net/forum/viewtopic.php?f=51&t=51340]My battle reports[/url]
Re: Solith's Battle Blog: Game 11 - 2000 HE vs DoC - 14/03
My Tournament list that i'm running with at the moment has 20 SM with the BOTWD, which would turn daemons into daemon-curry (Provided my memory serves me well... do all daemons count as magical attacks?)
Regards,
Brad
------------------------------------------------------
[url=http://www.ulthuan.net/forum/viewtopic.php?f=5&t=53518&start=0]Visit The Nexs-Files Conversion/Painting Log[/url]
Brad
------------------------------------------------------
[url=http://www.ulthuan.net/forum/viewtopic.php?f=5&t=53518&start=0]Visit The Nexs-Files Conversion/Painting Log[/url]
Re: Solith's Battle Blog: Game 11 - 2000 HE vs DoC - 14/03
They do. They can't ever get non magical attacks, which is why Daemons players complain a lot about it.NexS wrote:My Tournament list that i'm running with at the moment has 20 SM with the BOTWD, which would turn daemons into daemon-curry (Provided my memory serves me well... do all daemons count as magical attacks?)
Though in the case of The Watchtower, it's probably going to be quite one-sided: either you have BOTWD and if your unit takes the tower, Daemons won't ever dislodge them; or you don't, and good luck dislodging a large Unbreakable unit that does not crumble...
Solith, thanks a lot for all those reports! You're lucky to play that often, and we're lucky that you're willing to share it with us.
I've read your whole thread in the last few days, and it's nice to see the bunch of them together. I really can't see what you could do to improve them, they're both enjoyable to read and give enough details to follow the action!
Re: Solith's Battle Blog: Game 11 - 2000 HE vs DoC - 14/03
Very true. I guess swordmasters w/BotWD would be the best choice we have against that particular circumstanceIluvatar wrote: They do. They can't ever get non magical attacks, which is why Daemons players complain a lot about it.
Though in the case of The Watchtower, it's probably going to be quite one-sided: either you have BOTWD and if your unit takes the tower, Daemons won't ever dislodge them; or you don't, and good luck dislodging a large Unbreakable unit that does not crumble...
Regards,
Brad
------------------------------------------------------
[url=http://www.ulthuan.net/forum/viewtopic.php?f=5&t=53518&start=0]Visit The Nexs-Files Conversion/Painting Log[/url]
Brad
------------------------------------------------------
[url=http://www.ulthuan.net/forum/viewtopic.php?f=5&t=53518&start=0]Visit The Nexs-Files Conversion/Painting Log[/url]
Re: Solith's Battle Blog: Game 11 - 2000 HE vs DoC - 14/03
@NexS
It's not known as the Banner of Demon Tears for nothing!
@Iluvatar
Thank you!
I think that if I had enough time I could shift 20 Bloodletters out of the Watchtower. It might be worth spending a few turns blasting them with magic and shooting (my entire magic + shooting will probably kill them faster than Phoenix Guard can, but it really depends on whether I can spare the attention away form everything else) but it's doable - especially in the later turns when the Bloodletters go below 10, so they have less attacks and lose combat by a higher margin. The problem is if any other unit gets swapped into the tower I'm pretty much screwed as it'll take a good 4-5 turns (or a lucky failed break test!) to shift them.
I get why people don't like the Watchtower as a scenario because of how one sided it is and I agree with it, but I like the idea of what it does to you in the list building stage. (Even if the ideal falls far short of the reality)
Thanks for the comments on my reporting.
I have two more games to report on - one against The Empire and the other against Dwarfs. I don't have any games planned until next Saturday so the reports will probably be spread out over the week.
It's not known as the Banner of Demon Tears for nothing!
@Iluvatar
Thank you!
I think that if I had enough time I could shift 20 Bloodletters out of the Watchtower. It might be worth spending a few turns blasting them with magic and shooting (my entire magic + shooting will probably kill them faster than Phoenix Guard can, but it really depends on whether I can spare the attention away form everything else) but it's doable - especially in the later turns when the Bloodletters go below 10, so they have less attacks and lose combat by a higher margin. The problem is if any other unit gets swapped into the tower I'm pretty much screwed as it'll take a good 4-5 turns (or a lucky failed break test!) to shift them.
I get why people don't like the Watchtower as a scenario because of how one sided it is and I agree with it, but I like the idea of what it does to you in the list building stage.
Thanks for the comments on my reporting.
I have two more games to report on - one against The Empire and the other against Dwarfs. I don't have any games planned until next Saturday so the reports will probably be spread out over the week.
[url=http://www.ulthuan.net/forum/viewtopic.php?f=5&t=44644]My painting log[/url]
[url=http://www.ulthuan.net/forum/viewtopic.php?f=51&t=51340]My battle reports[/url]
[url=http://www.ulthuan.net/forum/viewtopic.php?f=51&t=51340]My battle reports[/url]
Re: Solith's Battle Blog: Game 11 - 2000 HE vs DoC - 14/03
Firstly I’m jealous as to how many games you play! I’m lucky to get a single game in per week so colour me jealous. I’m thoroughly enjoying the volume of reports you’re posting as well, your skills with Battle Chronicler are getting better with each report so keep it up.
Damn Skullcannons, I hate the things!
First Turn – I’m intrigued as to why you charged the building right away. I guess there is no right or wrong answer however there was an opportunity I believe here to focus on the other block of Bloodletters instead and shoot at the elements in the building. The sisters would have gained re-roll to wounds with their flaming attacks and by the time your units are ready to engage there would have been a shadow of a unit in the tower. Also because they’re unstable they can’t physically be ‘bumped’ out of the building.
Turn 2 – Extra Bloodletters – ouch. However perhaps some premonition with the Cavalry moving over that side, what was the purpose there anyway originally? Handle the Bloodcrushers? Was the Watchtower not quite keeping the Phoenix Guard outside of charge arc of the Bloodthirster?
Turn 3 – I’m unsure on the ruling however I don’t think a unit can leave a building and then another can garrison it unless in the combat phase of course. May want to check that out. What was the reason for not charging the Bloodletters with the Archers?
Turn 4 – Out of time. Damn.
Conclusion – you’ve address your deployment issue, well done. Very self critical and you’ve done a great job on addressing that issue. I felt between the Bolt Throwers and Prince they were the key answers to the Bloodthirster. One thing, does he gain hard cover from his own unit being a large target? I didn’t think they would gain any modifiers whatsoever because of that rule? I nearly would have sent the Dragon Princes directly after the Skullcannons, they’ve got flaming so they’d take minimal damage heading into the fight whilst under support from even the sisters and Bolt Throwers. Too me the Skullcannons represent such a danger to your cavalry bus so should be eliminated with haste. Sisters into the building could have been something to think about as well.
Either way great report, the losses tend to be the harder to report on however you learn so much more I find. Looking forward to the next as per usual.
Re: Solith's Battle Blog: Game 11 - 2000 HE vs DoC - 14/03
I was wondering the same thing regarding the bloodthirster's cover but apparently the large target rule only affects cover from obstacles (fences, walls).
As long as more than half of the bloodthirster's model was obscured by the intermediate unit then he would get hard cover.
As long as more than half of the bloodthirster's model was obscured by the intermediate unit then he would get hard cover.
Re: Solith's Battle Blog: Game 11 - 2000 HE vs DoC - 14/03
My understanding was that now that large target does not grant +1 to hit, it removes any cover options from them and gives 18" bubble and that's it?Jimmy wrote:One thing, does he gain hard cover from his own unit being a large target? I didn’t think they would gain any modifiers whatsoever because of that rule? I nearly would have sent the Dragon Princes directly after the Skullcannons, they’ve got flaming so they’d take minimal damage heading into the fight whilst under support from even the sisters and Bolt Throwers.
Question (which came up in a game last night): skullcannon cannon shot is flaming (says so right there in the rules), but is the grapeshot? I'm saying yes, but technically there isn't an entry for grapeshot to specify. And specifically prompted from your post - skullcannons aren't flaming in combat, right?
Cheers,
Ferny
The 9th Age: Alumni
Former Roles: Advisory Board, HR, Moderator and Highborn Elves Army Support
Former Roles: Advisory Board, HR, Moderator and Highborn Elves Army Support
Re: Solith's Battle Blog: Game 11 - 2000 HE vs DoC - 14/03
It's funny, I found myself wondering about the exact same thing just today (after reading the other thread regarding BotWD and Daemons). I arrived at the conclusion that RAW, the grapeshot should be exactly the same as the grapeshot described in the rulebook given no alternative profile is provided (so not flaming). Guess it's something you'd want to discuss before the game. That bs5 grapeshot becomes a lot more scary to dragonprinces if it's not flaming.Ferny wrote: Question (which came up in a game last night): skullcannon cannon shot is flaming (says so right there in the rules), but is the grapeshot? I'm saying yes, but technically there isn't an entry for grapeshot to specify.
(Thanks for the report BTW Solith
Re: Solith's Battle Blog: Game 11 - 2000 HE vs DoC - 14/03
@Jimmy
Thanks!
It's good fun getting in all these games.
Turn 1: I think you're right and that shooting the Bloodletters would have been the better option. However the counter argument is that by assaulting the Watchtower I get to shoot other things; while the damage to the Bloodletters in the tower goes down, the damage to the rest of the army goes up.
Turn 2: The Dragon Princes were kind of there to deal with the Bloodcrushers because I thought by Bolt Throwers would be shooting at the Bloodthirster every chance they got. However I positioned them badly and I couldn't get the flank charge on my turn 2. It didn't really matter though because my opponent was good at keeping the 'thirster in places where my Bolt Throwers had hard cover to shoot at it.
Turn 3: The garrisoning unit can't leave in turn 1 so the maneuver has to wait, but I think it's legal. The rulebook just says that you can't enter a building when a unit is already inside. You choose which order to move your units in - so you move the garrisoning unit out first; then, when you move the other unit, the building is now empty and you can step inside.
I'm not too familiar with the Demons rules, but I don't think the Skullcannons have flaming attacks in combat and I don't think my Dragon Princes could really deal with them. It may have been worth it just to hold them up and to stop them from shooting. Also, with 2+ ward saves against flaming attacks I wasn't concerned about my characters being cannoned off and the Silver Helms are a character delivery system as much as they are an effective unit.
I absolutely agree with reporting on losses. You hear people say that you learn more from your losses than from your victories but I've found that's nothing compared to how much you learn from reporting your losses - going over the game step by step in detail is really helpful, even though it can be harder to do.
@gaz
Thanks!
@Ferny
I don't think Skullcannons are flaming in combat. They are pretty scary in combat though. Lots of high strength attacks and the 5+ ward save - these things would probably be worth taking as basic chariots even if they didn't have the cannon on top.
On Fences:
I think between you it's all been covered. Large Targets can't get cover saves from being behind obstacles, but apart from that it's entirely based on true line of sight.
Thanks!
It's good fun getting in all these games.
Turn 1: I think you're right and that shooting the Bloodletters would have been the better option. However the counter argument is that by assaulting the Watchtower I get to shoot other things; while the damage to the Bloodletters in the tower goes down, the damage to the rest of the army goes up.
Turn 2: The Dragon Princes were kind of there to deal with the Bloodcrushers because I thought by Bolt Throwers would be shooting at the Bloodthirster every chance they got. However I positioned them badly and I couldn't get the flank charge on my turn 2. It didn't really matter though because my opponent was good at keeping the 'thirster in places where my Bolt Throwers had hard cover to shoot at it.
Turn 3: The garrisoning unit can't leave in turn 1 so the maneuver has to wait, but I think it's legal. The rulebook just says that you can't enter a building when a unit is already inside. You choose which order to move your units in - so you move the garrisoning unit out first; then, when you move the other unit, the building is now empty and you can step inside.
I'm not too familiar with the Demons rules, but I don't think the Skullcannons have flaming attacks in combat and I don't think my Dragon Princes could really deal with them. It may have been worth it just to hold them up and to stop them from shooting. Also, with 2+ ward saves against flaming attacks I wasn't concerned about my characters being cannoned off and the Silver Helms are a character delivery system as much as they are an effective unit.
I absolutely agree with reporting on losses. You hear people say that you learn more from your losses than from your victories but I've found that's nothing compared to how much you learn from reporting your losses - going over the game step by step in detail is really helpful, even though it can be harder to do.
@gaz
Thanks!
@Ferny
I don't think Skullcannons are flaming in combat. They are pretty scary in combat though. Lots of high strength attacks and the 5+ ward save - these things would probably be worth taking as basic chariots even if they didn't have the cannon on top.
On Fences:
I think between you it's all been covered. Large Targets can't get cover saves from being behind obstacles, but apart from that it's entirely based on true line of sight.
[url=http://www.ulthuan.net/forum/viewtopic.php?f=5&t=44644]My painting log[/url]
[url=http://www.ulthuan.net/forum/viewtopic.php?f=51&t=51340]My battle reports[/url]
[url=http://www.ulthuan.net/forum/viewtopic.php?f=51&t=51340]My battle reports[/url]
Re: Solith's Battle Blog: Game 11 - 2000 HE vs DoC - 14/03
Any idea if the grapeshot is flaming though?
The 9th Age: Alumni
Former Roles: Advisory Board, HR, Moderator and Highborn Elves Army Support
Former Roles: Advisory Board, HR, Moderator and Highborn Elves Army Support
Re: Solith's Battle Blog: Game 11 - 2000 HE vs DoC - 14/03
No clue tbh. It's not mentioned in the Demon's FAQ but beyond that...
[url=http://www.ulthuan.net/forum/viewtopic.php?f=5&t=44644]My painting log[/url]
[url=http://www.ulthuan.net/forum/viewtopic.php?f=51&t=51340]My battle reports[/url]
[url=http://www.ulthuan.net/forum/viewtopic.php?f=51&t=51340]My battle reports[/url]
Re: Solith's Battle Blog: Game 11 - 2000 HE vs DoC - 14/03
Game 12: The Madness of Marius – High Elves vs The Empire – 1500
This game was against Oscar and his men of The Empire. We rolled up Battle for the Pass.
My list: The same 1500 point list as before, but with a more helpful banner on the White Lions.
Prince – barded steed, heavy armour, shield, Giant Blade, Dragonhelm, Dawnstone, Potion of Foolhardiness (276)
Noble – barded steed, dragon armour, Sword of Might, Enchanted Shield, Golden Crown of Atrazar, The Other Trickster’s Shard (170)
Mage – level 2, Khaine’s Ring of Fury, Dispel Scroll – High Magic (170)
8 Silver Helms – shields, full command (214)
5 Reavers – bows only, musician (95)
13 Archers – musician (130)
20 White Lions – full command, Gleaming Pennant (305)
Repeater Bolt Thrower
Repeater Bolt Thrower
His list: (There may be some errors here)
Marius Lietdorf
Luthor Huss
Warrior Priest – Enchanted Shield
Battle Mage – level 2, Dispel Scroll Heavens Magic
16 Inner Circle Knights – full command, Steel Standard
38 Halberdiers – full command
5 Pistoliers
Great Cannon
He rolled up Iceshard Blizzard and Urannon’s Thunderbolt.
I got Arcane Unforging and Fiery Convocation!
Deployment:
I finally split up my Bolt Throwers! I set up my cavalry opposite my opponent’s. Even though that meant facing a Runefang I thought I’d need the armour busting Prince to face the Empire Knights. However, I had Arcane Unforging. Even if Marius still had his Runefang I’d get to attack first and had a not unreasonable chance of killing him right out so I wasn’t too worried about this matchup.
With the house in the middle I thought I might be able to isolate either the Knights, or more likely the Halberdiers to fight only one of the Empire units at a time. I wanted my Mage with the Archers but he started with the White Lions to bring in range during turn 1.
My Opponent got to vanguard first, so I decided not to. As the possibility of charging outweighed the slight distance I could move.
Empire turn 1:
The Pistoliers were able to fit through my lines and get out of my Silver Helm’s charge arc. The Knights performed a swift reform to move Marius further away from my Mage. My White Lions then discovered that three of them were sitting in a Wild Wood, which promptly ate 5 of my unit.
In the magic phase the Empire Wizard miscast Iceshard Blizzard on my Silver Helms and blew up two Halberdiers. Some Warrior Priest buffs may have also gone up, but I had no intention of charging anything in my turn so I didn’t care about them.
The Pistoliers killed off three of my Reavers, but they passed their panic test. The Cannon misfired, but rolled a 6 and would still be free to shoot next turn.
High Elves turn 1:
My Mage jumped into the Archer unit. I swung my White Lions round to head towards the Knights. The Halberdiers were angled slightly too much towards the house and so wouldn’t be able to wheel past to charge me in the flank. I moved my cavalry up to pressure the Knights more and ran my Reavers to slow them down.
My Archers and left Bolt Thrower took down 4 Halberdiers, while the right Bolt Thrower killed two Pistoliers at point blank range. Unfortunately they passed their panic test.
In the magic phase I believe I drew out a Scroll trying to burn the Halberdiers with Fiery Convocation.
Empire turn 2:
The Knights charged my doomed Reavers. The Pistoliers failed their march block test and were only able to block my cavalry from advancing; it would also be impossible to kill them and overrun into the Knights.
In the magic phase Iceshard Bliizard was cast onto my White Lions. Some blessings may have also been cast onto the Knights.
The Cannon smashed my right Bolt Thrower to pieces, and the Pistoliers were able to kill a single Silver Helm.
High Elves turn 2:
I really wanted to engage the Knights with both my cavalry and my White Lions. I considered throwing my White Lions into the Knights alone to soften them up, but I’d need to roll an 8 to make the charge. That was too risky and I wouldn’t be able to afford a failed charge here – I’d be in a horrible position. I could instead run the White Lions right in front of the Knights. Honestly this was a very tempting option, while I was sure I’d eventually be wiped out I could do a fair bit beforehand. I’d also be able to put a few crucial wounds onto Marius to ensure my Prince could cut him down if they ever fought each other. However, that would mean throwing a unit worth 20% of my total victory points away and I wasn’t willing to do it.
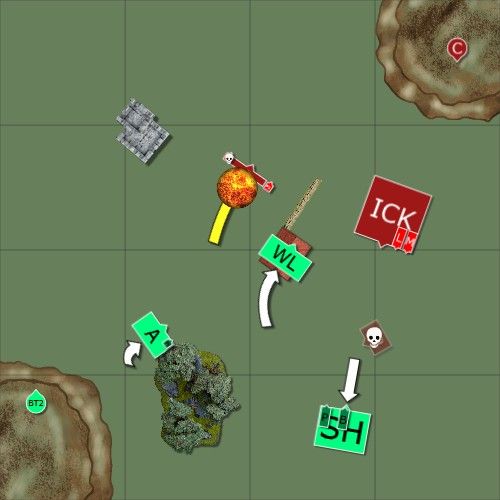
Instead, I came up with a plan. I’d back off with my Knights, move my White Lions into the building and clear away the Pistoliers with my shooting and magic. Then I’d be free to engage the Knights on my terms. I was forced to move my Archers even closer to the Halberdiers to get the Mage into 18” of the Pistoliers, but I could flee from the Halberdiers in my opponent’s turn so that wasn’t too much of an issue.
I got lucky with the winds of magic, ending up with 10 vs 5 dice. I threw 6 at Fiery Convocation against the Halberdiers to draw out the dispel dice. It worked better than I hoped as my opponent was unable to stop it! One wound on the mage and 22 dead halberdiers later and the game had shifted notably in my favour. Horrified by the sight of two thirds of their unit dying in an instant, the remainder failed their panic test fled from my Mage.
I changed my plans and used 2 dice on my Ring to cast Soul Quench on the fleeing unit to try to bring them under 25%. It killed 5 and now the unit would be rallying on double 1’s. Finally I used my remaining 2 dice on Arcane Unforging and rolled the 10+ I needed to cast it. Unfortunately Marius was out of range so I used the spell to zap a single Pistolier. (Successfully rolling the 5+ I needed to cause the wound!) They passed their panic test however.
Wow, what a magic phase!
I was forced to fire both my Archers and Bolt Thrower at the remaining two Pistoliers, but I was fortunately able to finish off the unit.
Empire turn 3:
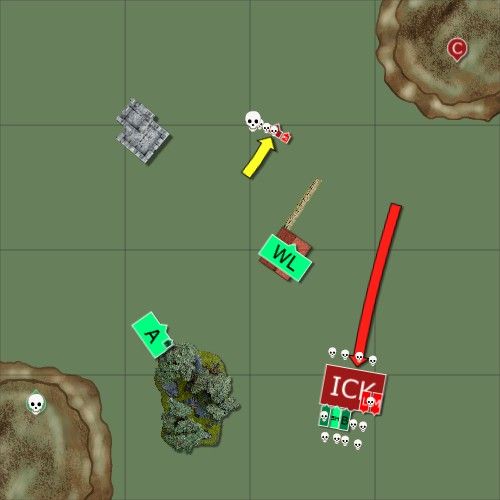
The Knights lowered their lances and charged my Silver Helms! With the Empire unit still at full strength I was really concerned with how this fight would progress.
In the magic phase Fiery Convocation finished off the Mage and killed a further three Halberdiers. I don’t remember if Luthor Huss was able to cast anything or not, but the only spell I really wanted to stop was the ward save one.
The Cannon blew up my remaining Bolt Thrower.
The Knight’s champion issued a challenge and my BSB stepped forward to accept. My BSB was able to kill the Knight. I directed as many attacks as I could on Marius and managed a single wound. My Prince and the rest of the Silver Helms killed four Knights. In return the Empire cavalry and a Hulked out Luthor Huss killed all but one Silver Helm and put one wound onto my general. Fortunately for me, the standard was the last Silver Helm alive (some attacks were directed onto my champion) so I only lost combat by 3 and was able to hold.
High Elves turn 3:
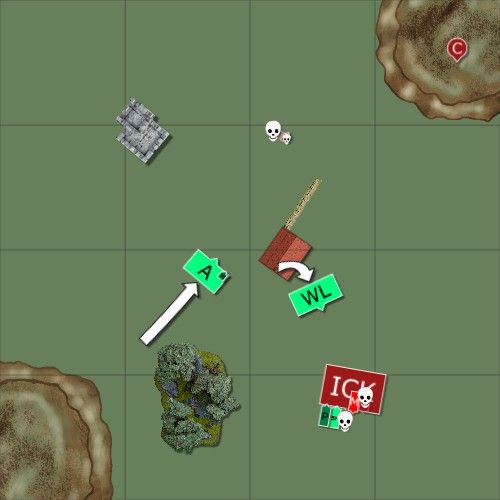
I marched my Archers up to get my Mage into range. My White Lions left the building, if my characters could hold out for two more rounds of combat I’d be able to rear charge the Empire Knights and it would all be over.
I was able to destroy the Warrior Priest’s shield. Fiery Convocation destroyed the remainder of the Halberdier unit and put one wound onto the Warrior Priest.
My Prince issued a challenge, and Luthor Huss accepted. With some epic ward save fails I was able to push three wounds through and kill the priest, but in return Marius chopped my BSB down. Somehow my last Silver Helm survived the rest of the Knight’s attacks. My opponent won combat by musician and without a BSB re-roll it was a tense break test for me, but I passed it.
Empire turn 4:
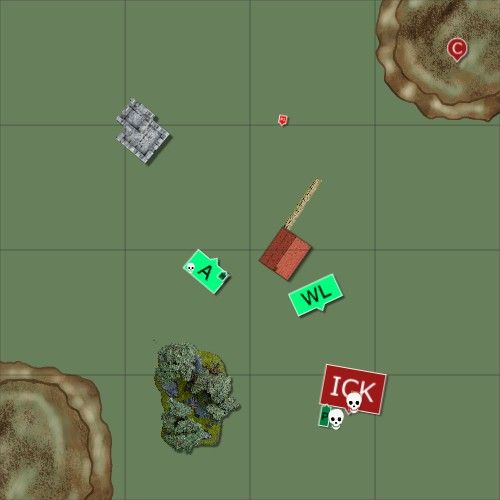
With no unit left to drag him off, the Warrior Priest rallied.
The Cannon killed a single Archer in an attempt to get revenge on my Mage.
Marius Lietdorf and my Prince ended up in a challenge and I was able to do two wounds; exactly enough to finish him off. Phew! No Runefang attacks on my ward-less Prince. The Knights killed off the last Silver Helm. Again I lost combat by 1 but was able to hold. The Knights reformed to face my White Lions.
High Elves turn 4:
Barely able to hold in my gleeful cackling, I charged my White Lions into the Knights.
Between my magic and shooting I was able to kill the Warrior Priest.
In combat I was able to kill off seven Knights. The survivors and their horses killed four White Lions. The Knights broke from combat but even with two units pursuing they got away and ran to about 1cm away from the table edge.
Empire turn 5:

The Knights rallied and turned to face me.
The Cannon again killed a single Archer
High Elves turn 5:
I charged the Prince and White Lions into the Knights, but they fled to keep me on the table rather than let me overrun or pursue off the board. My Archers marched up to get into range in my last turn.
Turn 6: (Both turn 6's combined)
The Cannon took careful aim and landed a hit on my Prince. It wounded me and without even a ward save from Dragon Armour I was sure my general was dead.
Then my opponent rolled a 1 and my Prince survived with a single wound remaining!
In my turn my Archers were able to roll three 6’s to wound and killed the Cannon, meaning I had won with a complete tabling!
I think my turn 2 magic phase was the best/luckiest I’ve ever had and it completely removed the Halberdiers from the game. Without that I’d have tried to slow the Halberdiers down with my Archers, but ultimately they would have probably been free to attack my cavalry or White Lions by turn 5 or 6.
I’m not so sure about my manoeuvre with the White Lions and the house. Instead, I thinkI could have moved them forward to be just outside of the Halberdier’s charge arc but still with the Knights charging into my front. This would put the Knights in a difficult position – either they charge my stubborn, great weapon wielding unit and get counter-charged by my cavalry in the following turn; or they try to fit past the White Lions to charge the Silver Helms. Even if they made the charge onto my cavalry, I wouldn’t have a lost a turn by having to reform the White Lions because they had to spend a turn leaving the building.
This game was against Oscar and his men of The Empire. We rolled up Battle for the Pass.
My list: The same 1500 point list as before, but with a more helpful banner on the White Lions.
Prince – barded steed, heavy armour, shield, Giant Blade, Dragonhelm, Dawnstone, Potion of Foolhardiness (276)
Noble – barded steed, dragon armour, Sword of Might, Enchanted Shield, Golden Crown of Atrazar, The Other Trickster’s Shard (170)
Mage – level 2, Khaine’s Ring of Fury, Dispel Scroll – High Magic (170)
8 Silver Helms – shields, full command (214)
5 Reavers – bows only, musician (95)
13 Archers – musician (130)
20 White Lions – full command, Gleaming Pennant (305)
Repeater Bolt Thrower
Repeater Bolt Thrower
His list: (There may be some errors here)
Marius Lietdorf
Luthor Huss
Warrior Priest – Enchanted Shield
Battle Mage – level 2, Dispel Scroll Heavens Magic
16 Inner Circle Knights – full command, Steel Standard
38 Halberdiers – full command
5 Pistoliers
Great Cannon
He rolled up Iceshard Blizzard and Urannon’s Thunderbolt.
I got Arcane Unforging and Fiery Convocation!
Deployment:
I finally split up my Bolt Throwers! I set up my cavalry opposite my opponent’s. Even though that meant facing a Runefang I thought I’d need the armour busting Prince to face the Empire Knights. However, I had Arcane Unforging. Even if Marius still had his Runefang I’d get to attack first and had a not unreasonable chance of killing him right out so I wasn’t too worried about this matchup.
With the house in the middle I thought I might be able to isolate either the Knights, or more likely the Halberdiers to fight only one of the Empire units at a time. I wanted my Mage with the Archers but he started with the White Lions to bring in range during turn 1.
My Opponent got to vanguard first, so I decided not to. As the possibility of charging outweighed the slight distance I could move.
Empire turn 1:
The Pistoliers were able to fit through my lines and get out of my Silver Helm’s charge arc. The Knights performed a swift reform to move Marius further away from my Mage. My White Lions then discovered that three of them were sitting in a Wild Wood, which promptly ate 5 of my unit.
In the magic phase the Empire Wizard miscast Iceshard Blizzard on my Silver Helms and blew up two Halberdiers. Some Warrior Priest buffs may have also gone up, but I had no intention of charging anything in my turn so I didn’t care about them.
The Pistoliers killed off three of my Reavers, but they passed their panic test. The Cannon misfired, but rolled a 6 and would still be free to shoot next turn.
High Elves turn 1:
My Mage jumped into the Archer unit. I swung my White Lions round to head towards the Knights. The Halberdiers were angled slightly too much towards the house and so wouldn’t be able to wheel past to charge me in the flank. I moved my cavalry up to pressure the Knights more and ran my Reavers to slow them down.
My Archers and left Bolt Thrower took down 4 Halberdiers, while the right Bolt Thrower killed two Pistoliers at point blank range. Unfortunately they passed their panic test.
In the magic phase I believe I drew out a Scroll trying to burn the Halberdiers with Fiery Convocation.
Empire turn 2:
The Knights charged my doomed Reavers. The Pistoliers failed their march block test and were only able to block my cavalry from advancing; it would also be impossible to kill them and overrun into the Knights.
In the magic phase Iceshard Bliizard was cast onto my White Lions. Some blessings may have also been cast onto the Knights.
The Cannon smashed my right Bolt Thrower to pieces, and the Pistoliers were able to kill a single Silver Helm.
High Elves turn 2:
I really wanted to engage the Knights with both my cavalry and my White Lions. I considered throwing my White Lions into the Knights alone to soften them up, but I’d need to roll an 8 to make the charge. That was too risky and I wouldn’t be able to afford a failed charge here – I’d be in a horrible position. I could instead run the White Lions right in front of the Knights. Honestly this was a very tempting option, while I was sure I’d eventually be wiped out I could do a fair bit beforehand. I’d also be able to put a few crucial wounds onto Marius to ensure my Prince could cut him down if they ever fought each other. However, that would mean throwing a unit worth 20% of my total victory points away and I wasn’t willing to do it.
Instead, I came up with a plan. I’d back off with my Knights, move my White Lions into the building and clear away the Pistoliers with my shooting and magic. Then I’d be free to engage the Knights on my terms. I was forced to move my Archers even closer to the Halberdiers to get the Mage into 18” of the Pistoliers, but I could flee from the Halberdiers in my opponent’s turn so that wasn’t too much of an issue.
I got lucky with the winds of magic, ending up with 10 vs 5 dice. I threw 6 at Fiery Convocation against the Halberdiers to draw out the dispel dice. It worked better than I hoped as my opponent was unable to stop it! One wound on the mage and 22 dead halberdiers later and the game had shifted notably in my favour. Horrified by the sight of two thirds of their unit dying in an instant, the remainder failed their panic test fled from my Mage.
I changed my plans and used 2 dice on my Ring to cast Soul Quench on the fleeing unit to try to bring them under 25%. It killed 5 and now the unit would be rallying on double 1’s. Finally I used my remaining 2 dice on Arcane Unforging and rolled the 10+ I needed to cast it. Unfortunately Marius was out of range so I used the spell to zap a single Pistolier. (Successfully rolling the 5+ I needed to cause the wound!) They passed their panic test however.
Wow, what a magic phase!
I was forced to fire both my Archers and Bolt Thrower at the remaining two Pistoliers, but I was fortunately able to finish off the unit.
Empire turn 3:
The Knights lowered their lances and charged my Silver Helms! With the Empire unit still at full strength I was really concerned with how this fight would progress.
In the magic phase Fiery Convocation finished off the Mage and killed a further three Halberdiers. I don’t remember if Luthor Huss was able to cast anything or not, but the only spell I really wanted to stop was the ward save one.
The Cannon blew up my remaining Bolt Thrower.
The Knight’s champion issued a challenge and my BSB stepped forward to accept. My BSB was able to kill the Knight. I directed as many attacks as I could on Marius and managed a single wound. My Prince and the rest of the Silver Helms killed four Knights. In return the Empire cavalry and a Hulked out Luthor Huss killed all but one Silver Helm and put one wound onto my general. Fortunately for me, the standard was the last Silver Helm alive (some attacks were directed onto my champion) so I only lost combat by 3 and was able to hold.
High Elves turn 3:
I marched my Archers up to get my Mage into range. My White Lions left the building, if my characters could hold out for two more rounds of combat I’d be able to rear charge the Empire Knights and it would all be over.
I was able to destroy the Warrior Priest’s shield. Fiery Convocation destroyed the remainder of the Halberdier unit and put one wound onto the Warrior Priest.
My Prince issued a challenge, and Luthor Huss accepted. With some epic ward save fails I was able to push three wounds through and kill the priest, but in return Marius chopped my BSB down. Somehow my last Silver Helm survived the rest of the Knight’s attacks. My opponent won combat by musician and without a BSB re-roll it was a tense break test for me, but I passed it.
Empire turn 4:
With no unit left to drag him off, the Warrior Priest rallied.
The Cannon killed a single Archer in an attempt to get revenge on my Mage.
Marius Lietdorf and my Prince ended up in a challenge and I was able to do two wounds; exactly enough to finish him off. Phew! No Runefang attacks on my ward-less Prince. The Knights killed off the last Silver Helm. Again I lost combat by 1 but was able to hold. The Knights reformed to face my White Lions.
High Elves turn 4:
Barely able to hold in my gleeful cackling, I charged my White Lions into the Knights.
Between my magic and shooting I was able to kill the Warrior Priest.
In combat I was able to kill off seven Knights. The survivors and their horses killed four White Lions. The Knights broke from combat but even with two units pursuing they got away and ran to about 1cm away from the table edge.
Empire turn 5:
The Knights rallied and turned to face me.
The Cannon again killed a single Archer
High Elves turn 5:
I charged the Prince and White Lions into the Knights, but they fled to keep me on the table rather than let me overrun or pursue off the board. My Archers marched up to get into range in my last turn.
Turn 6: (Both turn 6's combined)
The Cannon took careful aim and landed a hit on my Prince. It wounded me and without even a ward save from Dragon Armour I was sure my general was dead.
Then my opponent rolled a 1 and my Prince survived with a single wound remaining!
In my turn my Archers were able to roll three 6’s to wound and killed the Cannon, meaning I had won with a complete tabling!
I think my turn 2 magic phase was the best/luckiest I’ve ever had and it completely removed the Halberdiers from the game. Without that I’d have tried to slow the Halberdiers down with my Archers, but ultimately they would have probably been free to attack my cavalry or White Lions by turn 5 or 6.
I’m not so sure about my manoeuvre with the White Lions and the house. Instead, I thinkI could have moved them forward to be just outside of the Halberdier’s charge arc but still with the Knights charging into my front. This would put the Knights in a difficult position – either they charge my stubborn, great weapon wielding unit and get counter-charged by my cavalry in the following turn; or they try to fit past the White Lions to charge the Silver Helms. Even if they made the charge onto my cavalry, I wouldn’t have a lost a turn by having to reform the White Lions because they had to spend a turn leaving the building.
[url=http://www.ulthuan.net/forum/viewtopic.php?f=5&t=44644]My painting log[/url]
[url=http://www.ulthuan.net/forum/viewtopic.php?f=51&t=51340]My battle reports[/url]
[url=http://www.ulthuan.net/forum/viewtopic.php?f=51&t=51340]My battle reports[/url]
Re: Solith's Battle Blog: Game 11 - 2000 HE vs DoC - 14/03
What a tense battle! I'm surprised at how well convocation worked on the halberdiers!
Seeing the pistoliers where they were, I'd certainly have vanguarded to a position where they couldn't have fit between the units, but it all worked out in the end! But so tense!
Seeing the pistoliers where they were, I'd certainly have vanguarded to a position where they couldn't have fit between the units, but it all worked out in the end! But so tense!
Regards,
Brad
------------------------------------------------------
[url=http://www.ulthuan.net/forum/viewtopic.php?f=5&t=53518&start=0]Visit The Nexs-Files Conversion/Painting Log[/url]
Brad
------------------------------------------------------
[url=http://www.ulthuan.net/forum/viewtopic.php?f=5&t=53518&start=0]Visit The Nexs-Files Conversion/Painting Log[/url]
Re: Solith's Battle Blog: Game 11 - 2000 HE vs DoC - 14/03
The grapeshot is an interesting question in which there is currently no right/wrong answer for.
On the White Lions being in the forest and being Strider wouldn’t have negate any damage they take or not?
Turn 2 – Wow what a turn around from a single magic phase!
Probably the best game you’ve had to date in terms of tension in the last few turns. Prince was lucky to survive!
Always a pleasure to read.