Olannon's Guide to Battle Chronicler
Posted: Wed Dec 28, 2011 3:26 pm
Stickied. ~Eldacar
On these forums you will find a great many battle reports that are thoroughly made, with diagrams and lots of detail. Naturally, this makes for way better reports which in turn allows the author to get better feedback.
Many people have also said that they do not fully grasp how Battle Chronicler works. Because of this I decided to make a guide so we can all improve the level of the battle reports.
:: Getting Started ::
Battle Chronicler is essentially a tailor-made battle reports program for games like Warhammer. It's based on the .NET framework from Microsoft, and I believe it only works with Windows computers. The download link can be found here: click
Once you've downloaded Battle Chronicler, you can install it and start it. The following window should appear:
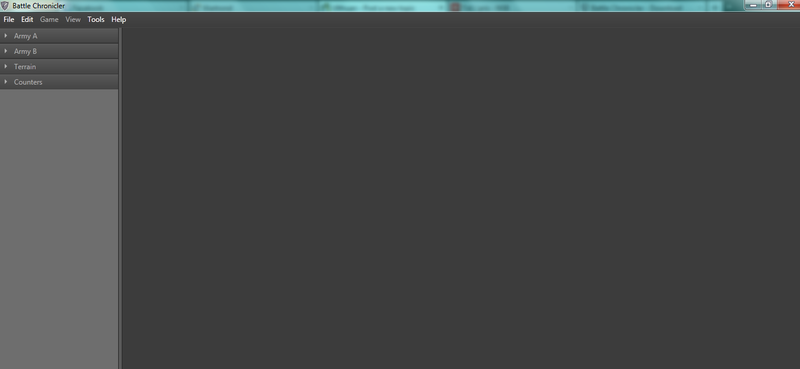
Congratulations - you're now ready to start using the program
:: Battle Chronicler Basics - Setting Up Armies and Game Info ::
Once you've opened the program, click 'File' in the upper-left corner and select 'New'. The following window should appear:
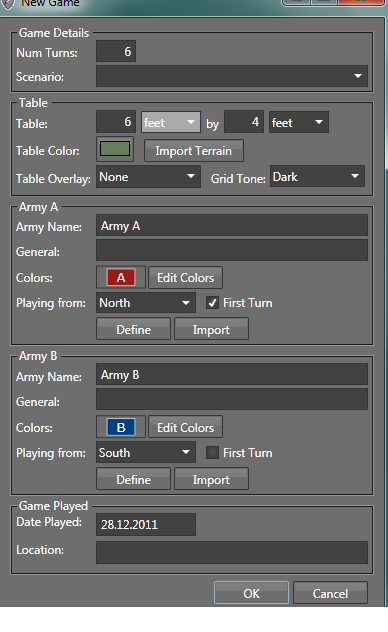
Let's discuss this picture for a second. The default values here are as follows: the game lasts for 6 turns, the table is 6x4 feet, Army A starts on the North side and gets first turn. The table colour is green, Army A is red, Army B is blue. Please note that all these values can easily be changed and often times, we forget to do so. Because of this I advice that you take a couple of seconds now to make sure everything is correct.
After you're done with the basics of the game, it's time to define the armies. Both Army A and Army B has an option called 'Define', next to 'Import'. Now, if this is your first time using Battle Chronicler, you have nothing to import! Let's take a look at what happens when you select 'Define':
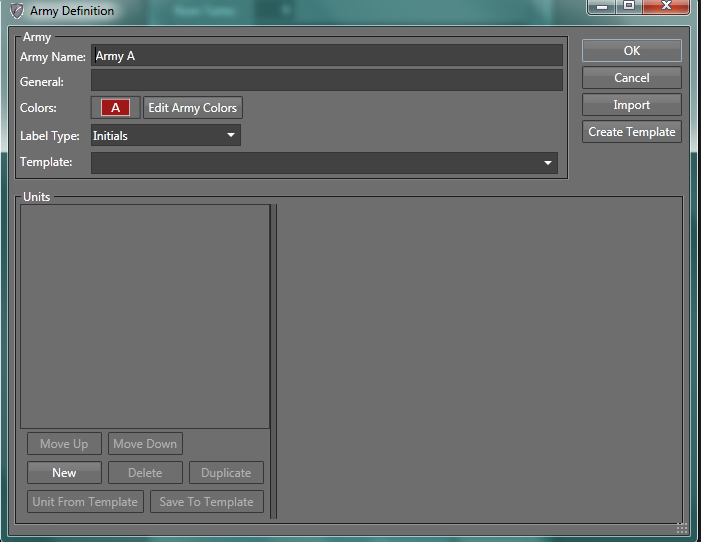
The main thing you need to understand here is how an army is created. The 'New' button in the lower-left corner creates a new unit. You can then fill out the unit's size, name, base size etc. When you're done, I suggest you click 'Create Template'. This allows you to import this file later on, so that you don't need to define the army every single time you're making a battle report. Handy indeed!
Once you've done this for both armies, you're ready to start making the actual diagrams which you'll be (hopefully) posting online to complement your notes.
:: Using Battle Chronicler To Simulate Deployment and Game Turns ::
Having completed the armies and filled out the game information, you're ready to click 'ok'. The following screen appears:
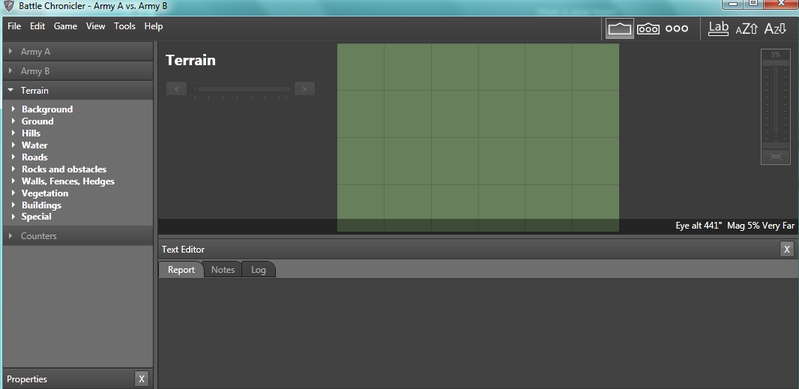
Now, you select the terrain you want from the menu on your left. When you're done, do NOT start placing the armies. Do you notice the bar beneath the white 'Terrain' header? This bar controls which part of the game you're in (e.g. terrain, deployment etc). As such, simply hit the arrow to the right of this bar when you're done with terrain and you'll get to deployment.
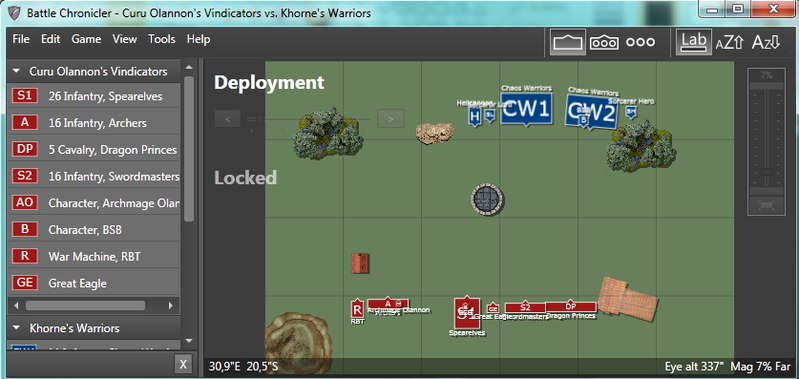
When you're done with deployment, it should look roughly like this (but the word 'Locked' should not appear: this word appears when you go back so that any changes won't affect future turns):
Now if you've gotten this far, the rest is a piece of cake: hit the right arrow on the bar to advance to the next game turn. Moving units is easy and self-explanatory, simply drag'n'drop them to where they moved etc. Also note that you have a plethora of options on your left-hand side: such as decreasing the unit's size, marking a unit as charging, placing a blast marker etc.
:: Closing Notes ::
I advice that you save the game in battle chronicler regularly (so that you don't lose any work if you accidentally lose power/exit the program or whatever). This can be done by clicking 'File' and 'Save'. Now, to export all these diagrams, simply hit 'File' and 'Export to Image File'. I find that in order to get diagrams that convey enough information while not being too large for most laptops, 900x600 pixels is a good size. To get the images on this forum, you need to host them online. Personally, I use photobucket. It does what it's supposed to but there might be better ones out there. For me, photobucket provides everything I need.
On these forums you will find a great many battle reports that are thoroughly made, with diagrams and lots of detail. Naturally, this makes for way better reports which in turn allows the author to get better feedback.
Many people have also said that they do not fully grasp how Battle Chronicler works. Because of this I decided to make a guide so we can all improve the level of the battle reports.
:: Getting Started ::
Battle Chronicler is essentially a tailor-made battle reports program for games like Warhammer. It's based on the .NET framework from Microsoft, and I believe it only works with Windows computers. The download link can be found here: click
Once you've downloaded Battle Chronicler, you can install it and start it. The following window should appear:
Congratulations - you're now ready to start using the program
:: Battle Chronicler Basics - Setting Up Armies and Game Info ::
Once you've opened the program, click 'File' in the upper-left corner and select 'New'. The following window should appear:
Let's discuss this picture for a second. The default values here are as follows: the game lasts for 6 turns, the table is 6x4 feet, Army A starts on the North side and gets first turn. The table colour is green, Army A is red, Army B is blue. Please note that all these values can easily be changed and often times, we forget to do so. Because of this I advice that you take a couple of seconds now to make sure everything is correct.
After you're done with the basics of the game, it's time to define the armies. Both Army A and Army B has an option called 'Define', next to 'Import'. Now, if this is your first time using Battle Chronicler, you have nothing to import! Let's take a look at what happens when you select 'Define':
The main thing you need to understand here is how an army is created. The 'New' button in the lower-left corner creates a new unit. You can then fill out the unit's size, name, base size etc. When you're done, I suggest you click 'Create Template'. This allows you to import this file later on, so that you don't need to define the army every single time you're making a battle report. Handy indeed!
Once you've done this for both armies, you're ready to start making the actual diagrams which you'll be (hopefully) posting online to complement your notes.
:: Using Battle Chronicler To Simulate Deployment and Game Turns ::
Having completed the armies and filled out the game information, you're ready to click 'ok'. The following screen appears:
Now, you select the terrain you want from the menu on your left. When you're done, do NOT start placing the armies. Do you notice the bar beneath the white 'Terrain' header? This bar controls which part of the game you're in (e.g. terrain, deployment etc). As such, simply hit the arrow to the right of this bar when you're done with terrain and you'll get to deployment.
When you're done with deployment, it should look roughly like this (but the word 'Locked' should not appear: this word appears when you go back so that any changes won't affect future turns):
Now if you've gotten this far, the rest is a piece of cake: hit the right arrow on the bar to advance to the next game turn. Moving units is easy and self-explanatory, simply drag'n'drop them to where they moved etc. Also note that you have a plethora of options on your left-hand side: such as decreasing the unit's size, marking a unit as charging, placing a blast marker etc.
:: Closing Notes ::
I advice that you save the game in battle chronicler regularly (so that you don't lose any work if you accidentally lose power/exit the program or whatever). This can be done by clicking 'File' and 'Save'. Now, to export all these diagrams, simply hit 'File' and 'Export to Image File'. I find that in order to get diagrams that convey enough information while not being too large for most laptops, 900x600 pixels is a good size. To get the images on this forum, you need to host them online. Personally, I use photobucket. It does what it's supposed to but there might be better ones out there. For me, photobucket provides everything I need.