My second game against Dark Elves! As we're playtesting our lists for a league with unusual comp, the Dark Elf list is somewhat un-orthodox. The main comp for Dark Elves is as follows: no cauldron of blood if you have either a shadow mage or a hydra, max 30 repeater crossbows, pendant banned, max. +2 PD per turn (this one counts for ALL armies), Black Guard + Hydra 0-1. Anyways, on to the report!
:: No quarter asked, no quarter given ::
My dragonlist:
Prince Saerith on Star Dragon - Vambraces of Defense, Great Weapon, Armour of Caledor, Talisman of Loec :: 622
Noble Naenor BSB on Great Eagle - Dragon Armour, Shield, Great Weapon, Helm of Fortune, The Other Trickster's Shard :: 216
High Mage Curu Olannon - Level 2, Annulian Crystal, Dragonbane Gem :: 180
Characters Total :: 1019
30 Archers, Full Command and Gleaming Pennant - 360
13 Archers, Musician, Standard Bearer - 158
10 Archers - 110
Core Total :: 628
30 White Lions, Full Command and Banner of Eternal Flame, Amulet of Light :: 505
5 Dragon Princes, Drakemaster with Skeinsliver :: 195
Special Total: 700
3 Great Eagles :: 150
Rare Total :: 150
Army total: 2497
Dark Elves:
Supreme Sorceress (Shadow Magic) - lvl 4, +1DD, sac. dagger
Cold One Mounted BSB, Hydra Banner, 1+ armour save
30 Corsairs, Full Command, Sea Serpent Standard
10 RxB - shields
10 Shades, champ
10 Shades, champ
20 Spearelves, full command, +1LD banner
5 Harpies
5 Harpies
11 Cold One Knights - Full Command, ASF Banner, Whip of Agony on champ
20 Black Guard - Full Command, Banner of Armour Piercing
1 War Hydra
:: Pre-battle thoughts & deployment::
Magic: I got Shield of Saphery and Vaul's Unmaking. He got Miasma, Withering, Pit and Mindrazor.
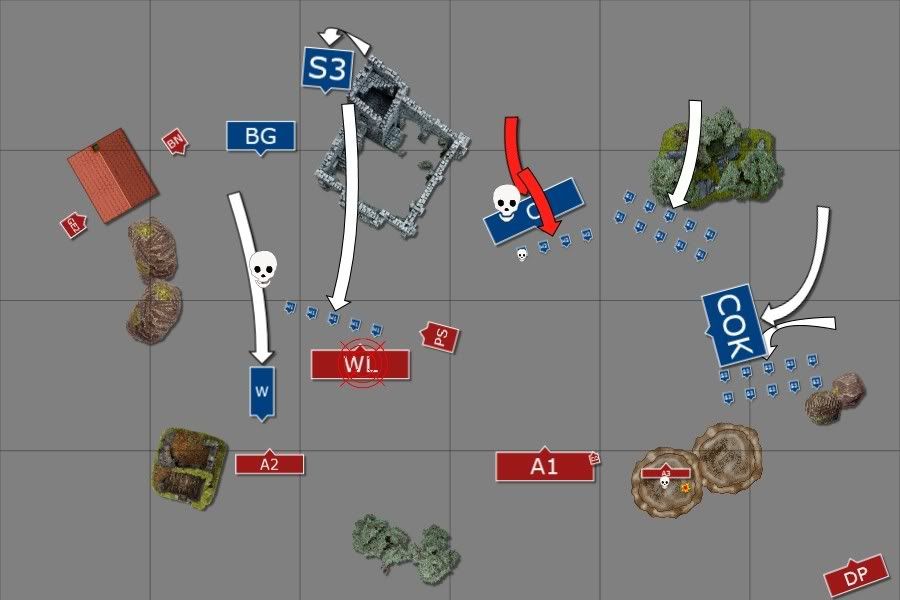
The scenario was automatically Battleline as per the rules of the upcoming league. I got to choose sides and chose South because I knew North would force him to advance in columns - 2 or 3 depending upon how tight he wanted his troops. To this end, I deployed my big Archers centrally and the battle plan was to destroy one flank of Dark Elves while the Archers held the middle. As deployment unfolded, I was confident I could achieve this - I also made sure to deny his Shades any lucrative position.
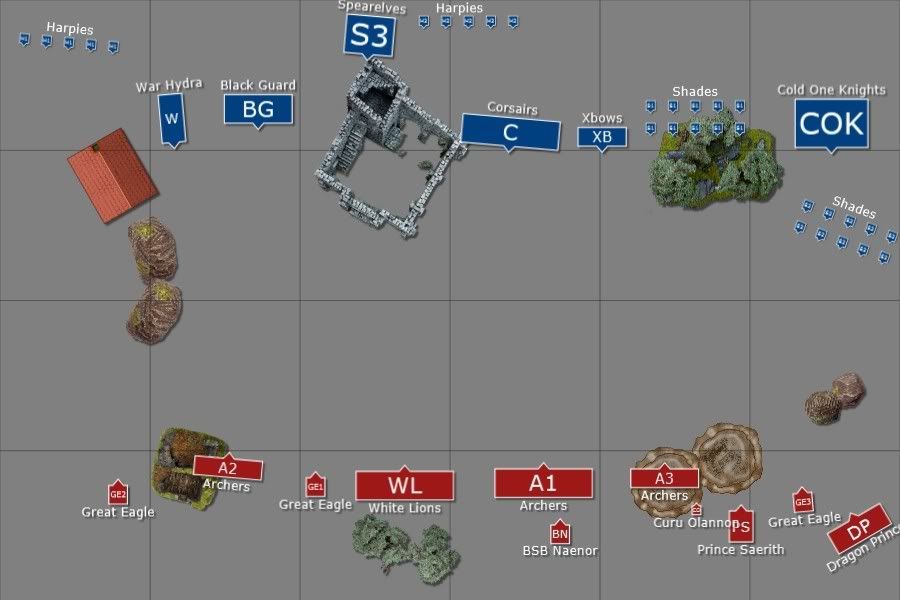 Note: His Supreme Sorceress was in the Spearelves unit, the BSB with the Knights.
I rolled a 4 for starting and since he had scouts, that meant he needed a '6' for a re-roll. He didn't get it, so I went first.
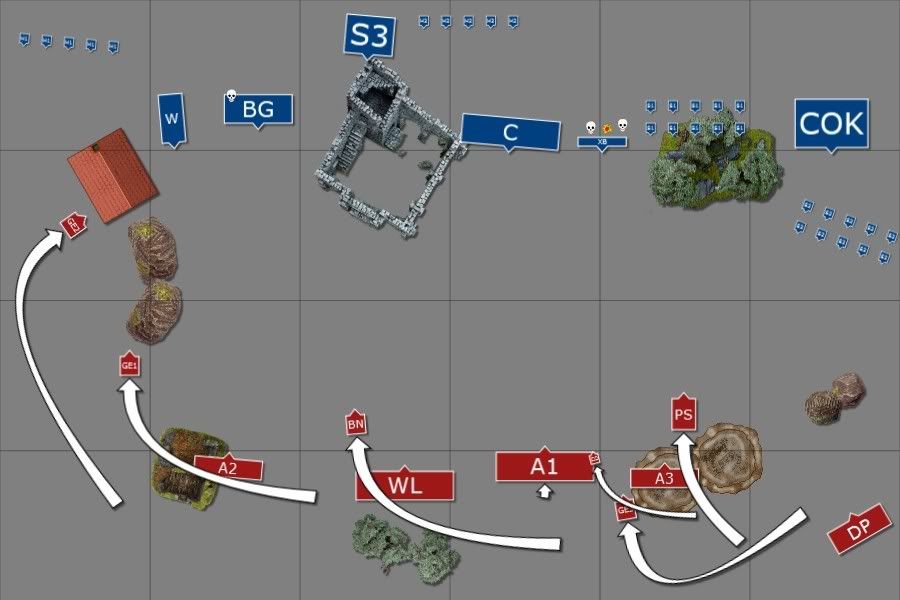
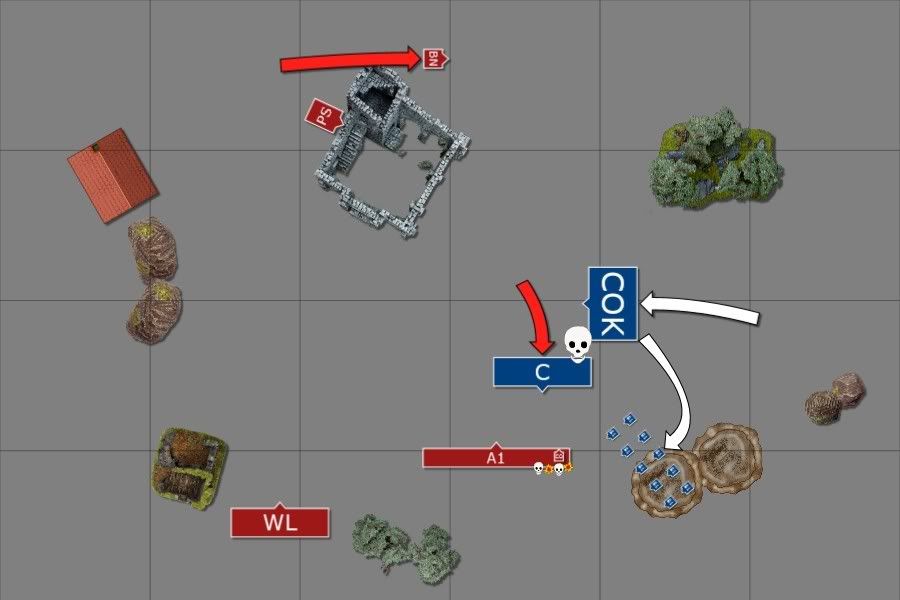
:: High Elves Turn 1 ::
I advanced cautiously with my flyers, setting up lots of flexible moves depending on his turn 1. The rest stayed put, apart from the Horde archers who moved to within 24" of the Corsairs. Olannon joined them.
Magic is 6v4 and I throw it all at Vaul's. I get a miserable total of 16 (after the added bonus!) which he dispels with his 4D6.
Shooting kills 5 repeater crossbows and a black guard.
 :: Dark Elves Turn 1 ::
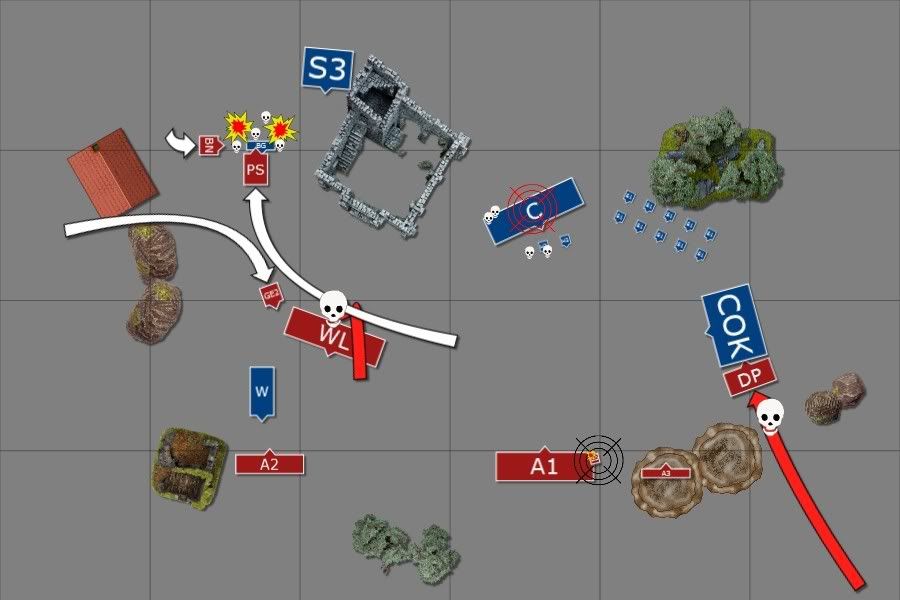
My opponent replies with a very defensive tactic, which again surprises me. His Hydra is the only thing moving up, which does so to threaten my weak flank. This suits me perfectly as I immediately decide to smash his Western flank and hope I can stall the Knights for long enough to turn around and help the centre before it's too late.
Magic is 8v7. He starts with a 2D6 miasma on the Dragon, which I let through. The result is -1M, nothing major. He then casts Withering on 6D6, getting IF! The result is -2T but the miscast sees him lose 2 levels - along with Withering and Mindrazor! Talk about luck...
His shooting then decides to throw caution to the wind and everything (50 crossbow shots) now open up on the Dragon which is T4, its rider T1. After some amazing rolls the result is that Saerith has taken a single wound while the Dragon (which, by the way, is desperately in need of a name!) saves everything: me making 6 or 7 4+ saves!
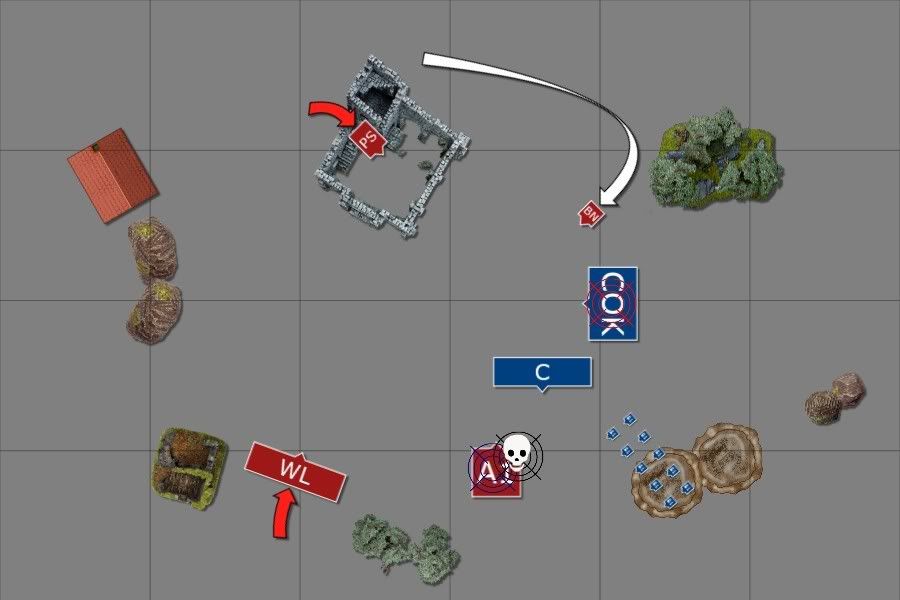
 :: High Elves Turn 2 ::
I now bring my flank-attack moves into play: Naenor and Saerith moves up aggressively, making sure to threaten the Hydra and the Black Guard. The idea is to force him to give up one of them to a combined charge, leaving the other defenseless. The Lions move up, too, eager to take up a flanking position should he threaten my middle. They also have a good arc to the Hydra, which I block with an Eagle. I don't want to fully commit them yet as aggressive moves on his part could see my middle threatened very quickly. The second Eagle blocks his Harpies, effectively somewhat blocking his Corsairs in, while the last stays put, waiting for future use.
Magic is 7v7 and I simply dispel Withering. Shooting kills off his Crossbowmen and another Black Guard.
 :: Dark Elves Turn 2 ::
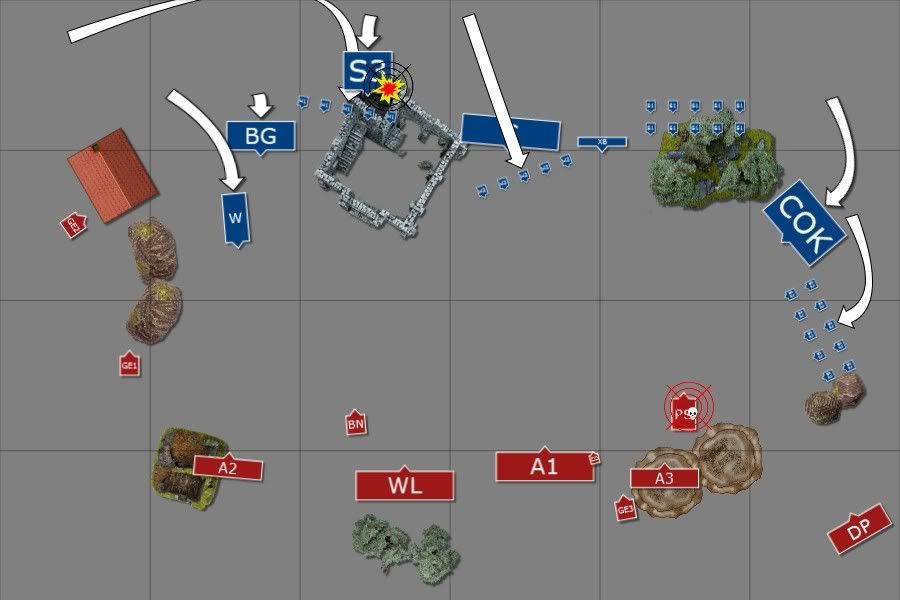
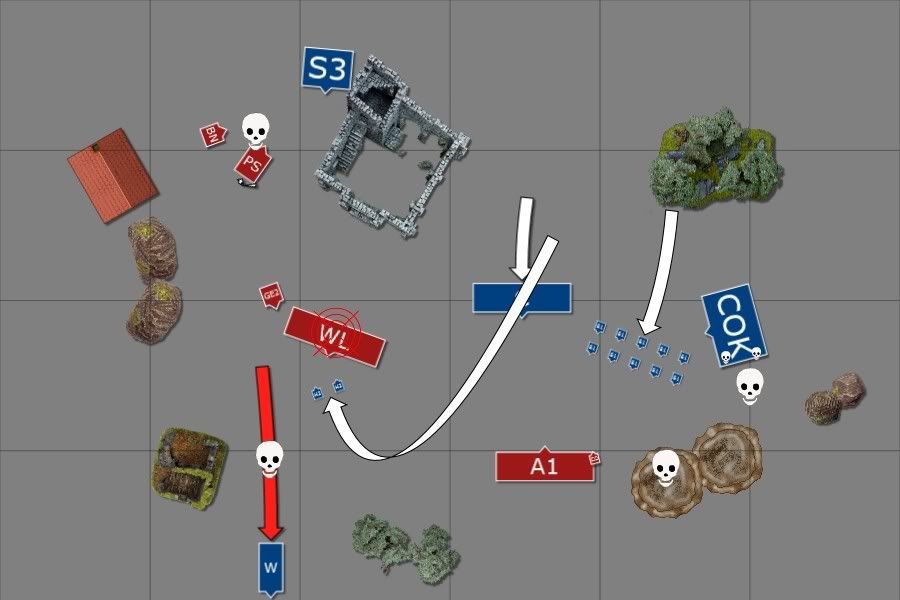
Hydra charges the blocking Eagle. His blocked Harpies charge my hill archers, who stand and shoot to bring down a couple. This allows his corsairs to charge the Eagle. The Harpies are very far away and don't run too far, which means that even if the Corsairs kill the bird they won't advance more than a few inches. The other Harpies fly to block off my Lions from the Hydra's flank.
Magic is 10v7. He starts off with a 5D6 boosted Miasma on the White Lions, which I let through, the result being -3. He then tries a boosted Pit but I dispel it.
Shooting kills a handful of Archers, my Dragon Princes' armour being solid against the Shades.
Combat sees the Eagles die badly, the Hydra overrunning a full 10", landing 2" away from the Archers!
 :: High Elves Turn 3 ::
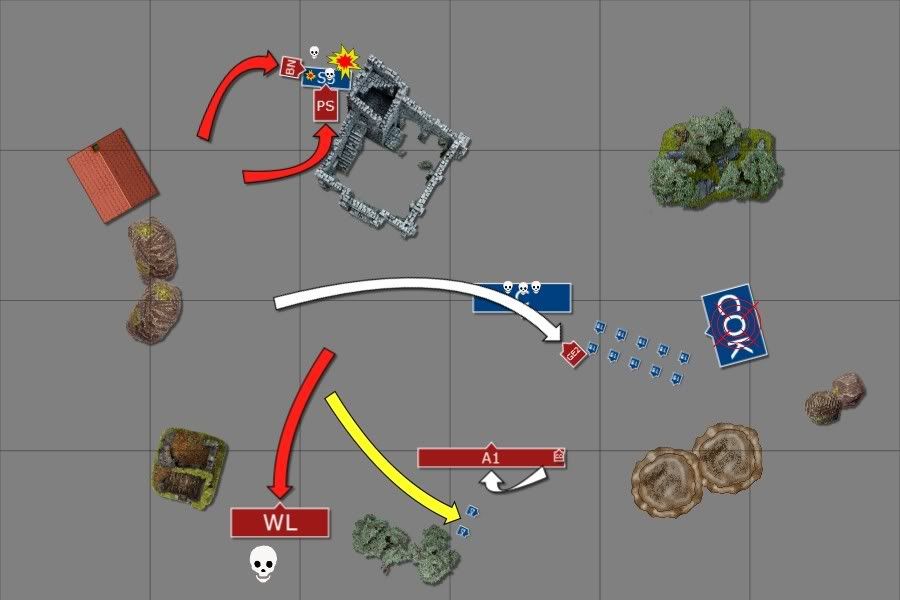
I dual-charge his Black Guard (he didn't see this coming!), the Dragon being 17" away. The Lions charge the blocking Harpies while the Dragon Princes charge the Shades: stand and shoot killing 1.
Magic is 6v6 and I spend it all at Vaul's Unmaking, removing the Corsairs' Frenzy Banner. I imagine that without this, and with a couple more turns of shooting, my archer anvil can hold firm against them, provided that they don't get any support.
Shooting sees the 13 desperate Archers fail to wound the Hydra. The rest combine to kill a couple of Harpies and Corsairs.
Combat - my flyers do what they do best and only a couple of Black Guard are left alive. At one point here we had a few interesting dice-rolls: he wounded Saerith twice, leaving me with a 4+ triple-save. I failed the first 2 on BOTH my dice, making that last roll dramatic as I'd already lost a wound. Luckily, I saved both, leading me to breath a sigh of relief!
The Dragon Princes kill all but 1 of the Shades and lose none in return. They overrun into the Cold One Knights, effectively tarpitting them for a turn. The Lions easily kill the blockers and reform to face the Hydra.
 :: Dark Elves Turn 3 ::
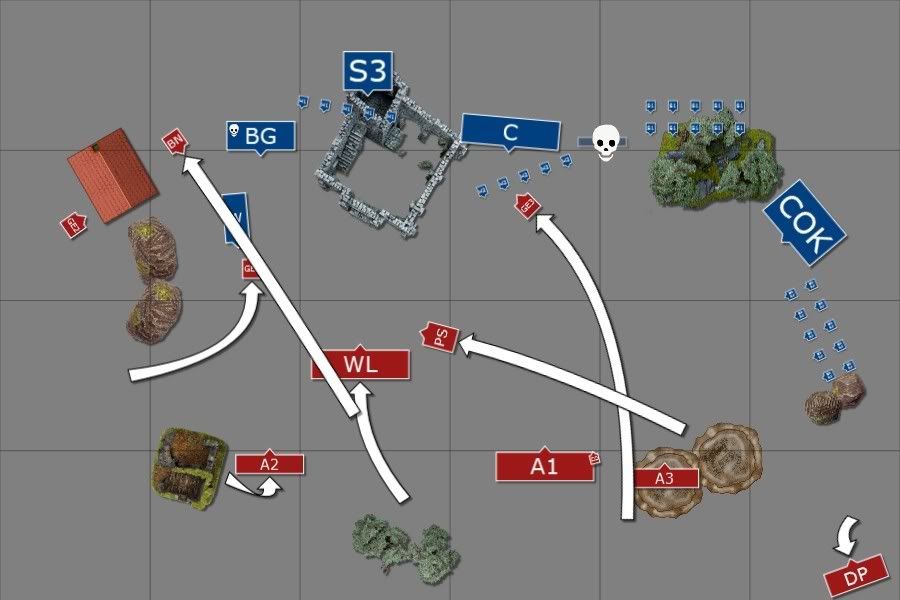
Hydra charges the Archers, the last 2 Harpies move to block off my White Lions.
Magic is 5v6 and the result is -3I on the Lions. His shooting kills my small unit of Archers on the hill.
Combat sees my Dragon Princes kill his champion (who made way to make use of the Whip) and wound his BSB once. In return, they're all killed, unfortunately, so he doesn't have to pursue or anything. Anyways, removing the champion was vital, as was wounding the BSB. The very dangerous hammer now looks a lot more like... Dragonfood? The last Black Guard go down and I reform to face his mage's bunker.
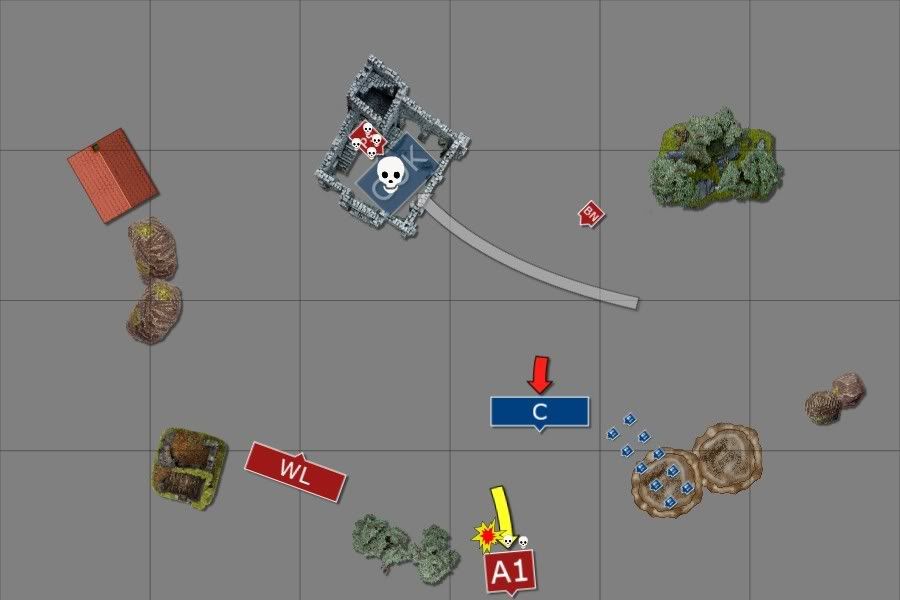
 :: High Elves Turn 4 ::
Both flyers charge the bunker. The Lions charge the Harpies, who flee as the Hydra got a very good overrun move. I decide to redirect and I get a good roll - catching the Hydra. Can 30 White Lions with a flaming banner do what 18 with a movement banner could not?
My last Eagle moves to block off his corsairs, denying a charge on my big archers.
Magic is 4v3 and I remove the Cold One Knight's +1A banner, fearing it more than ASF. Shooting kills a few corsairs.
In combat I kill a lot of Spearelves but he holds due to steadfast (he had like 6-7 models left). The Lions chop-chop the Hydra, dealing no less than 9 wounds to it! I reform to face the centre.
 :: Dark Elves Turn 4 ::
Corsairs charge blocking Eagle. Magic is 1v2 and thus I dispel what little he has. Shooting kills off 6 Archers.
Combat - Eagle dies, his Spears die. Naenor runs down his Supreme Sorceress while Saerith reforms to face the centre.
 :: High Elves Turn 5 ::
Saerith charges the Cold One Knights (who are 16" away) and roll a 2, 2 and 1 for a failed charge! The White Lions, being 13" away from the Corsairs, try their luck but fall 1" short. The Archers then decide to free reform, but fail their leadership test. Instead I simply reform them to have maximum ranks.
Magic is 7v4. I start off with a 5D6 Vaul's which removes the Knights' ASF banner. I then cast Shield on the Archers on 2D6, getting 2 6's and killing off Olannon.
 :: Dark Elves Turn 5 ::
He smells a last chance of victory: the Corsairs charge the Archers and lose a couple to Stand and Shoot. His Knights then charge the Archers and I flee, being 7" away from the edge I properly roll a 6. Adding insult to injury, the Corsairs fail to catch me! The Knights redirect into Saerith, and I choose to hold. He makes the roll and passes ALL 11 difficult terrain tests.
Shooting kills a couple of more Archers but I'm not really concerned at this point...
I challenge and he refuses, his BSB thus ending up in his rear rank. Saerith starts off by killing 4 Knights on his own. I didn't activate Loec here but in hindsight I probably should have to make sure those Knights go down. It doesn't matter if he gets killed as the entire model is worth the VP's and the Dragon gets to attack regardless of whether he's killed. The Knights combine to put 4(!) wounds on the Star Dragon. In return, it kills ALL remaining 6 Knights, leaving the BSB alone. He needs snake eyes to hold, and as he does not he auto-dies since he has a banner and all.
The last turns weren't too interesting: I combo-charged and killed his Corsairs, my Archers rallied. His Shades were the only ones surviving the battle.
:: Victory Points ::
He lost everything apart from one unit of Shades. I lost 3 Great Eagles, 13 Archers, 10 Archers, 5 Dragon Princes. In addition, I had his general, BSB, 4banners (corsairs, cold one's, black guard, spearelves) while he had a single banner (the 13 archers).
A massacre to the High Elves!
:: Evaluation ::
Well - the Archer core worked very well here. Mainly is was their ability to stay back and actually do something useful while doing so (as opposed to Spears) that proved to be effective. Also, having the large Archer unit is comforting as it'll put out a huge amount of firepower, relative to fighting T3 5+ save opponents, while also being strong enough to hold most mediocre combat blocks on its own.
My opponent had a really poor start: not only did he lose his 2 most important Dragon counters to a T1 miscast, but his shooting also failed to hurt me the one time in the game when my toughness was lowered. Shadow can be a brutal mistress as I've experienced myself, and this was one of the worst starts he could've had, shy of just losing the mage directly (which I probably would have).
Throughout the game I felt that my units were being stretched as far as they could. I always needed everything to do its job perfectly to avoid my army being too scattered and unable to support the various elements. Despite the Hydra going down fairly fast to the Chracian hunters, it did make a mess of my otherwise perfect battle lineup as I had to devote a 500 point unit, which covered the centre of the board perfectly, to make sure it couldn't run wild with my anvil. The units did manage to do just this though, the Dragon Princes performing their intended flank-guard duty with excellence while my flyer-tag-team did their thing.
Vaul's unmaking was crucial in this game and I really believe that with a single level 2 mage there is no better lore for this army. So many of the spells from High Magic is useful, Vaul's with its value of 12+ to cast being the icing on the cake. Removing 3 banners gave me a lot of tactical flexibility (no way I could've held the Star Dragon against his charge if he'd had both +1A and ASF) and eventually gave me a massacre as opposed to what (probably) would've been a normal win.
The way I imagine this army will play and the way I played it this game ensured me that I really believe the all-archer core is the superior setup.
Hope you enjoyed, C&C welcome

