Surprise! I got a game against Rusty today! Eager to try out my new list, Rusty agreed to use a LOT of proxies. I asked him to give me a relatively hard list, bar tailoring, while not bringing the worst of the worst. He complied and I got to face what I consider one of the worst matchups: Daemons of Chaos.
The battle was long and hard-fought, which made for a lot of interesting events. Want to find out how it all unfolded? Read on!
:: Caledorian Pride ::
My dragonlist:
Prince Saerith on Star Dragon - Vambraces of Defense, Great Weapon, Armour of Caledor, Talisman of Loec :: 622
Noble Naenor BSB on Great Eagle - Heavy Armour, Shield, Great Weapon, Dragonhelm, Dawnstone, Potion of Foolhardiness :: 214
Noble Cael on Great Eagle - Dragon Armour, Shield, Helm of Fortune, The Other Trickster's Shard, Great Weapon :: 191
High Mage Curu Olannon - Level 2, Annulian Crystal, Dragonbane Gem :: 180
Characters Total ::1208
32 Spears, Full Command and Flamebanner :: 323
31 Spears, Full Command :: 304
Core Total :: 627
23 White Lions, Full Command and Banner of Swiftness, Skeinsliver :: 415
5 Dragon Princes :: 150
Special Total: 565
2 Great Eagles :: 100
Rare Total :: 100
Army total :: 2500
His list:
Keeper of Secrets, level 4, various upgrades, Siren Song
Tzeentch Herald, loremaster (death), flying, -2LD banner
2x Slaanesh Heralds (no songs though, he wanted to be nice (!)
2x40 Daemonettes with full command
7 Fiends of Slaanesh
1 Fiend of Slaanesh
:: Pre-battle thoughts & deployment::
Magic: I got Flames and Vaul's, swapping the latter for Shield. He got 3,4,5,6 for Keeper.
He brought exactly what I wanted to face for my first game: a relatively hard list, but not the worst around. The lack of flamers, potent magic-potential and 2 missing Siren Songs was just about perfect for a first game. His LD-bombability had a lot of potential and he was very fast. This time however, I had the speed to counter him with! I won roll-off for sides and chose to refuse a flank. My plan was as follows: Use the relatively tight Eastern flank to refuse him everything at once. Let the Lions handle the Western flank and use superior mobility to dictate the fights.
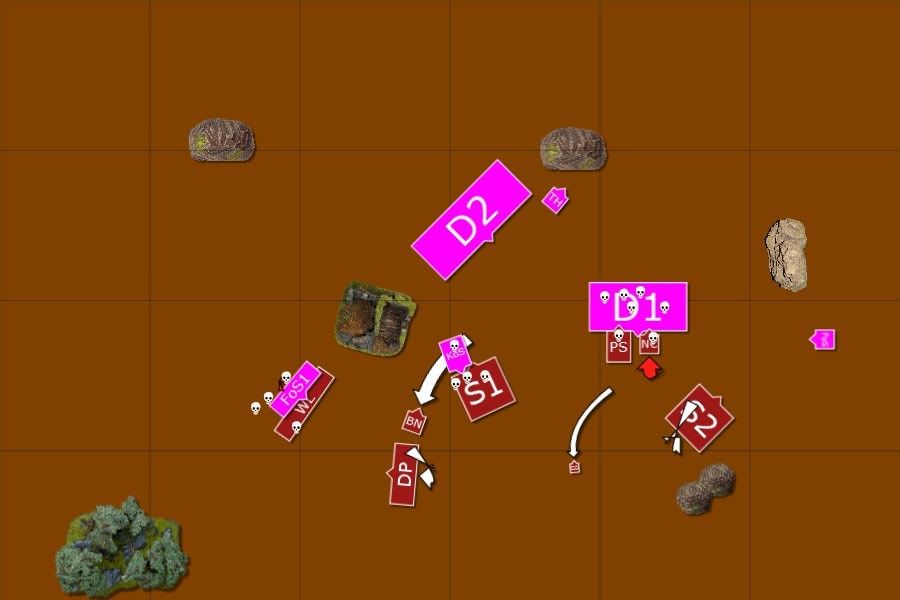
This worked out wonderfully as deployment went exactly as I'd have hoped:
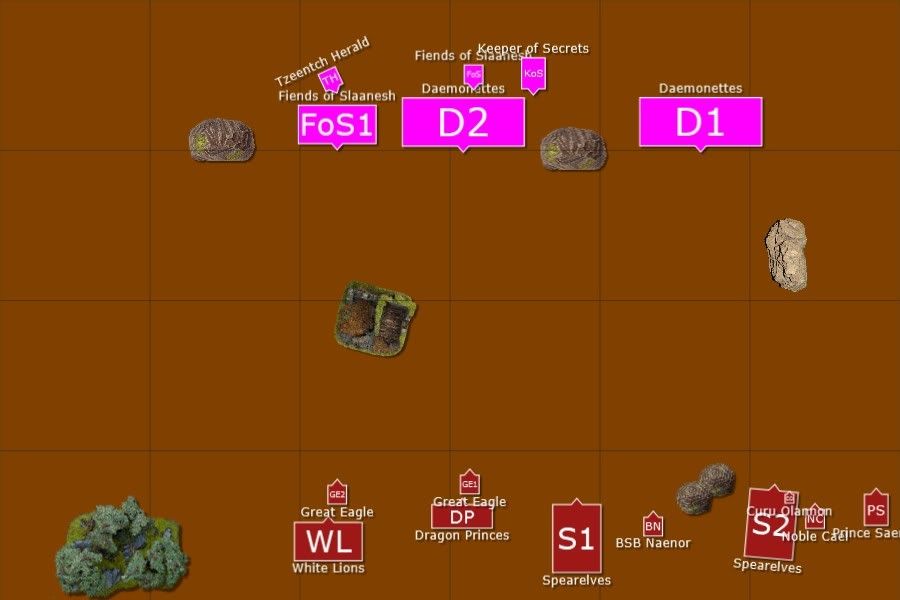
He had +1 to start due to finishing deployment first, however Skeinsliver made up for this. Regardless, I rolled a '5' and he a '2' so I went first.
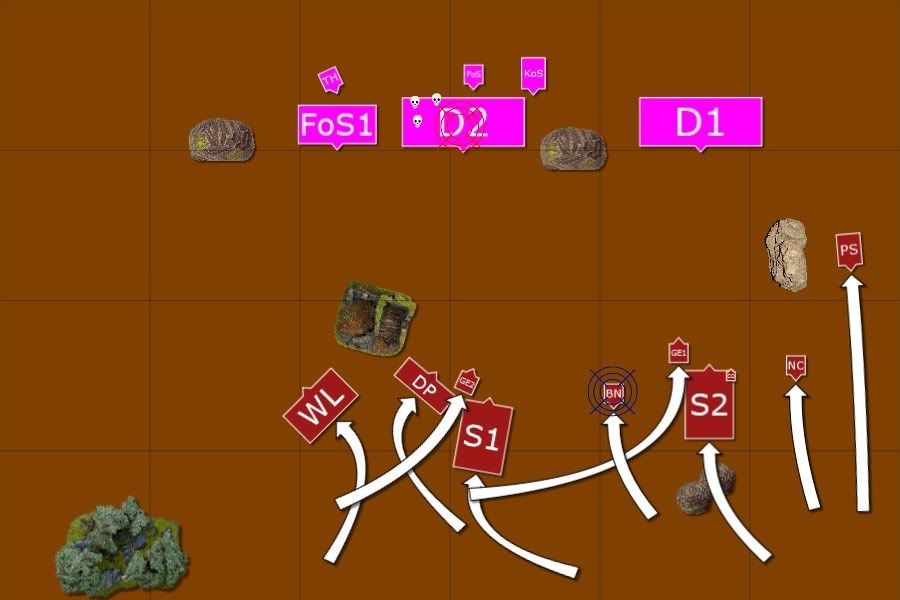
:: High Elves Turn 1 ::
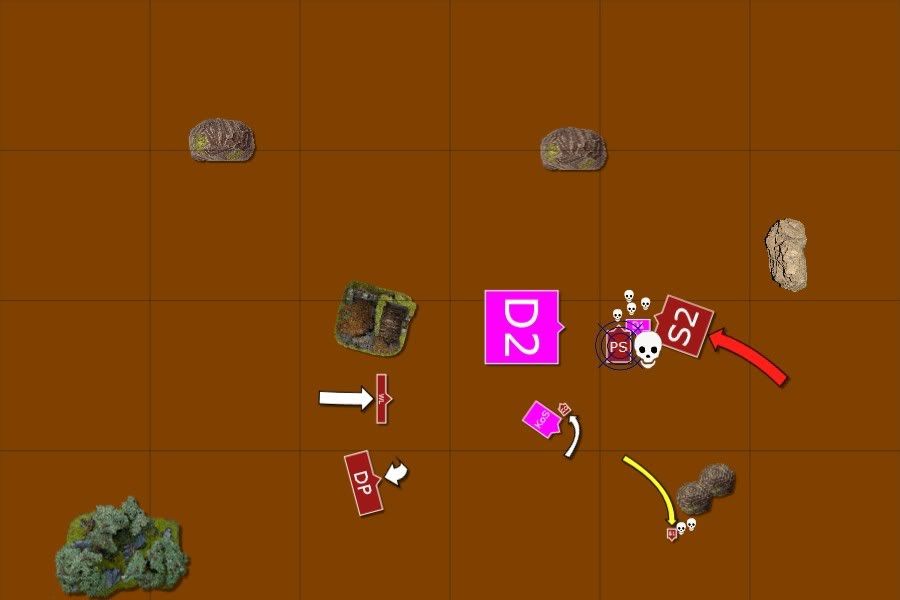
I followed through on my initial plan, happy to get first turn. I was a little unsure of what to do with the Dragon Princes as I was afraid the centre would get a little crammed for them. I decided to move them up. The Spears also advanced, my Great Eagles protecting everything barring my flyers from Siren Song. My Flyers countered this by turning 180 degrees around, making it impossible for him to Song them.
Magic starts off beautifully with 11v6. I start off with Flames on 6D6 which he fails to dispel. Some poor rolls and lucky saves on his part (don't Daemon players just have a talent for rolling 5+??) saw only 8 Daemonettes from his central block die (the average is ~14). I followed up with Shield on my Noble, fearing his Slicing Shards and finished with Drain. Not too shabby for a level 2!
Shooting is non-existant and my first turn is complete in what must be a new record (I think I spent less than 10 minutes - very rare for an opening turn from me). I'm confident in my position and opportunities as the deployment, movement and terrain have virtually left his usual superior movement useless. Granted, he can reach me fast but he can't dance around me.
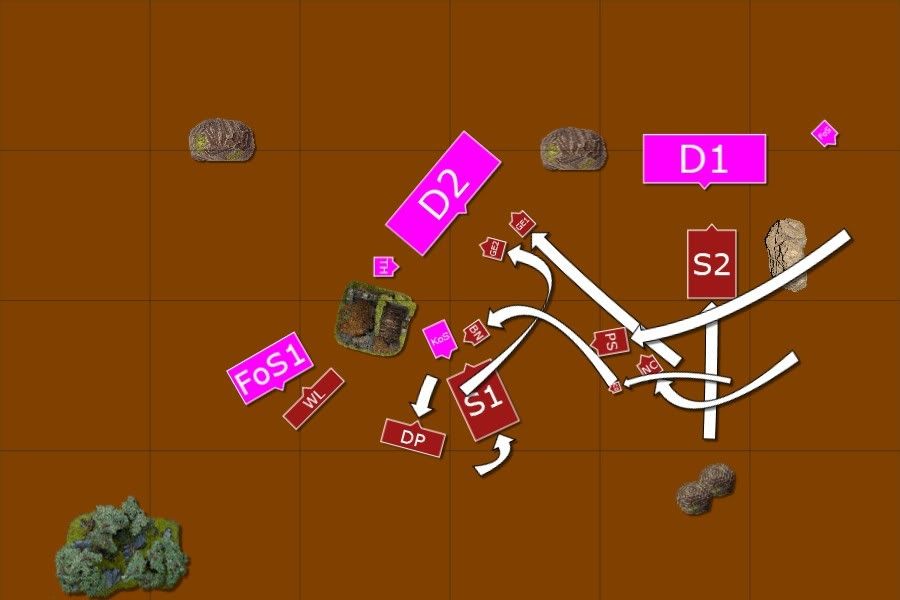
 :: Daemons Turn 1 ::
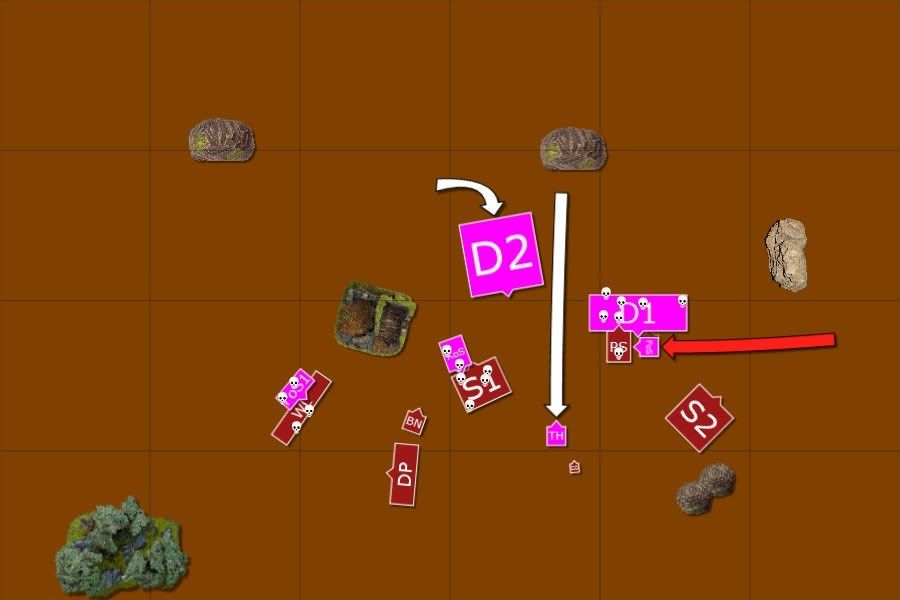
His center Daemonettes move to let his Keeper through. This puts them at an awkward angle as his units can quickly become crammed. The other Daemonettes move up cautiously. The lone fiend takes a rearguard move to threaten Saerith and the Star Dragon, primarily to force a march leadership test.
His big unit of Fiends marches right into my Lions' face, which suits me just fine. I assume this grind will go on for some time and as long as he doesn't try anything fancy I'm better off. The Keeper moves up very aggressively, threatening my Dragon Princes. I immediately start thinking about how I can box him in and create a favourable combat - if he goes down in Turn 2 or 3, I have a very good shot at winning this game.
Magic ensues and it's a 9v6 phase. He starts off dispelling Flames on 3D6 from Keeper, which works out. He then tries Slicing Shards on my Great Eagle on 6D6, which I dispel.
 :: High Elves Turn 2 ::
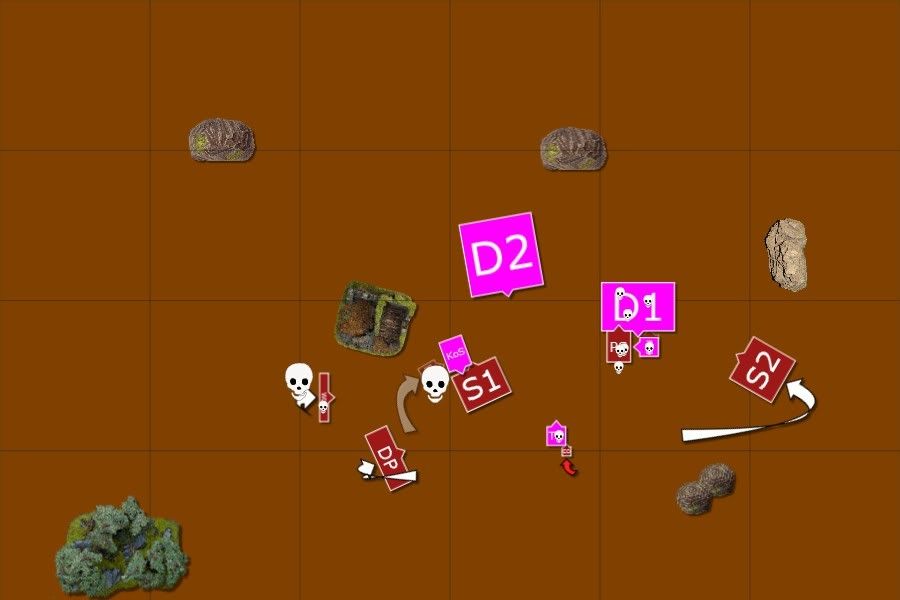
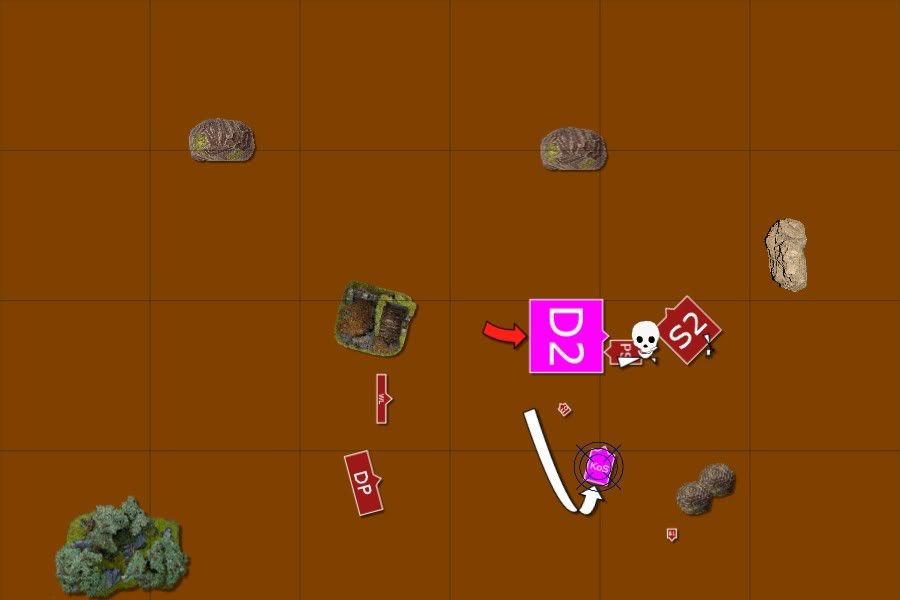
I contemplate how I can lock down the Keeper. I want to get Saerith and the Star Dragon in his flank, having my Spears in his front. This will give me lots of static combat resolution to help with the killing power. To do this, I need to hold off both Daemonette units for a turn. Now, the diagram is a little unclear here since there's a lot of fine angling necessary to accomplish this: I end up having to use 2 Eagles to block his Western block while my Spears have to try their luck against his other block.
To box in the Keeper, I send Naenor to his flank. This way, he cannot pivot (as he'll be within 1" of me). I finish up by sending my Spears to his front. His only legal move is charging the spears. I champion-challenge, hold on steadfast, then charge in Saerith next turn. At least that's the plan. A problem with Saerith is that he is so far away that I cannot get clear of the Daemonettes' overrun arc. I could've probably angled the Spears to avoid this but I didn't consider them breaking in one turn at all (huge mistake on my part). Cael moves to be able to help whoever needs it.
My White Lions reform to 12+11, maximizing the frontage against the Fiends. I also want to delay this fight as long as possible and would rather have all the extra attacks than +1 to combat resolution.
Magic gives us 8v6. I start off with Flames on his central block on 5D6, which is dispelled with everything he's got. I then make a huge mistake in not casting Shield of Saphery on my Spears (I'm used to them being steadfast) but opt for Drain instead. I contemplated this a lot, but not long enough apparantly.
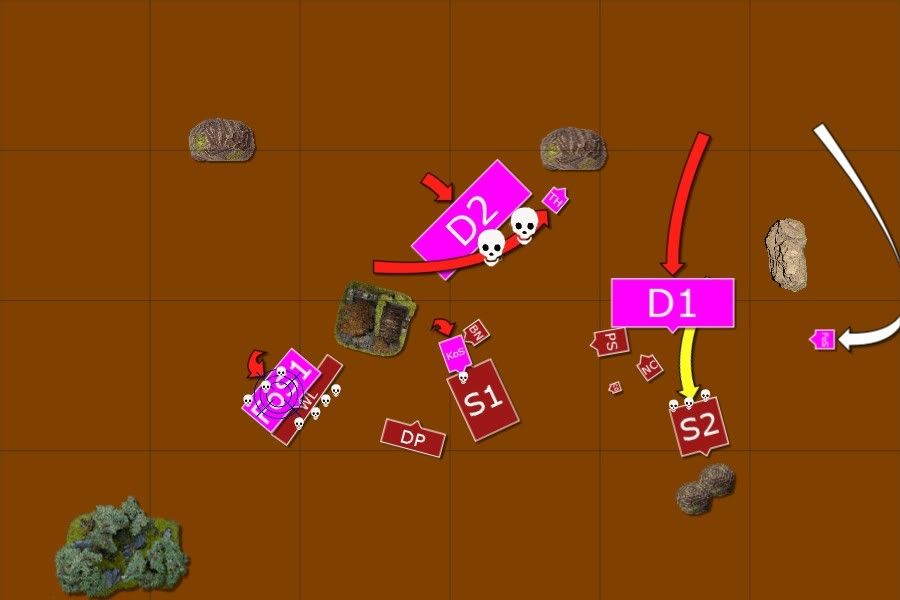
 :: Daemons Turn 2 ::
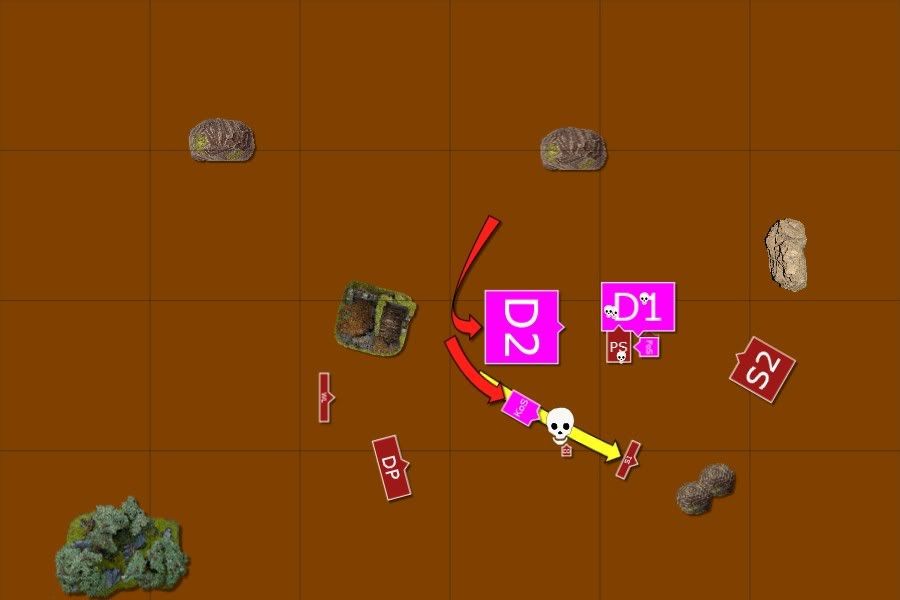
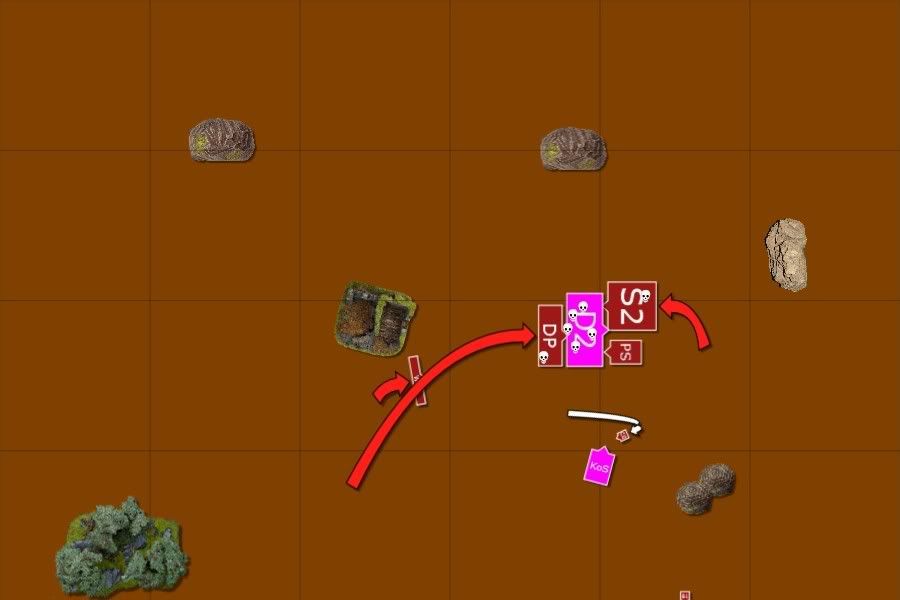
It's his Turn 2 and I can't believe all that's happened already! He makes the obvious charges: however one thing I hadn't considered was the Tzeentch Herald: he has vision to my Eagles! This is a problem because there is no room for Saerith and the Star Dragon between Naenor and the Spearelves. Hence, if he kills both Eagles and overruns into Naenor, not only is my BSB toast but I cannot fight the Keeper with my Star Dragon!
Again, the diagram isn't fully representative. Angle problems means the Daemonettes can only charge the Western Eagle. This means the Tzeentch Herald must charge the Eastern Eagle to get this super-overrun to work.
So: Daemonettes charge an Eagle, the Herald the other. I however notice that the impassable terrain is so close that overruns will not work out the way he wanted it to: the Herald must either overrun first, in which case he stops in front of the rock, blocking the Daemonettes' path further. The other option is that he doesn't overrun at all, in which case he's directly in their way! I caught a lucky break here (it was intentional placing the Eastern Eagle so close to impassable terrain but I hadn't thought of this particular situation).
The other Daemonettes charge my Spearelves. The Keeper charges my Spearelves. The Fiends charge my Lions. This game was about to be exciting!
Magic gives us 8v5 and he throws 5D6 at Doom and Darkness on Saerith, but I dispel on double 6's. This leaves him with 3D6 with which he gives his Fiends ASF + re-roll to hit against my Lions.
Combat: Eagles both die terribly. The overrun goes as described though and he can't lock Naenor! The Spearelves' champion challenges his Keeper and is killed, however I hold on steadfast due to Naenor (Saerith was LD8 due to his Herald's banner). The other Spearelves however fare much worse: I'm used to Spears being steadfast. However, only having 30 means you 'only' have 6 ranks. Against his 4, he needed to kill 7+ to bring me down beneath 5 ranks. Remember what I said about not casting Shield of Saphery? Yes, he kills 10 Spearelves, meaning I'm no longer steadfast. I break and run far, however while he doesn't catch them, he overruns into Saerith.
And things looked so good after my Turn 1...
The Lion combat however is another story: I roll a spectacular amount of hits and win combat, despite his magical augment. I think it's something like ~8 wounds each. He doesn't lose any to instability.
 :: High Elves Turn 3 ::
First things first: analyze. Can I get out of this problem caused by my previous mistakes (failing to angle the spears, failing to pay heed to the Tzeentch Herald, failing to cast Shield on my Spearelves) or is it too late? I decide that in order for this to work, his central daemonettes must be kept away for as long as possible. The Lions seem ok against the Fiends so at least that flank's secured. I need to bring down the Daemonettes around Saerith though.
The result is as follows: Cael charges in alongside Saerith to benefit from Trickster's Shard the most. My Spears rally and I make another mistake by trying to do too much with them: I barely see the Daemonette's front and I cover a lot of room if his lone Fiends wants to be smart. The Dragon Princes reform to help the Lions if need be. Middle is too crammed for them anyway.
There's a slight error in the diagram here: Olannon moved out of the unit in the previous turn (not wanting to fight Daemonettes). I've visualized it here instead.
Magic is 7v4 and I make a mistake: I spend 4D6 at Flames, which barely goes through. He dispels with all and I cast Drain on my remaining 3D6. I should've spent 5D6 at Flames instead, which would've made his decisions very hard and probably would've seen my Flames go through. Also, I should've cast Shield on Cael.
Combat: Star Dragon loses one wound, Keeper loses one wound. Cael wounds his Herald, losing a wound in return, and Saerith along with his mount kill a heap of Daemonettes. My Lions do a great job against his Fiends and they lose badly, however rolling a '2' and a '1' for his Break test means no-one dies to instability. My Spearelves hold, again due to Naenor. His Daemonettes lose a couple to instability. However, he passes his combat reform roll, eliminating a couple of Daemonettes on his flank, thus negating my Spears' Line of Sight to them. Brilliant on his part, really poor of me not to notice this.
 :: Daemons Turn 3 ::
His big block cannot get into combat because it's too big! The ongoing combats are closer than the diagram suggests (it's roughly 6" from my Spears' edge to the Star Dragon). He free reforms his Daemonettes for a charge on my Spears, hoping to overrun into the Star Dragon in his turn 4 (he breaks the Spears easily with all those Daemonette ranks). I see this coming and have a plan, if we get that far.
His Fiend charges Cael and this is a big mistake in my opinion: by doing this he gives my Spears Line of Sight again. If he cannot break me or kill Cael this will greatly help me out.
Magic is 6v6. Again, everything goes towards Doom and Darkness. Again, I dispel on 6D6.
Combat and it's exciting! Lions again win over Fiends and I'm now confident they'll be fine (I believe it's something like 5 Lions vs 1 Fiend at this point), barring very poor rolls. In the central combat Cael kills the Herald. In return, he puts 1 wound past his defenses. The Daemonettes wound the Dragon three times (he rolled an insane amount of 6's, something like 6 out of 13 hits). After all the ASF-stuff is done, the Fiend attacks Cael and puts one wound on him. I fail my 5+ re-rollable and he's dead, losing me the Other Trickster's Shard too. Saerith kills a couple but I fear for combat resolution: I elect to breath fire this round to help me out. 8 hits and 4 dead Daemonettes later, along with a powerful thunderstomp, sees me barely win combat and he holds. My Spearelves put up an amazing performance, wounding the Keeper twice! This, combined with some poor rolls on his part, ensures he loses combat by 2. Having only 2W left, it's very interesting to see what'll happen next. He rolls boxcars for his break test. However, he had previously moved his Tzeentch Herald (BSB) up very aggressively, and gets another cast. This one's a 6 and he loses no wounds!
 :: High Elves Turn 4 ::
His Keeper uses Siren Song (which he'd forgot he had in my Turn 3) to force Naenor to charge him. No matter, I would've done this regardless as he's down to 2W. I declare potion of foolhardiness as I go in.
My Dragon Princes reform to face the centre. Olannon, realizing he has a rear charge on the Tzeentch Herald, charges him (dragonbane gem and flaming attacks, mind you!). Rusty hadn't paid attention to the fact that I had a 2+ ward against flaming. This was a brilliant opportunity for me. The Spears moved wide to get a support charge for my Star Dragon in the next turn, this time ensuring no possible reform could keep them out!
Magic is 7v6 but some poor rolls sees him dispel everything.
Combat: My Lions wipe the Fiends at last and reform to face the centre. I pray for some good rolls in the other combats. I naturally start with the Dragon to get the re-rolls from Naenor, as he could very well die to the Keeper. This one's a disaster though, I roll poorly and end up losing a lot. The break test needs to be passed on 3-. I first roll 11. Then I re-roll due to Naenor. One dice comes up a 2, the other a 1! Naenor unfortunately fluffs his 4 attacks and can't even hurt the Keeper once. In return he's killed and luckily my Spears hold on LD8 steadfast. What's more, I combat reform them to being very wide. This means that for his Daemonettes to maximise, they must place themselves further East, meaning an overrun will take them into their own unit rather than the Star Dragon. My apologies for not reflecting this in the diagram! It was pretty cool seeing the spears stand something like 13 wide

Olannon performs above and beyond the call of duty - putting a wound on the bsb! He thus loses by 3 (rear + charge + wound vs BSB) and needs a 6- to survive. He rolls a 10, then he rolls a 6!
 :: Daemons Turn 4 ::
He charges his Daemonettes into my long line of Spears. Magic is 6v7 and I dispel his 6D6 attempt at Doom and Darkness. The Spears die badly but kept the Daemonettes away from Saerith. They opt to reform rather than pursue. The remaining 4 Spearelves escape the Keeper though!
The all-important combat phase: some good rolls on my part sees me win combat! The Star Dragon is now down to 2W! Lastly, Olannon manages to finish off the Tzeentch Herald!
 :: High Elves Turn 5 ::
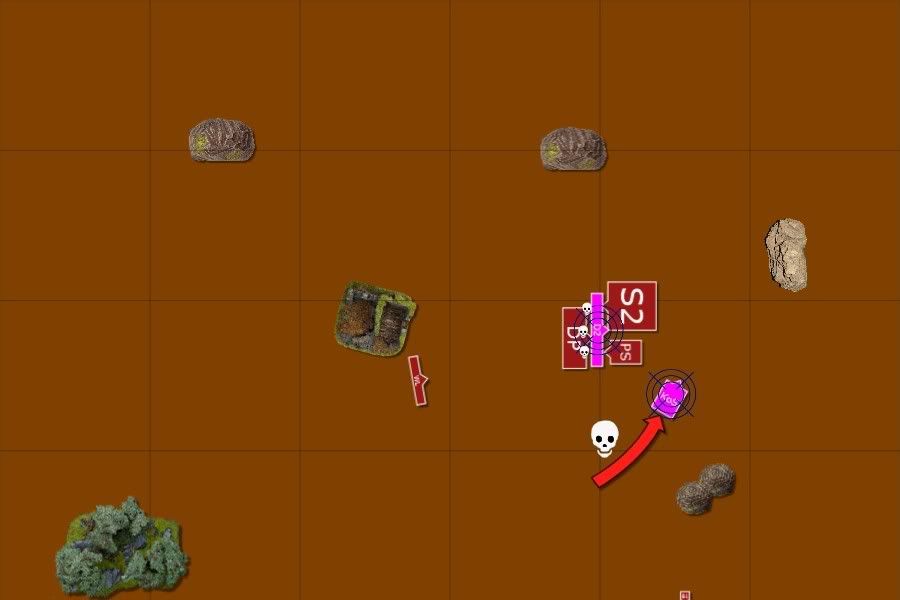
My Spearelves charge the rear of the Fiend engaged with Saerith, clipping the Daemonettes' flank as well. My Lions are somewhat cautious, as are the Dragon Princes because of the Keeper. Although he could try and get stuck in the central combat, this is blockable by Olannon and I'm afraid of losing the Lions especially. I don't dare charge the Keeper with the Dragon Princes because if he wins, he gets a free reform and with 2 turns left that means he's guaranteed to see combat. I move Olannon to the Keeper's flank.
Magic is 7v4 and my primary goal is to get shield on the Star Dragon. I thus start off with a 4D6 Flames of the Phoenix which he dispels with all his dice. The Shield goes up.
Combat: I murder lots of Daemonettes and kill the Fiend and take no wounds in return on the Dragon, many thanks to the 4+ scaly skin (Daemonettes have piercing attacks) and the Shield. He makes a really low break test however and 2 Daemonettes remain, thus denying my the opportunity to combat reform my Dragon.
 :: Daemons Turn 5 ::
His Keeper fails his march test on the roll of double 5's! He's thus forced to try and get stuck in the central combat, however he can't get very far
I breath a sigh of relief for my Lions.
His Daemonettes flank my Star Dragon. Magic is 9v7 and he gets Phantasmagoria through, since I'm very afraid of Slicing Shards on Olannon.
In combat the Daemonettes put a wound on the Star Dragon and Rusty's surprised that the thing has 7 (!) wounds! He thought it'd be dead by now! In return, I kill a lot of Daemonettes, the Spears killing the last 2 on the Eastern Flank. I win and he passes the break test. I reform the Star Dragon so he doesn't have my flank anymore and reform the Spears so they can charge past Saerith.
 :: High Elves Turn 6 ::
My White Lions are 12" away from his Daemonettes (corner-to-corner measurement) and I intend to dual-charge his rear; making a long wheel with the Lions to allow the Dragon Princes to get at least 3 models in. However, I roll a 3 and a 1 for their charge move. The Dragon Princes however make it along with the Spearelves. He's now engaged on 2 fronts. Olannon valiantly moves to block his Keeper, keeping him out of the final, most important, fight.
Magic sees me get Shield on the Star Dragon (4v2, he failed his dispel attempt).
Combat: I win big and he fails to even wound the Star Dragon! 12 Daemonettes + Herald remains.
 :: Daemons Turn 6 ::
His Keeper charges Olannon, furious with the fact that he cannot aid his lesser Daemons. Magic is 11v7, him rolling box cars. He gets both Phantasmagoria and ASF + re-roll through.
Combat. It's highly exciting as we believe that VP's are awarded separately for Monster mount and rider. He manages to wound the dragon 3 (!) times. I pass 2 of the armour saves and it's down to one last roll since I have Shield up: I do what Daemon players usually do - the dice turns up a 5! I kill his Herald and a few Daemonettes and after his Break test, only 2 remain (though these 2 netted him a LOT of victory points). The Keeper obviously murdered Olannon.
 :: Victory Points ::
Counting up the victory points, he had 1123 remaining and I had 1494 remaining. A close look at the rules showed that points are not awarded separately for monster mount and rider, thus the final dramatic 5+ ward save roll wasn't so important after all. Had it not been the case and had the Dragon died, the points would've been amazingly 1123 remaining to 1124 remaining (we both killed the other BSB and had 1 banner each so bonus points were equal).
I was ahead by 371 points. A
victory to the High Elves!
:: Evaluation ::
Wow, what a game! It was indeed very intense and had a lot of epic moments and tactical challenges. I believe both Rusty and I had some glaring mistakes (his Tzeentch Herald, my Spears failing to angle his Daemonettes) but also some brilliant moves (combat reforms spring to mind).
I pointed out most of these during the report, so here I'll just evaluate the army as a whole:
- Magic defense was solid. The Annulian really helped me keep him at bay throughout most of the game. Due to Drain magic casts he usually chucked 5-6 dice at Doom and Darkness, never once getting IF. This could've changed a lot as inspiring presence is 18" and with his Banner of -2LD most of my army would've taken Fear and Break tests on LD5 base.
- The Star Dragon was solid. I cannot believe this machine! I mean I've read about people using it and stuff but it basically just got stuck in combat Turn 2, started massacring Daemons and didn't look back! The fact that it survived a whooping 9 (!) combat rounds is amazing.
- The dual-spears were game-breaking. I do not believe this army plays well without both units: they are very essential. Basically you want solid and reliable blocks around which your heavy hitters can work. This game proved just how valuable this can be: my Spears did their job excellent and Archers would've probably lost me the game.
- The Lions did really well on the flank. The first combat I had some really lucky rolls and I believe this sealed the Fiends' fate. I imagine this is a role I'll frequently be giving them: sticking them on a flank buys me a lot of time to work my flyers around his more juicy units together with the spears. To this end, Stubborn is crucial.
- The Dragon Princes might've seemed useless for major parts of the game. However their movement provoked the Keeper; kept my Western flank safe and eventually helped me (almost!) wipe out the Daemonettes. I believe they did their job well enough. I'm glad I remembered not to charge them at the Keeper when I had the chance: giving him a free reform was too risky and he definitely would've brought the central combat to a halt. With him having 2W left it's very unlikely that I would've managed to kill him.
- Eagles and Noble flyers: I really like how these play! Cael dying shows a weakness I must be aware of: against any RnF the Nobles are vulnerable unless I can break them relatively fast. Their mobility is amazing and really lets me do what I like the most: create opportunities for yourself and lock your opponent.
I hope you liked my first game with the list and this report! It's more thorough than the last ones have been. This is deliberately done because I wanted to show you my train of thought throughout the game since this is a very new type of list for me. Also, I believe this game had a lot more tactical depth than the last handful of games I've played.
Special thanks to Rusty for bringing just the kind of list I asked for
I imagine that next time around, he won't make it that easy for me!
C&C welcome
