Fair play, we are both trying to analyze rather than generalize.
In this case though, the list is a lot closer to mine and Seredain's than a Star Dragon list is to a shooting list. As said, I've played lists even closer to this one, comparison is unavoidable.
Combo-charging is tricky because you need to roll high enough to get both units in, especially problematic with infantry (lacking Swiftstride). One solution is to advance your infantry unit into enemy charge range then throw the cav in next round. This requires either elites, who can trade, or Spears who can hold on. Problem with the latter is that many units now can sweep 27 Spears away in a single round. Even if they don't, theSpears bleed combat res next round, which makes life hard for the cav.
The other obvious way is to outflank with the cav, then turn inwards in combination with the infantry. Seredain's Helm Hammer is great at this because it can be thrown forward, take charges on the chin, win and reform. Much more difficult with lighter cavalry to achieve the position.
I ran 2 eagles and 5 Reavers until my last event, when I dropped one eagle. There are lots of demands for their services. Certainly very useful but what you are able to do with them varies a lot depending on enemy specifics. They are though a useful addition to a grinding capacity rather than an alternative to it. Say you are facing something horrendous like triple Bloodletter Horde. Sure you can re-direct one. Maybe you can shoot up the second. But unless you have combat units that can take such things on, your toolbox is incomplete and your army will likely be overloaded.
I'm not saying that's the whole story, it clearly isn't. But those are some of the main mechanics of the High Magic MMU combined arms list. Clearly Peter is finding something extra. I'd love to know what it is.
The Cavalry Prince - List Design, Tactics, Battle Reports
Moderators: The Heralds, The Loremasters
-
SpellArcher
- Green Istari
- Posts: 13847
- Joined: Sat Sep 13, 2008 11:26 am
- Location: Otherworld
Re: The Cavalry Prince - List Design, Tactics, Battle Reports
A New Blog (Orcs and Goblins)
http://ulthuan.net/forum/viewtopic.php?f=5&t=70550
Cavalry Prince Reloaded
http://ulthuan.net/forum/viewtopic.php?f=80&t=70001
http://ulthuan.net/forum/viewtopic.php?f=5&t=70550
Cavalry Prince Reloaded
http://ulthuan.net/forum/viewtopic.php?f=80&t=70001

Re: The Cavalry Prince - List Design, Tactics, Battle Reports
I never said he was lucky, just that I have no idea how he wins. Therefore I would be interested to know, because his list doesn't appear to be that good. I'm not doubting he's successful and a very good general.
"I say the Eatainii were cheating - again." -Aicanor
"Eatainian jerks…" -Headshot
"It was a little ungentlemanly." -Aicanor (on the Eatainii)
"What is it with Eataini being blamed for everything?" -Aicanor
"Eatainian jerks…" -Headshot
"It was a little ungentlemanly." -Aicanor (on the Eatainii)
"What is it with Eataini being blamed for everything?" -Aicanor
Re: The Cavalry Prince - List Design, Tactics, Battle Reports
I had that same sentiment, and I've found that Williamson's play style is similar to Seradian's. I am failing at trying to say that use the same strategy (point denial - combined arms combat) but different tactics to do it.Elithmar of Lothern wrote:I never said he was lucky, just that I have no idea how he wins. Therefore I would be interested to know, because his list doesn't appear to be that good. I'm not doubting he's successful and a very good general.
I can't really support that claim at the moment, but that is the impression I got from reading about both lists.
Re: The Cavalry Prince - List Design, Tactics, Battle Reports
Hey Seredain... Getting back into Warhammer after a heavy 6 year hiatus, wanted to try out high elves and REALLY like your helm bus.
One of those im gonna play alot prefer Waywatcher heavy army with a highborn that got bow of loren and arcane bodkins, wanted to hear how you think you might deal with this in your all-comers list.
Ps: Incase you don't know, waywatchers are scouts with bs5, longbows and killing blow arrows(Bad for armour units). The bow of loren gives shooting attacks equal to attack stat (4 on Highborn with bs6) and arcane bodkin makes those 4 attacks ignore armour saves. The highborn are a Waywatcher himself too.

Re: The Cavalry Prince - List Design, Tactics, Battle Reports
Hey Mech,Mech87 wrote:Hey Seredain... Getting back into Warhammer after a heavy 6 year hiatus, wanted to try out high elves and REALLY like your helm bus.
One of those im gonna play alot prefer Waywatcher heavy army with a highborn that got bow of loren and arcane bodkins, wanted to hear how you think you might deal with this in your all-comers list.
Ps: Incase you don't know, waywatchers are scouts with bs5, longbows and killing blow arrows(Bad for armour units). The bow of loren gives shooting attacks equal to attack stat (4 on Highborn with bs6) and arcane bodkin makes those 4 attacks ignore armour saves. The highborn are a Waywatcher himself too.
Well, the first rule is to make sure that all the woods near your deployment zone are within 12" of one of your deployments. The last thing you want is to have waywatchers KB'ing you at close range. Fast units like dragon princes can, however, typically clear the waywatchers out of nearby woods pretty quickly (I've also used eagles leaping out from behind friendly units). You might suffer a volley or two, but KB will only really hurt if you let them keeping shooting over longer periods of time.
There's less you can do about the arcane bodkins - that character is an anti-armour specialist - but he's only got 4 shots and, with all the shooting you have (in my list at least), you can deploy in such a way as to punish units which bring the woody lord within range (longbows match and RBTs exceed the range of woodies - a very good thing). Fury of Khaine, Arrow Attraction and Vaul's are also all bad news for this setup. Finally, though, use your horses and get your combat units in combat. Knightly armour doesn't work against the arcane bodkins (but it does fine against the rest of the bows), but horsey speed does. Most wood elf lists that I've seen (and I'll admit now that it isn't many - SpellArcher knows the woodies far better than I), involves at least one expensive and static element (an archer horde, for example). This is typically where the Level 4 caster is. Get your knights pointed at that level 4's unit and get aggressive: force your opponent to scramble to save his magic phase before you kill it. Shield of Saphery and terrain are your friends when it comes to protecting your advance.
Bottom line? 4 arcane bodkins are bad news, but you're packing lots of bad news for a woody list. Deploy with the terrain in mind and you should be able to handle them just fine.
The Cavalry Prince - List Design, Tactics, Battle Reports
http://www.ulthuan.net/forum/viewtopic.php?f=76&t=33584
http://www.ulthuan.net/forum/viewtopic.php?f=76&t=33584
Re: The Cavalry Prince - List Design, Tactics, Battle Reports
Game 2 – A Lesson in Manoeuvres and Magic, with Mallas
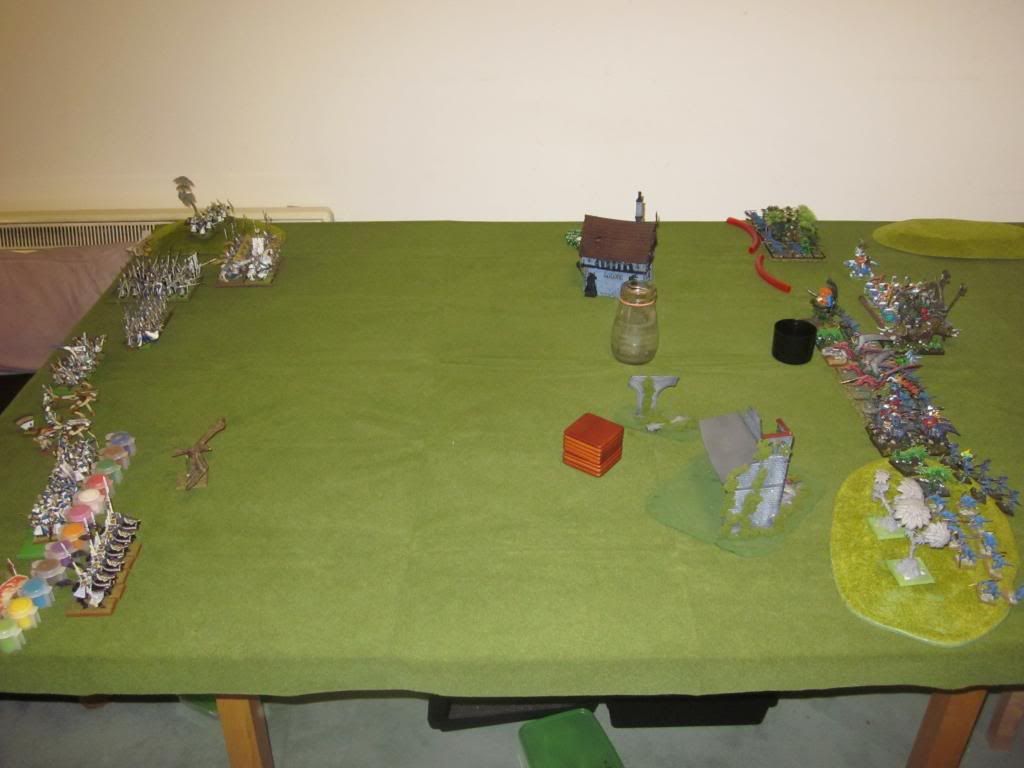
Deployment
A long break from gaming after my meeting with Jurassic Park, but I had a tournament to attend with SpellArcher, so I needed to get some practice in to make sure I wasn't too rusty. Mallas was the obvious choice because he's good and likes beer.
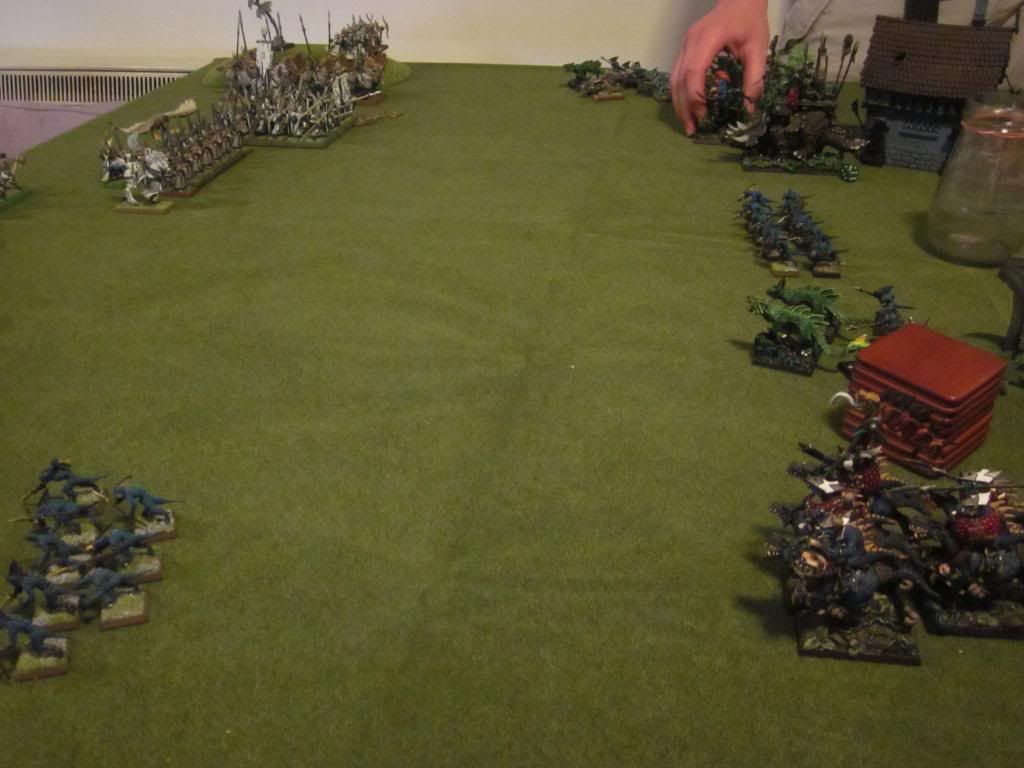
This time I was up against a much more conventional lizzie list, incorporating an invincible solo life-slann with all the trimmings, Engine steg (scroll), 20 HW+S saurus (in case he hits watchtower), a big horde of krox+skinks, a unit of flaming cavalry, some sallies, some terradons and a few skirmishers and scouts. Scenario dice tumbled and, interestingly for me, we rolled up Battle for the Pass.
This was the first time I'd seen this scenario first-hand and, since I had the good ranged missile fire, I felt extremely confident. If I deployed on the backline, Mall would have to trudge for miles before he got anywhere near me and, with High Magic rocking the 28 archer + 2 repeater shooting phase, I could traumatise him badly coming in and break through the remnants on Turn 4 or so with a combo-charge. It wasn’t exactly a sophisticated plan, but it felt like a good one.
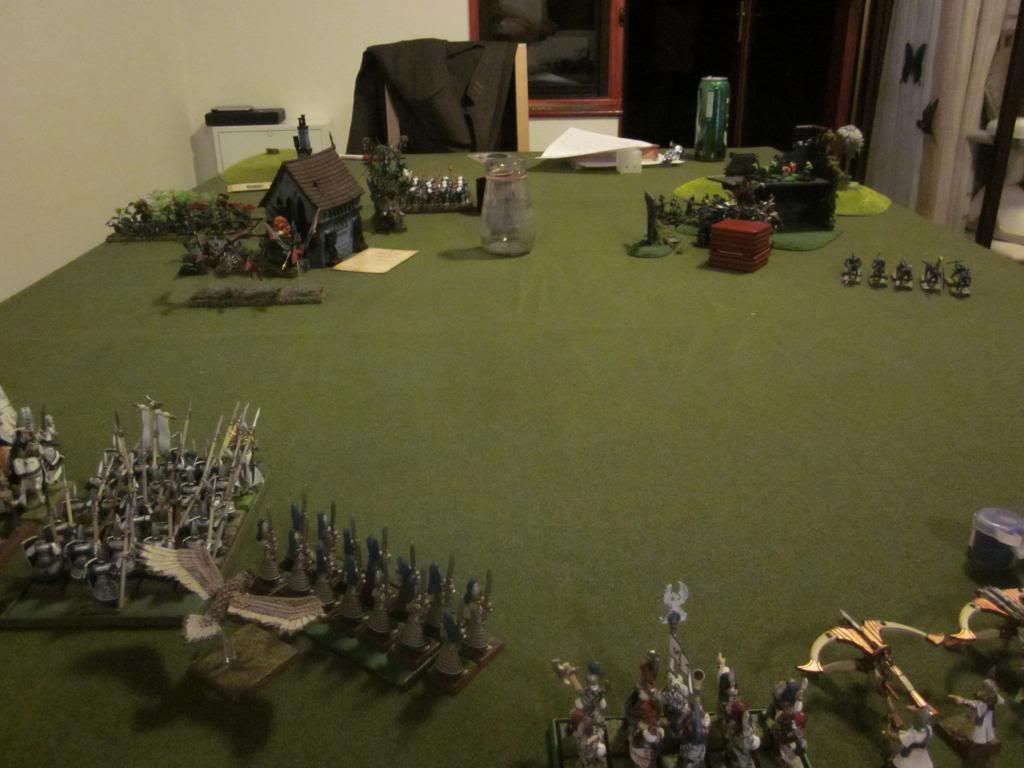
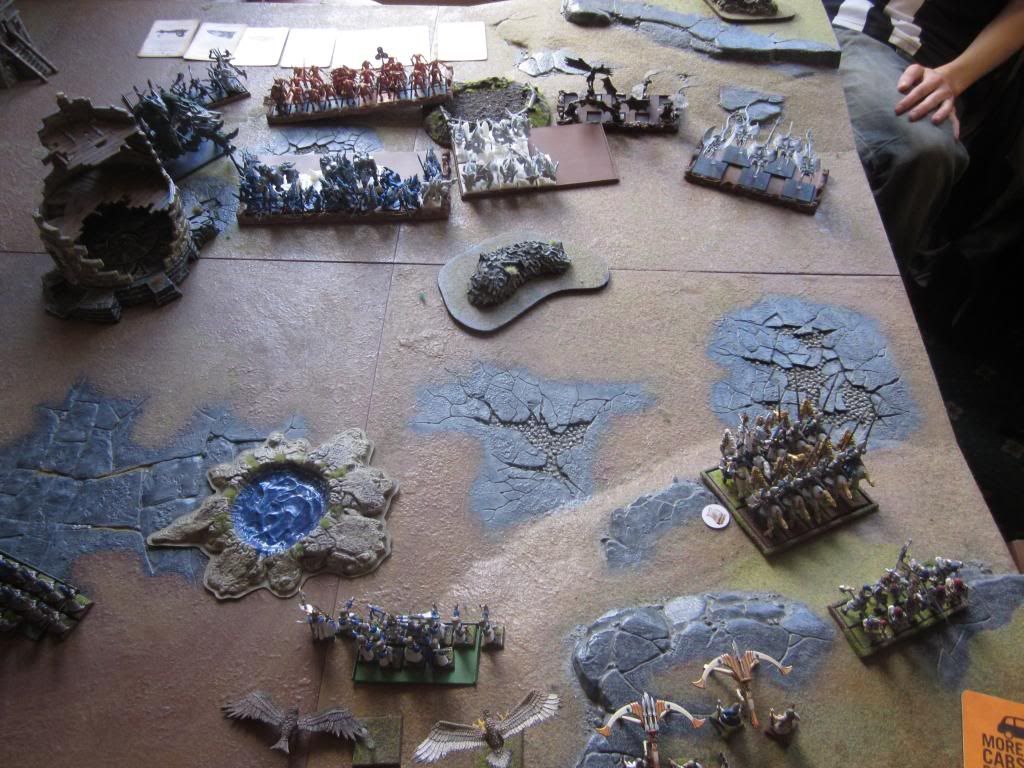
There were some problems, however. Deployment was not as enjoyable as it usually was, chiefly in this case because I tried to cram my typically open deployment (defensive refused flank, aggressive weighted flank, central shooting) into an area far too small to properly accommodate it. On the far right, then, I deployed the line of 18 archers (should have ranked them up to save space, really), then the repeaters in the centre and the dragon princes on the far right, forming an exclusion zone to their front. On the left flank, meanwhile, I placed the spears, swords and silver helms, with the white lions filling the central gap between my heavy wing and the repeaters.
I liked the set-up but it was clear from the start that deployment hadn’t gone my way: Mal had placed terrain (especially buildings) very intelligently in the centre of the board (especially the right looking from my view), to provide cover for his advance and to limit the free movement of my knights should I choose to attack. Psychologically, this was enough to swing me toward the more open left-hand side and, with plenty of other chaff drops coming from the lizards, Mal quickly had enough information to deploy a solid battle line of his steg, infantry and slann, backed up by a sally pack, directly opposite my own line. Skirmishers, salamanders and the cavalry deployed in and around the buildings opposite my shooters on the right. This made their lives difficult – the closest targets were also the hardest to hit.
The Game – early turns
Mal got the first turn and advanced aggressively with his main line – he need to close quickly to avoid getting shot. The terradons made a move into the open toward my shooters (unwise), but the skirmishers behind them settled into the hard cover facing my right flank. Magic didn’t much matter at this range, but even so I happily dispelled Throne of Vines and then Flesh to Stone on the terradons.
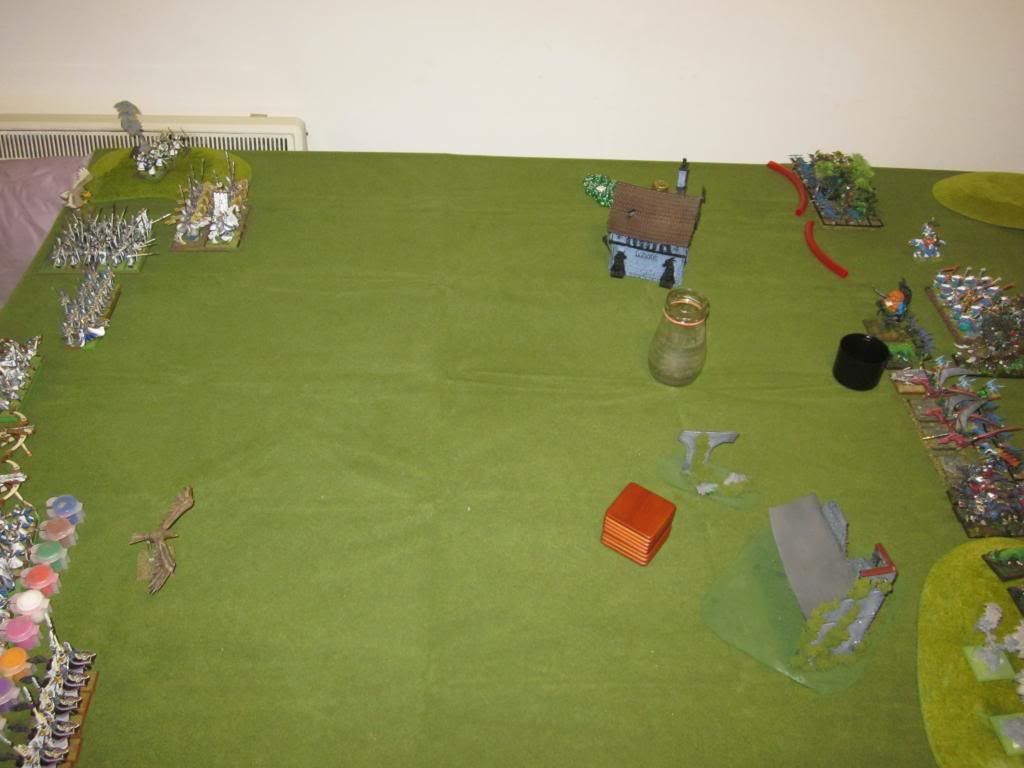
All fine but, with my repeaters deployed far back at ground level and in the middle of my army it quickly became obvious that, if I wanted to have sight of a decent number of targets for the machines, my flanking cavalry units would have to hold back for as long as possible, wait for the shooting to take effect and only then charge in. My best units were therefore in a quandary: Mal had limited their ability to breakout by predicting their location and placing his best defensive units immediately across from them, and I had done so further by giving preference to the shooting phase which, if it was to achieve anything, necessarily restricted their movement. This was a far cry from the usual plan of concerted early-game ranged and flank-attacks: here I would have to trust my shooting and magic to lay down a withering fire, enough to cripple the enemy infantry before I charged directly into their front to overwhelm them.
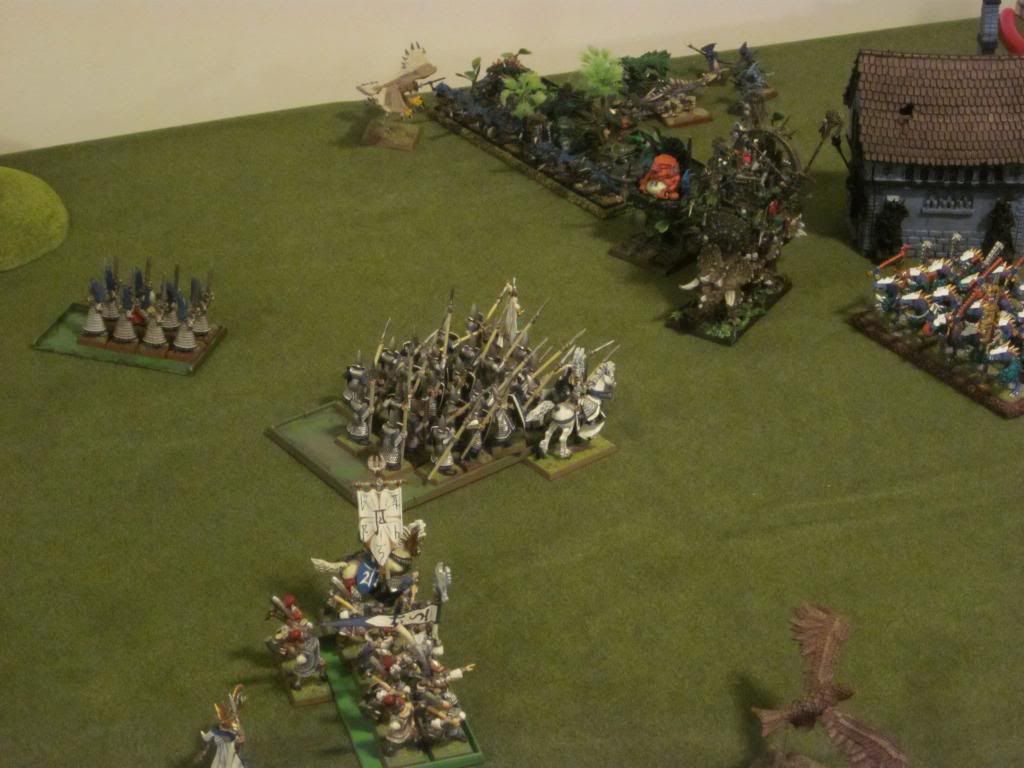
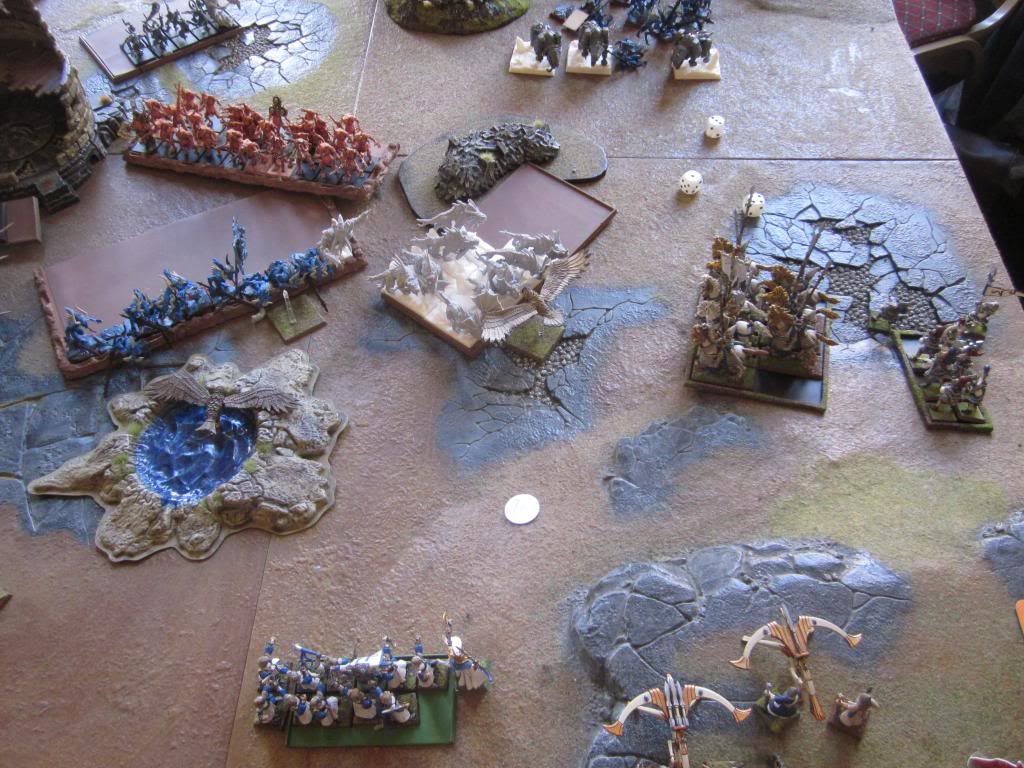
Note how the elven units are positioned to maintain an arc of fire for the repeater bolt throwers and (right, out of shot) archers.
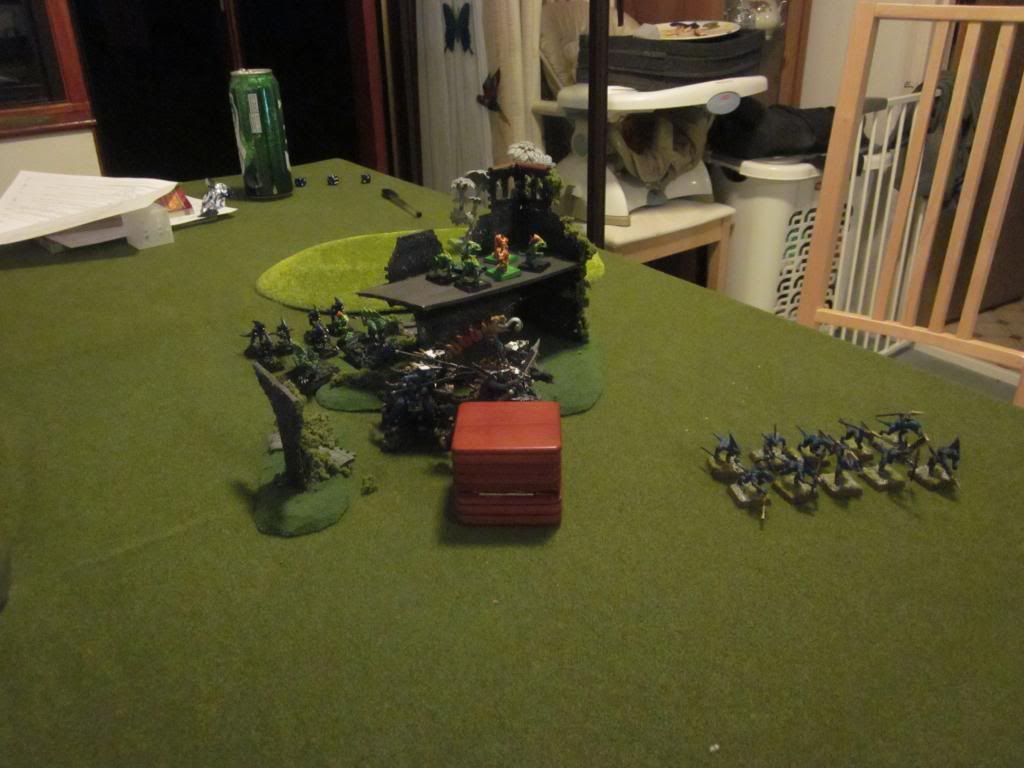
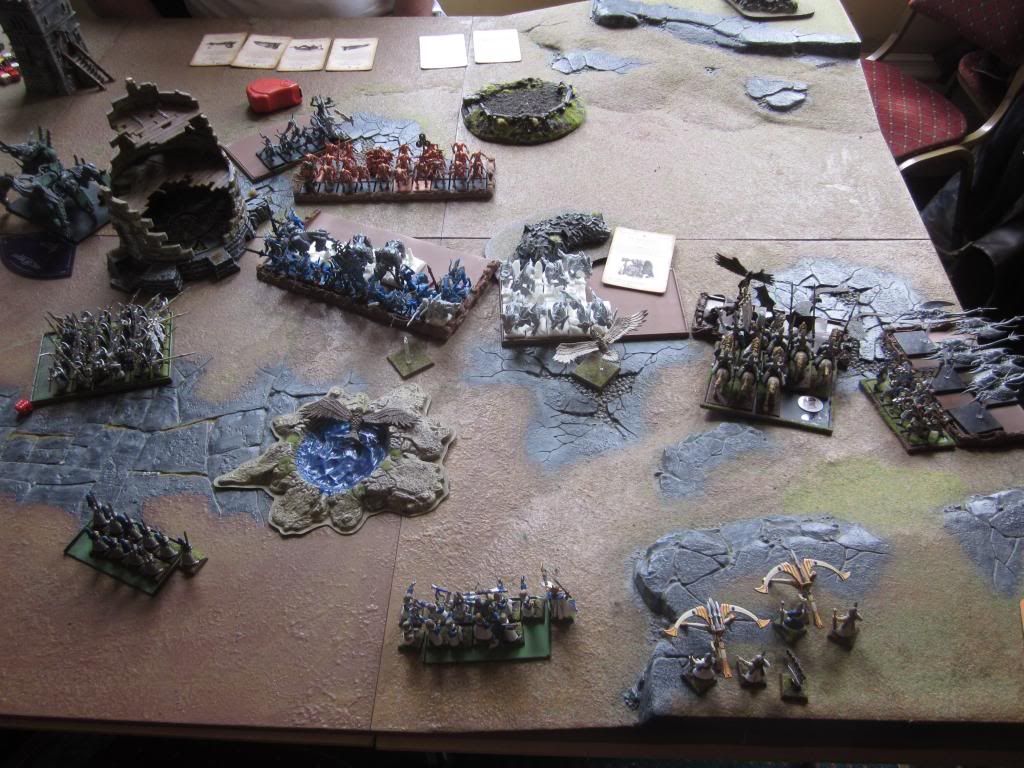
Lizardman shooting units take shelter in buildings while a sacrificial (but intact!) unit of skinks covers the cold ones' advance and helps to pin the High Elf right flank.
Unfortunately, in the first few turns, my shooting and magic collectively achieved precisely nothing, not even a dead unit of terradons or a handful of dead cohort skinks. To-hit and to-wound rolls failed, and my spell rolls did likewise. Increasingly, as Mal’s infantry marched inexorably toward me, the threat from a powerful High Elf counter-charge began to die as my ranged power proved toothless.
Mid-Game
By contrast, the lizard magic phase was relentless, and Mal was now packing a new slann build to take the best advantage. This guy was ethereal, had a 2+ ward save against ranged attacks, fencer’s blades for WS10, Standard of Discipline for re-rollable ld 10 and wound-giving Life magic. Wheeling about by himself, he was extremely manoeuvreable and basically impossible to kill outside of (magical) close combat. Finally, he was also (inevitably) packing Focus of Rumination, giving him the free power dice for each spells cast and, with big rolls of 10+ coming up in most phases, from Turn 3 (when he moved in range for Dwellers on my helms), I began to crack under the pressure. The scroll went in short order, and then I began to sacrifice units to hold up the enemy advance to buy my own magic (and shooting) more time to come good: one big round on the saurus warriors or cohort would buy me the chance to charge and break out of the vice. The silver helms were flung out (Seredain shifting to the spears) and held up the lizards nicely (albeit expensively), but it was all wasted points. I didn’t get any aggressive spells cast (Mal scrolled the only one that did – a Flames on the skinks), and my arrows did nothing! Unthreatened and therefore free to do as they pleased, one of Mal’s salamander packs closed in on my left flank and started burning away the swordmasters.
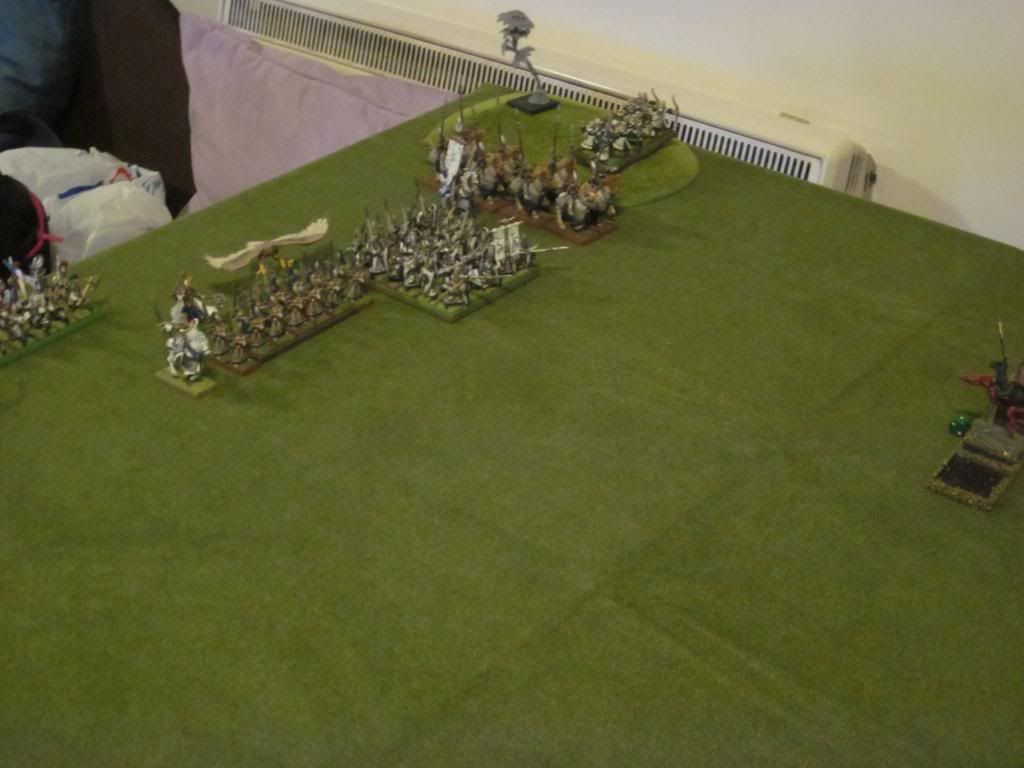
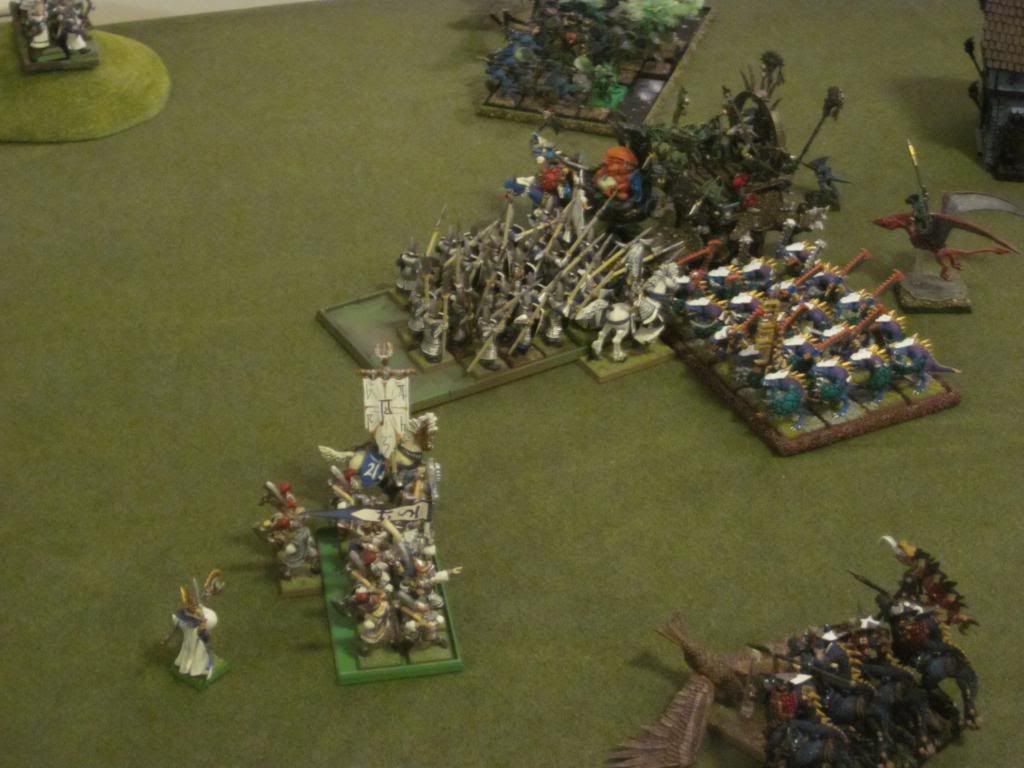
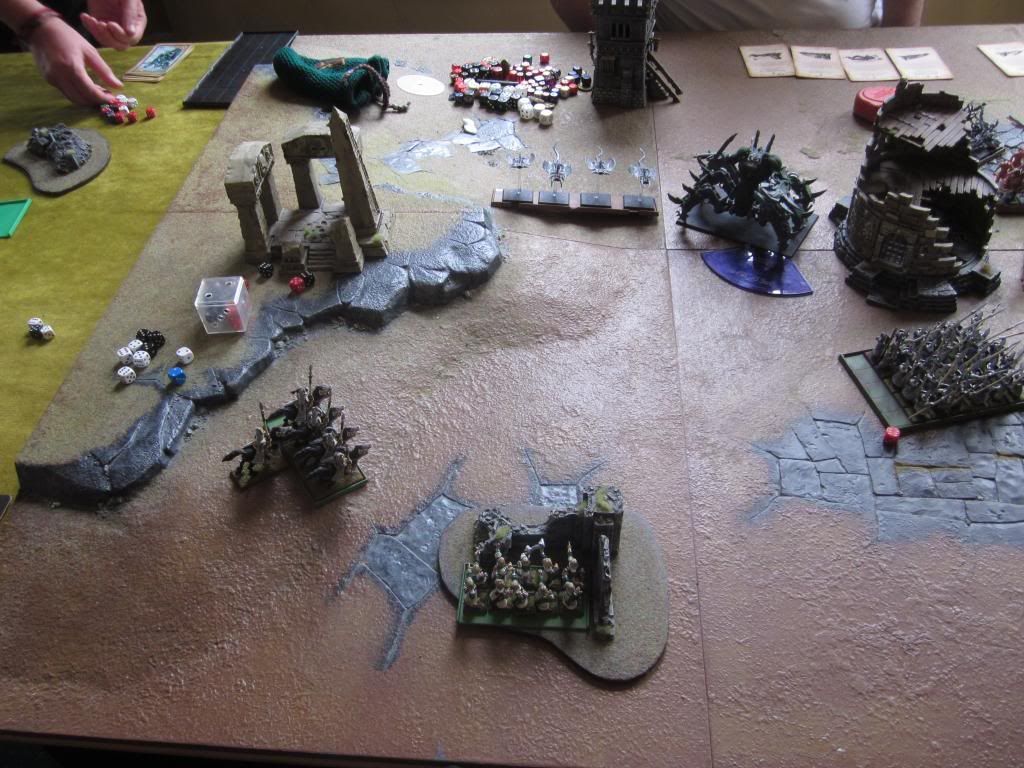
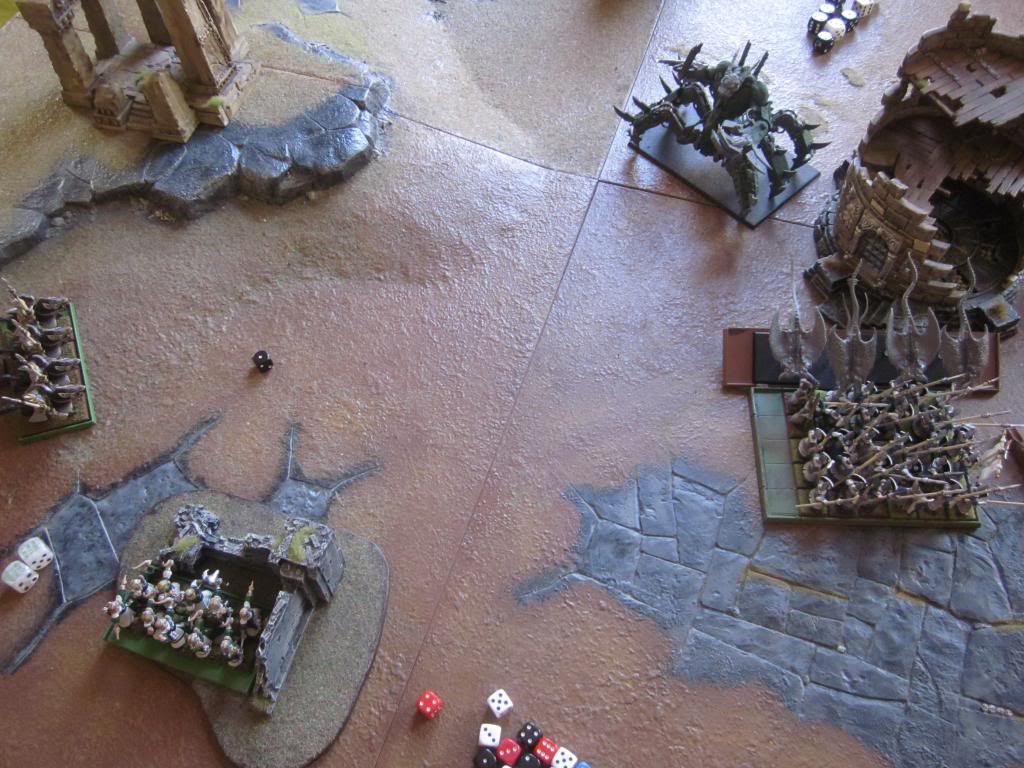
The helm hammer separates in the face of the dwellers below.
An expensive sacrifice.
With no defences left and no prospects of making a combined charge across the long gap which still stood between my line and the lizards, my characters were now stranded in the face of Dwellers Below. One successful cast and I’d lose half my spears and maybe my prince. With my swordmasters already down to near half-strength, it would surely be curtains.
It was clear by this stage of the game that the new plan wasn’t working. So what were the problems with it?
1. I was relying far too much on my shooting and magic to do the damage. If I rolled poorly (and admittedly I did), there was no plan B and, without time to manoeuvre, I had no choice but to try and hold front-on against a life-buffed line of lizards head on. This is exactly what Mal had planned for with his excellent deployment.
2. By sitting back I was giving my most aggressive units, the cavalry, far less killing time than they would normally enjoy, reducing the amount of damage I did in the early turns and getting less out of the points spent;
3. As my shooting and magic failed to do anything in the early turns, instead of changing tack and getting aggressive, I started to drip-feed units in (eagles, the vanilla silver helms) to simply buy my shooting more time. 2 eagles is plenty, but it's up to you to take advantage of the time they buy you. The rest of my army just stood still while they sacrificed themselves and, with shooting and magic doing nothing, the points (and opportunities) were wasted.
4. Because my cavalry were no longer acting as an aggressive weapon, Mal was able to advance his skirmishers, especially the sallies, into range and start burning my infantry. As a result they (particularly the swordmasters), would suffer much more damage than usual before they saw combat.
5. By sitting back I was also giving Mallas all the time in the world to repeatedly chuck Dwellers at my exposed characters. He got great dice here, but even with average dice he was always going to have effective magic phases, and I had shown up woefully unprepared to face them.
Panic Stations
This last source of strain would prove the most important. Even though I'd originally intended to join the characters together again just before combat, I cracked under the pressure and kept them split up rather than risk another Dwellers. However, although keeping your heroes separate is a good way of avoiding a spell like this, it does nothing to combat the spell directly (of course) and only pays off tactically if either:
a) I am able to reunite my characters by eventually charging them out against a single unit, thereby recombining their combat power when needed; or
b) I am confident that they can successfully defend a charge alone with whichever unit is guarding them.
At the time, I simply made neither of these calculations. Mallas' coolness under fire, meanwhile, compounded my dilemma. Having brought the slann in range and besieged me with Dwellers, he defended the slann perfectly by forming up a powerful combination of units in support (with Life buffs): cohort, saurus and engine steg. I was much more frightened of Dwellers than I was of these units, however, so having fled my BSB into the nearby white lions I advanced my spears, led by the prince alone, to receive a charge from the steg and saurus warriors (my eagles now joining the action to stop the cohort and saurus cavalry getting involved. Hopefully, this would be enough to tempt a charge from the lizards and hide the prince from Dwellers. The BSB stayed close with the white lions to provide both the re-rolls for the prince and a powerful counter-attack against the saurus once the spears had held in combat.
Had I done even a little bit of arithmetic, however, this would have revealed itself quite plainly to be a terribly risky plan. I was bound to lose combat, as I knew, but what I didn’t appreciate at the time was that Mal needed only 11 kills to break my steadfast: perfectly possible with the units he had arrayed. If he rolled big for impact hits and thunderstomp, I would be in serious trouble. Magic again refused to help – a 3 dice cast of Shield was dispelled.
Amazingly, however, Fate gave me a chance at the last moment, and Mallas made a terrible mistake. Because his slann was only afraid of magical attacks, he declared a charge with the ancient stegadon against the half-strength swordmasters (still toting the Amulet of Light). This would, of course, mean that I wouldn’t have to worry about the spears getting stamped on and, in a fight between them and the saurus, they’d easily hold for that phase and allow the white lions to charge on in. However, truly amazingly (let’s say for the sake of my blushes that it’s because I was drunk), I fled the swordmasters to save the points (!), remaining confident that the spears would hold. Mallas duly redirected his steg into the spears alongside the invinci-slann (to tank hits) and the saurus (for the ranks). 6 impact hits and 5 or 6 wounds later (bad luck but it happens!), I still didn’t see the gravity of the position. Seredain chose to save the Talisman of Loec for the toad, and killed 3 warriors. The spears killed 2 more, for a total of 9 static res. Then saurus attacks and thunderstomps happened, another load of spears died and, in the end, I’d lost exactly the number of spears needed to break steadfast. I was now testing on re-rollable Ld 4 to stick. I duly failed, broke, was run down and gave away 581 victory points and the game.
Be careful what you wish for, lads!
With the swordmasters fleeing at half strength, the helms, spears and prince all gone and shooting and magic doing nothing, it was all over now bar the shouting. I tried to come back into it by flank-charging the slann with my lions + BSB but, even on Ld6 then 7 the cold-blooded Ld10 BSB slann wasn't going anywhere, held for 3 turns and the game ended with a serious defeat for the High Elves. Mal had suckered me into playing his game, and then had sucker-punched me right in the face. Ow.
What went wrong?
First off, Mallas made very few mistakes. The stegadon charge against the swordmasters was a bad idea but, in all, he pretty much played his army as it should be played. He put his scary spellcaster in range of my most expensive units, protected him with a solid-line of magic-buffed infantry, took advantage of my early inactivity to pin me in place and, like a boa, squeezed.
He had also cleverly held his skirmishing flank (my right his left), supported by his cavalry, in hard terrain opposite my shooting units and dragon princes. By keeping them back like this, he kept them alive so they could provide harassment in the late game. By the time I was willing to attack with the princes to support my besieged infantry, Mal had more than enough chaff to stop the knights doing anything useful. In effect, by the time I felt forced to engage in combat (to escape Dwellers), I found my army too pinned down to counter convincingly. Instead, a portion of my army stood alone, without flank support and with collapsing shooting and magic phases, against an enemy combat line standing front-on, completely intact and well protected by defensive spells – a total nightmare.
Mallas had played a great game to get to this position but I, by contrast, had been mesmerised by the scenario (”Look at all the shooting range I've got!”), and fought a static defensive game which clearly didn't play to my army's strengths. With a tournament looming, I had received a timely lesson in the virtues of good board control and, as much as anything else, of paying attention.
A better Plan A?
My army doesn’t like its movement to be limited and Battle for the Pass is surely the most movement-limiting scenario. However, silly mistakes aside (and there were far too many), there were obviously much better ways of playing my army; partly by using what movement the board did allow me (I didn’t use any), and partly by spotting the weaknesses that the scenario had imposed on Mal’s army too.
The latter didn’t occur to me at the time but, with hindsight, it is clear that an army with lots of skirmishing units is not as well placed to run harassment operations in this scenario as it is in others. Chiefly, this is because the narrow board cramps up deployment of these otherwise-loose formations, making it much easier for an aggressive player to take his fast units, deploy them in wide formations and seek out easy overruns – killing enemy units more quickly and covering more ground. Wherever you deploy your knights, you can move them quickly to the preferred side of the board and aggressively attack this weak-point early in the game, covering the flank of the attack with eagles and (if necessary) infantry detachments while relegating your shooting to picking up the slack. Now, depending on what the enemy infantry does, you can either loop round into their rear or force a stand-off, advancing more infantry up to provide a threat from another angle, keeping the enemy blocks both under pressure and under fire (although on this scenario, shooting visibility can be a problem unless you have a hill). Meanwhile, as long as your knights are safely carving up skinks and salamanders, Dwellers is not a problem.
It’s a dice game, and things can go wrong, but it’s clear that being more proactive with your fast units, even in more cramped conditions, is a reliable way of preventing the enemy army from marching unopposed at your soft underbelly before you're ready to engage. Standing the cavalry still for the first 3 turns will force no hard choices at all on your opponent and, if your shooting fails, you’ll leave his harassment units intact for long enough to damage your most important infantry units and win him more favourable combats once his own infantry have closed in.
The Power of Dwellers
The point that struck me most, however, was the specific moment I lost the spears and prince. Even after all the errors, had I popped Loec (likely an extra res for Ld 5) and kept the BSB with them (2 kills plus standard takes the Ld test to rr8), I would have a good chance to hold and counter with the white lions and would at least have had a fight on my hands. With Dwellers then no longer an issue with my heroes in combat, I could redirect my dispel attempts at the other Life spells and (my) life would be more enjoyable.
The decision to move the BSB into the lions was, in short, incredibly careless. The reason I felt compelled to do it, however, was that I didn't want to lump my characters together in the face of Dwellers Below. I had just managed to keep a lid on the spell up until that point (using the scroll once and as many dice as I could throw at it each turn), but sooner or later it'd go through and I didn't want to have 2 heroes and 30 spears all taking it in the face. Having thrown the tough helms away and caused myself problems with my passive approach to the game (even leaving the eagles out of range for too long!), I suddenly found it necessary to force myself into an unfavourable combat just to get out of the way. The psychological impact of the spell was, in short, massive.
Conclusion - Some important lessons re-learned
So, after my long hiatus I'd been reminded of some things about how to use my army:
1. A combined-arms force needs to use all its arms successfully to succeed. If one or two arms fail because some of your dice suck, the others can pick up the slack (this, incidentally, is the chief reason I don't like all magic armies). You can’t blame bad dice if you haven’t planned for them.
2. The movement phase doesn't require dice rolls. Intelligent movement can always, therefore, improve your position, especially if you have fast units.
3. In a combined-arms list your cavalry (especially the durable combat variants like the helm hammers), should typically engage and threaten the enemy force early, in order to prevent enemy skirmishers and damage-dealers (like salamanders) crowding up against your vulnerable infantry (either because they're distracted trying to stop your knights, or because your knights are killing them). Shooting can then focus on a reduced number of targets.
4. Following 3, use the superior deployment options and speed of a combined-arms army to attack a point of the enemy line in overwhelming force. Even in narrow battlefields like BftP, this is doable with the right use of eagles etc. A combined-arms general who allows an enemy infantry army to gang up on a part of his line has failed quite spectacularly.
5. Something I don’t often mention: the helm bus contains two characters for a reason. In most combats, having 7 attacks plus battle-standard (and doubling your challenging options) is much better than having 4 attacks alone. Splitting the bus up is a useful option in many circumstances (and one reason I prefer knights to monsters), but for any difficult combat, keep the heroes together.
6. Courage of Aenarion can, in the right circumstances, be a game-changer. If you don’t have lots of steadfast around, seriously consider it.
The question now was how many of these lessons would stick in time for the tournament the following morning? Stay tuned, and you'll find out.
In the meantime, thanks for reading.
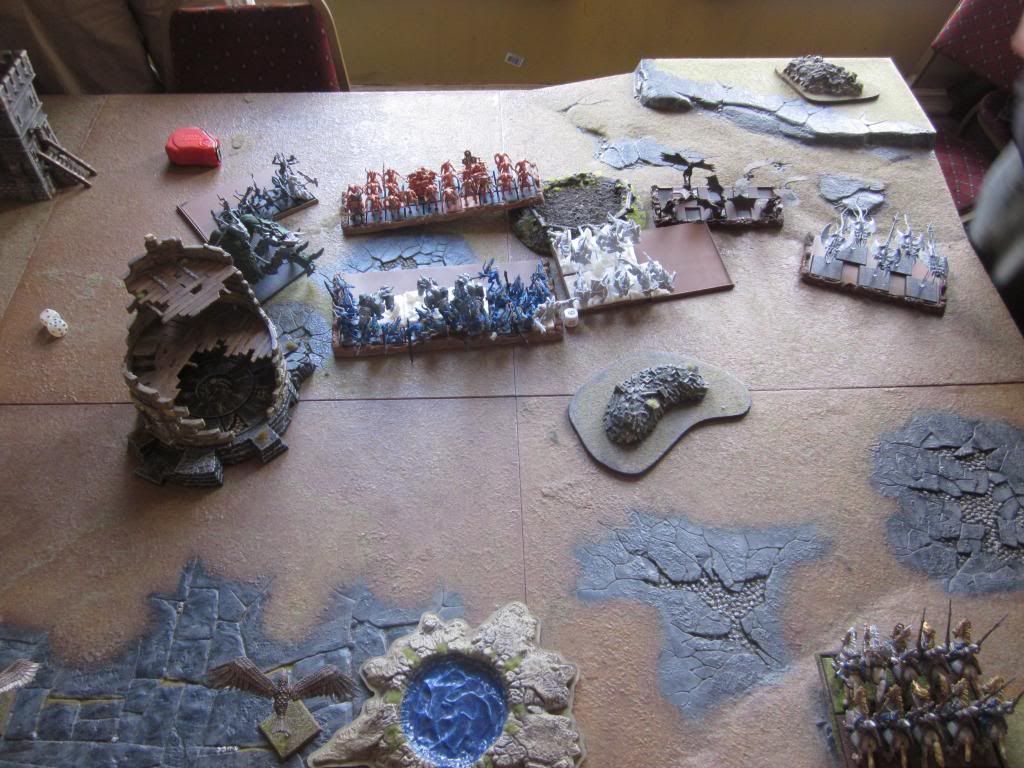
Deployment
A long break from gaming after my meeting with Jurassic Park, but I had a tournament to attend with SpellArcher, so I needed to get some practice in to make sure I wasn't too rusty. Mallas was the obvious choice because he's good and likes beer.
This time I was up against a much more conventional lizzie list, incorporating an invincible solo life-slann with all the trimmings, Engine steg (scroll), 20 HW+S saurus (in case he hits watchtower), a big horde of krox+skinks, a unit of flaming cavalry, some sallies, some terradons and a few skirmishers and scouts. Scenario dice tumbled and, interestingly for me, we rolled up Battle for the Pass.
This was the first time I'd seen this scenario first-hand and, since I had the good ranged missile fire, I felt extremely confident. If I deployed on the backline, Mall would have to trudge for miles before he got anywhere near me and, with High Magic rocking the 28 archer + 2 repeater shooting phase, I could traumatise him badly coming in and break through the remnants on Turn 4 or so with a combo-charge. It wasn’t exactly a sophisticated plan, but it felt like a good one.
There were some problems, however. Deployment was not as enjoyable as it usually was, chiefly in this case because I tried to cram my typically open deployment (defensive refused flank, aggressive weighted flank, central shooting) into an area far too small to properly accommodate it. On the far right, then, I deployed the line of 18 archers (should have ranked them up to save space, really), then the repeaters in the centre and the dragon princes on the far right, forming an exclusion zone to their front. On the left flank, meanwhile, I placed the spears, swords and silver helms, with the white lions filling the central gap between my heavy wing and the repeaters.
I liked the set-up but it was clear from the start that deployment hadn’t gone my way: Mal had placed terrain (especially buildings) very intelligently in the centre of the board (especially the right looking from my view), to provide cover for his advance and to limit the free movement of my knights should I choose to attack. Psychologically, this was enough to swing me toward the more open left-hand side and, with plenty of other chaff drops coming from the lizards, Mal quickly had enough information to deploy a solid battle line of his steg, infantry and slann, backed up by a sally pack, directly opposite my own line. Skirmishers, salamanders and the cavalry deployed in and around the buildings opposite my shooters on the right. This made their lives difficult – the closest targets were also the hardest to hit.
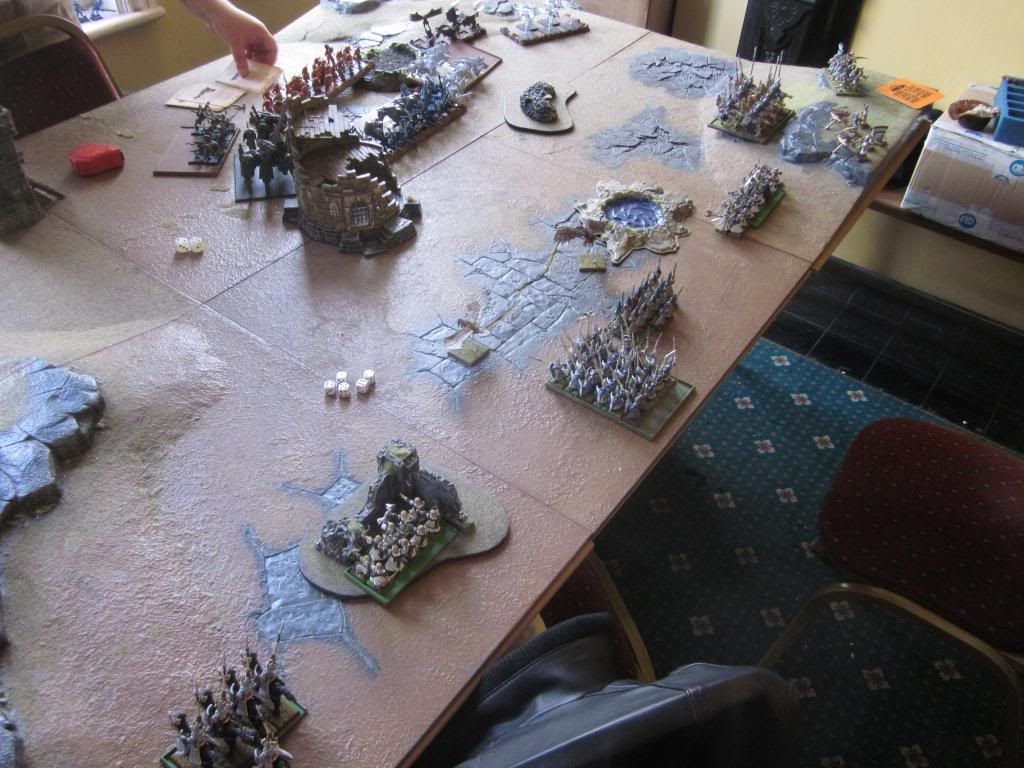
The Game – early turns
Mal got the first turn and advanced aggressively with his main line – he need to close quickly to avoid getting shot. The terradons made a move into the open toward my shooters (unwise), but the skirmishers behind them settled into the hard cover facing my right flank. Magic didn’t much matter at this range, but even so I happily dispelled Throne of Vines and then Flesh to Stone on the terradons.
All fine but, with my repeaters deployed far back at ground level and in the middle of my army it quickly became obvious that, if I wanted to have sight of a decent number of targets for the machines, my flanking cavalry units would have to hold back for as long as possible, wait for the shooting to take effect and only then charge in. My best units were therefore in a quandary: Mal had limited their ability to breakout by predicting their location and placing his best defensive units immediately across from them, and I had done so further by giving preference to the shooting phase which, if it was to achieve anything, necessarily restricted their movement. This was a far cry from the usual plan of concerted early-game ranged and flank-attacks: here I would have to trust my shooting and magic to lay down a withering fire, enough to cripple the enemy infantry before I charged directly into their front to overwhelm them.
Note how the elven units are positioned to maintain an arc of fire for the repeater bolt throwers and (right, out of shot) archers.
Lizardman shooting units take shelter in buildings while a sacrificial (but intact!) unit of skinks covers the cold ones' advance and helps to pin the High Elf right flank.
Unfortunately, in the first few turns, my shooting and magic collectively achieved precisely nothing, not even a dead unit of terradons or a handful of dead cohort skinks. To-hit and to-wound rolls failed, and my spell rolls did likewise. Increasingly, as Mal’s infantry marched inexorably toward me, the threat from a powerful High Elf counter-charge began to die as my ranged power proved toothless.
Mid-Game
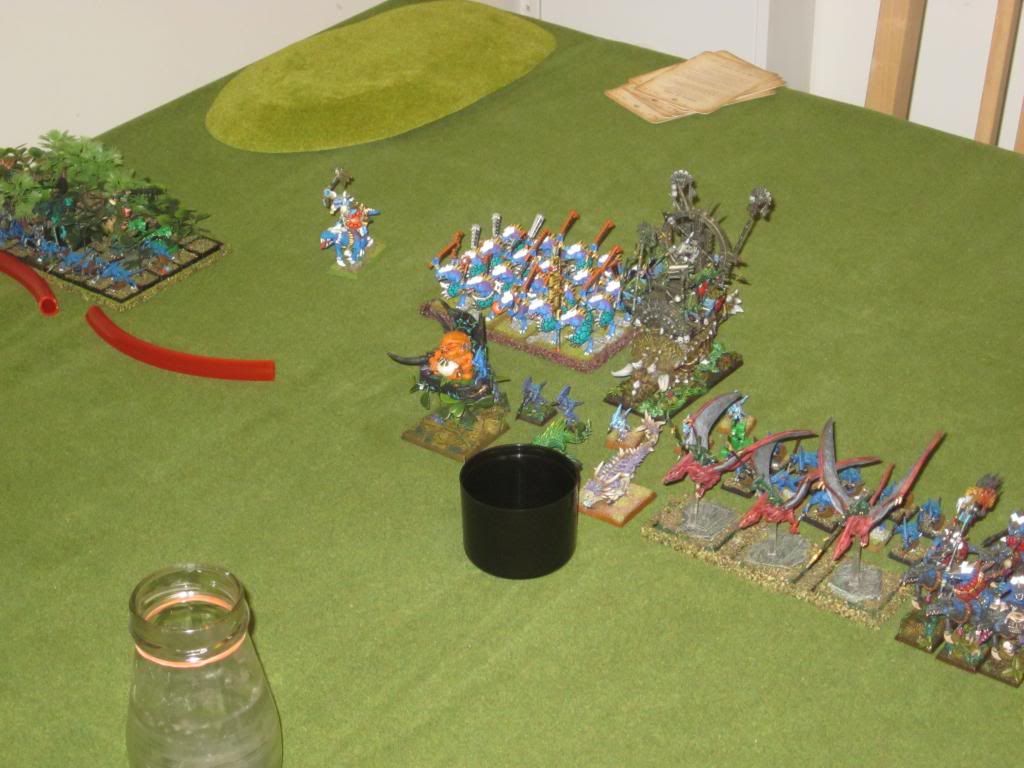
By contrast, the lizard magic phase was relentless, and Mal was now packing a new slann build to take the best advantage. This guy was ethereal, had a 2+ ward save against ranged attacks, fencer’s blades for WS10, Standard of Discipline for re-rollable ld 10 and wound-giving Life magic. Wheeling about by himself, he was extremely manoeuvreable and basically impossible to kill outside of (magical) close combat. Finally, he was also (inevitably) packing Focus of Rumination, giving him the free power dice for each spells cast and, with big rolls of 10+ coming up in most phases, from Turn 3 (when he moved in range for Dwellers on my helms), I began to crack under the pressure. The scroll went in short order, and then I began to sacrifice units to hold up the enemy advance to buy my own magic (and shooting) more time to come good: one big round on the saurus warriors or cohort would buy me the chance to charge and break out of the vice. The silver helms were flung out (Seredain shifting to the spears) and held up the lizards nicely (albeit expensively), but it was all wasted points. I didn’t get any aggressive spells cast (Mal scrolled the only one that did – a Flames on the skinks), and my arrows did nothing! Unthreatened and therefore free to do as they pleased, one of Mal’s salamander packs closed in on my left flank and started burning away the swordmasters.
The helm hammer separates in the face of the dwellers below.
An expensive sacrifice.
With no defences left and no prospects of making a combined charge across the long gap which still stood between my line and the lizards, my characters were now stranded in the face of Dwellers Below. One successful cast and I’d lose half my spears and maybe my prince. With my swordmasters already down to near half-strength, it would surely be curtains.
It was clear by this stage of the game that the new plan wasn’t working. So what were the problems with it?
1. I was relying far too much on my shooting and magic to do the damage. If I rolled poorly (and admittedly I did), there was no plan B and, without time to manoeuvre, I had no choice but to try and hold front-on against a life-buffed line of lizards head on. This is exactly what Mal had planned for with his excellent deployment.
2. By sitting back I was giving my most aggressive units, the cavalry, far less killing time than they would normally enjoy, reducing the amount of damage I did in the early turns and getting less out of the points spent;
3. As my shooting and magic failed to do anything in the early turns, instead of changing tack and getting aggressive, I started to drip-feed units in (eagles, the vanilla silver helms) to simply buy my shooting more time. 2 eagles is plenty, but it's up to you to take advantage of the time they buy you. The rest of my army just stood still while they sacrificed themselves and, with shooting and magic doing nothing, the points (and opportunities) were wasted.
4. Because my cavalry were no longer acting as an aggressive weapon, Mal was able to advance his skirmishers, especially the sallies, into range and start burning my infantry. As a result they (particularly the swordmasters), would suffer much more damage than usual before they saw combat.
5. By sitting back I was also giving Mallas all the time in the world to repeatedly chuck Dwellers at my exposed characters. He got great dice here, but even with average dice he was always going to have effective magic phases, and I had shown up woefully unprepared to face them.
Panic Stations
This last source of strain would prove the most important. Even though I'd originally intended to join the characters together again just before combat, I cracked under the pressure and kept them split up rather than risk another Dwellers. However, although keeping your heroes separate is a good way of avoiding a spell like this, it does nothing to combat the spell directly (of course) and only pays off tactically if either:
a) I am able to reunite my characters by eventually charging them out against a single unit, thereby recombining their combat power when needed; or
b) I am confident that they can successfully defend a charge alone with whichever unit is guarding them.
At the time, I simply made neither of these calculations. Mallas' coolness under fire, meanwhile, compounded my dilemma. Having brought the slann in range and besieged me with Dwellers, he defended the slann perfectly by forming up a powerful combination of units in support (with Life buffs): cohort, saurus and engine steg. I was much more frightened of Dwellers than I was of these units, however, so having fled my BSB into the nearby white lions I advanced my spears, led by the prince alone, to receive a charge from the steg and saurus warriors (my eagles now joining the action to stop the cohort and saurus cavalry getting involved. Hopefully, this would be enough to tempt a charge from the lizards and hide the prince from Dwellers. The BSB stayed close with the white lions to provide both the re-rolls for the prince and a powerful counter-attack against the saurus once the spears had held in combat.
Had I done even a little bit of arithmetic, however, this would have revealed itself quite plainly to be a terribly risky plan. I was bound to lose combat, as I knew, but what I didn’t appreciate at the time was that Mal needed only 11 kills to break my steadfast: perfectly possible with the units he had arrayed. If he rolled big for impact hits and thunderstomp, I would be in serious trouble. Magic again refused to help – a 3 dice cast of Shield was dispelled.
Amazingly, however, Fate gave me a chance at the last moment, and Mallas made a terrible mistake. Because his slann was only afraid of magical attacks, he declared a charge with the ancient stegadon against the half-strength swordmasters (still toting the Amulet of Light). This would, of course, mean that I wouldn’t have to worry about the spears getting stamped on and, in a fight between them and the saurus, they’d easily hold for that phase and allow the white lions to charge on in. However, truly amazingly (let’s say for the sake of my blushes that it’s because I was drunk), I fled the swordmasters to save the points (!), remaining confident that the spears would hold. Mallas duly redirected his steg into the spears alongside the invinci-slann (to tank hits) and the saurus (for the ranks). 6 impact hits and 5 or 6 wounds later (bad luck but it happens!), I still didn’t see the gravity of the position. Seredain chose to save the Talisman of Loec for the toad, and killed 3 warriors. The spears killed 2 more, for a total of 9 static res. Then saurus attacks and thunderstomps happened, another load of spears died and, in the end, I’d lost exactly the number of spears needed to break steadfast. I was now testing on re-rollable Ld 4 to stick. I duly failed, broke, was run down and gave away 581 victory points and the game.
Be careful what you wish for, lads!
With the swordmasters fleeing at half strength, the helms, spears and prince all gone and shooting and magic doing nothing, it was all over now bar the shouting. I tried to come back into it by flank-charging the slann with my lions + BSB but, even on Ld6 then 7 the cold-blooded Ld10 BSB slann wasn't going anywhere, held for 3 turns and the game ended with a serious defeat for the High Elves. Mal had suckered me into playing his game, and then had sucker-punched me right in the face. Ow.
What went wrong?
First off, Mallas made very few mistakes. The stegadon charge against the swordmasters was a bad idea but, in all, he pretty much played his army as it should be played. He put his scary spellcaster in range of my most expensive units, protected him with a solid-line of magic-buffed infantry, took advantage of my early inactivity to pin me in place and, like a boa, squeezed.
He had also cleverly held his skirmishing flank (my right his left), supported by his cavalry, in hard terrain opposite my shooting units and dragon princes. By keeping them back like this, he kept them alive so they could provide harassment in the late game. By the time I was willing to attack with the princes to support my besieged infantry, Mal had more than enough chaff to stop the knights doing anything useful. In effect, by the time I felt forced to engage in combat (to escape Dwellers), I found my army too pinned down to counter convincingly. Instead, a portion of my army stood alone, without flank support and with collapsing shooting and magic phases, against an enemy combat line standing front-on, completely intact and well protected by defensive spells – a total nightmare.
Mallas had played a great game to get to this position but I, by contrast, had been mesmerised by the scenario (”Look at all the shooting range I've got!”), and fought a static defensive game which clearly didn't play to my army's strengths. With a tournament looming, I had received a timely lesson in the virtues of good board control and, as much as anything else, of paying attention.
A better Plan A?
My army doesn’t like its movement to be limited and Battle for the Pass is surely the most movement-limiting scenario. However, silly mistakes aside (and there were far too many), there were obviously much better ways of playing my army; partly by using what movement the board did allow me (I didn’t use any), and partly by spotting the weaknesses that the scenario had imposed on Mal’s army too.
The latter didn’t occur to me at the time but, with hindsight, it is clear that an army with lots of skirmishing units is not as well placed to run harassment operations in this scenario as it is in others. Chiefly, this is because the narrow board cramps up deployment of these otherwise-loose formations, making it much easier for an aggressive player to take his fast units, deploy them in wide formations and seek out easy overruns – killing enemy units more quickly and covering more ground. Wherever you deploy your knights, you can move them quickly to the preferred side of the board and aggressively attack this weak-point early in the game, covering the flank of the attack with eagles and (if necessary) infantry detachments while relegating your shooting to picking up the slack. Now, depending on what the enemy infantry does, you can either loop round into their rear or force a stand-off, advancing more infantry up to provide a threat from another angle, keeping the enemy blocks both under pressure and under fire (although on this scenario, shooting visibility can be a problem unless you have a hill). Meanwhile, as long as your knights are safely carving up skinks and salamanders, Dwellers is not a problem.
It’s a dice game, and things can go wrong, but it’s clear that being more proactive with your fast units, even in more cramped conditions, is a reliable way of preventing the enemy army from marching unopposed at your soft underbelly before you're ready to engage. Standing the cavalry still for the first 3 turns will force no hard choices at all on your opponent and, if your shooting fails, you’ll leave his harassment units intact for long enough to damage your most important infantry units and win him more favourable combats once his own infantry have closed in.
The Power of Dwellers
The point that struck me most, however, was the specific moment I lost the spears and prince. Even after all the errors, had I popped Loec (likely an extra res for Ld 5) and kept the BSB with them (2 kills plus standard takes the Ld test to rr8), I would have a good chance to hold and counter with the white lions and would at least have had a fight on my hands. With Dwellers then no longer an issue with my heroes in combat, I could redirect my dispel attempts at the other Life spells and (my) life would be more enjoyable.
The decision to move the BSB into the lions was, in short, incredibly careless. The reason I felt compelled to do it, however, was that I didn't want to lump my characters together in the face of Dwellers Below. I had just managed to keep a lid on the spell up until that point (using the scroll once and as many dice as I could throw at it each turn), but sooner or later it'd go through and I didn't want to have 2 heroes and 30 spears all taking it in the face. Having thrown the tough helms away and caused myself problems with my passive approach to the game (even leaving the eagles out of range for too long!), I suddenly found it necessary to force myself into an unfavourable combat just to get out of the way. The psychological impact of the spell was, in short, massive.
Conclusion - Some important lessons re-learned
So, after my long hiatus I'd been reminded of some things about how to use my army:
1. A combined-arms force needs to use all its arms successfully to succeed. If one or two arms fail because some of your dice suck, the others can pick up the slack (this, incidentally, is the chief reason I don't like all magic armies). You can’t blame bad dice if you haven’t planned for them.
2. The movement phase doesn't require dice rolls. Intelligent movement can always, therefore, improve your position, especially if you have fast units.
3. In a combined-arms list your cavalry (especially the durable combat variants like the helm hammers), should typically engage and threaten the enemy force early, in order to prevent enemy skirmishers and damage-dealers (like salamanders) crowding up against your vulnerable infantry (either because they're distracted trying to stop your knights, or because your knights are killing them). Shooting can then focus on a reduced number of targets.
4. Following 3, use the superior deployment options and speed of a combined-arms army to attack a point of the enemy line in overwhelming force. Even in narrow battlefields like BftP, this is doable with the right use of eagles etc. A combined-arms general who allows an enemy infantry army to gang up on a part of his line has failed quite spectacularly.
5. Something I don’t often mention: the helm bus contains two characters for a reason. In most combats, having 7 attacks plus battle-standard (and doubling your challenging options) is much better than having 4 attacks alone. Splitting the bus up is a useful option in many circumstances (and one reason I prefer knights to monsters), but for any difficult combat, keep the heroes together.
6. Courage of Aenarion can, in the right circumstances, be a game-changer. If you don’t have lots of steadfast around, seriously consider it.
The question now was how many of these lessons would stick in time for the tournament the following morning? Stay tuned, and you'll find out.
In the meantime, thanks for reading.
The Cavalry Prince - List Design, Tactics, Battle Reports
http://www.ulthuan.net/forum/viewtopic.php?f=76&t=33584
http://www.ulthuan.net/forum/viewtopic.php?f=76&t=33584
-
SpellArcher
- Green Istari
- Posts: 13847
- Joined: Sat Sep 13, 2008 11:26 am
- Location: Otherworld
Re: The Cavalry Prince - List Design, Tactics, Battle Reports
Ouch!
Reading this really put me in mind of one of Swordmaster's reports Mr S. This too was Battle for the Pass, arguably a difficult scenario for his combat MSU list. But what he did was to advance quickly up the field. He was then able to go forwards with some units, back with others and use the space he had taken as if it were lateral almost.
Now I agree that you too should have advanced rapidly with your cavalry. In fact you have the added advantage over Swordmaster's list that your fighting characters enable you to concentrate an awful lot of force in a small frontage of cavalry punch. Of course you don't have the swarm threat of his multiple units but an aggressive approach is likewise a good idea I think.
Now magic is something that might have helped you. But even if you'd had Banner of Sorcery it's hard to rely on against a Slann. Which I suppose just highlights again the point you made, that you have to give all of your army's strengths a chance to shine to improve the likelihood of one of them coming up trumps.
A New Blog (Orcs and Goblins)
http://ulthuan.net/forum/viewtopic.php?f=5&t=70550
Cavalry Prince Reloaded
http://ulthuan.net/forum/viewtopic.php?f=80&t=70001
http://ulthuan.net/forum/viewtopic.php?f=5&t=70550
Cavalry Prince Reloaded
http://ulthuan.net/forum/viewtopic.php?f=80&t=70001
-
John Rainbow

- Posts: 3550
- Joined: Thu Mar 24, 2011 2:47 am
- Location: PA, USA
Re: The Cavalry Prince - List Design, Tactics, Battle Reports
As you say, the scenario hampered you quite severely as your list relies on maneuverability. Having said this though, you still deployed as you usually do with two strong flanks (cav. and support units) with the ranged stuff in the center. Your opponent anticipated this and nullified you pretty well. I guess what I'm getting it is whether it would have been better to change your deployment strategy from the get go? I don't think you can rely on a pincer move involving both flanks when playing along the board. Would not a refused flank have been better? As you are arguably Ulthuan's most (in)famous  general, do you find that people you play against have some idea of what you are about? In which case you should be more unpredictable with deployment as your opponent might know/have read up on your tactics here.
I'm also surprised that you play without any form of comp. In the US it seems that pretty much all the big tournaments (Adepticon excluded) have some limit on power dice and big spells, hence a large number of local groups play within those restrictions i.e. 'look out sir' v. big spells and max. 12 PD/DD per phase. I'm a little surprised there aren't similar restrictions back in the UK.
I'm also surprised that you play without any form of comp. In the US it seems that pretty much all the big tournaments (Adepticon excluded) have some limit on power dice and big spells, hence a large number of local groups play within those restrictions i.e. 'look out sir' v. big spells and max. 12 PD/DD per phase. I'm a little surprised there aren't similar restrictions back in the UK.
Re: The Cavalry Prince - List Design, Tactics, Battle Reports
Hmm, this is a good warning for me I think. I tend to rely on shooting a bit too much, and I have less than you.
So the moral is to play a combined arms game with a combined arms list, not just to rely on certain elements?
So the moral is to play a combined arms game with a combined arms list, not just to rely on certain elements?
"I say the Eatainii were cheating - again." -Aicanor
"Eatainian jerks…" -Headshot
"It was a little ungentlemanly." -Aicanor (on the Eatainii)
"What is it with Eataini being blamed for everything?" -Aicanor
"Eatainian jerks…" -Headshot
"It was a little ungentlemanly." -Aicanor (on the Eatainii)
"What is it with Eataini being blamed for everything?" -Aicanor
Re: The Cavalry Prince - List Design, Tactics, Battle Reports
Yes, this is exactly the moral of this game. To be fair, I usually play with this in mind, but here the scenario got the better of me: I thought look at all that range! and then just stopped thinking about anything else. As SA said (and I myself constantly preach), a particularly important part of the combined-arms approach is to force your opponent to react to the helm hammer and then, by making that reaction awkward (through a combination of deployment, aggression and eagle harassment), punish your opponent using the rest of the army. Here, the helm hammer did nothing and, with shooting and magic both rolling poorly, it left my fragile infantry set-up woefully exposed. I couldn't do anything about the dice rolls, but the lack of aggression and movement left me with nothing to compensate and that was all my own fault.Elithmar of Lothern wrote: So the moral is to play a combined arms game with a combined arms list, not just to rely on certain elements?
Surprisingly, people who know my army well aren't any worse to play than people who don't. If you look at my minis on the table before deployment, it's usually quite obvious that I'm putting the characters in the helms and deploying them last, so the danger is usually pretty clear. It's the number of drops I have, and keeping my early deployments neutral, which causes confusion about what I'm planning to do ore than the nature of the army per se. It also tends to be the case (but not always against fear-causing armies especially) that I run the knights on the flanks - this is their natural turf after all. However, a tactic I very much enjoy is deploying my knights in one part of the board only to suddenly swing them towards the centre. This so often catches your opponent on the hop and, because knights are faster than infantry (and because I have eagles), it will typically be very difficult for him to respond quickly (this is my tactic for killing infantry-based level 4's as described in my articles on Cutting the head off the snake.John Rainbow wrote:As you say, the scenario hampered you quite severely as your list relies on maneuverability. Having said this though, you still deployed as you usually do with two strong flanks (cav. and support units) with the ranged stuff in the center. Your opponent anticipated this and nullified you pretty well. I guess what I'm getting it is whether it would have been better to change your deployment strategy from the get go? I don't think you can rely on a pincer move involving both flanks when playing along the board. Would not a refused flank have been better? As you are arguably Ulthuan's most (in)famous
So, although this scenario prevents wide flanking manoeuvres, there was nothing stopping me from swinging the helms from left to right early, pushing them into the face of the saurus cav and skirmishers and get them killing stuff. It would simultaneously win me points, keep the characters in combat (ie away from Dwellers), keep the enemy skirmishers away from my infantry (leaving only the sallies on my far left to worry about), and threaten the flank of the slann's advance against my left wing. With movement combined with the power of the knights, these are benefits you can win without having to rely on luck of the dice.
I don't play with any comp, and I'm happy playing armies with no comp at all. For every Slann you have toting dwellers, you don't have a massive unit with 6 heroes in it. There are plenty of ways to avoid the big spells (see my article On Dwellers (2) in the contents page: I just didn't use any of them here and got punished for it. Still, it's nice to have the extra insurance, and this is where the Sigil of Asuryan comes in...John Rainbow wrote:I'm also surprised that you play without any form of comp. In the US it seems that pretty much all the big tournaments (Adepticon excluded) have some limit on power dice and big spells, hence a large number of local groups play within those restrictions i.e. 'look out sir' v. big spells and max. 12 PD/DD per phase. I'm a little surprised there aren't similar restrictions back in the UK.
Exactly right SA. The difference between being passive and being aggressive with the helms is quite striking, as the next few games should show...SpellArcher wrote:Now I agree that you too should have advanced rapidly with your cavalry. In fact you have the added advantage over Swordmaster's list that your fighting characters enable you to concentrate an awful lot of force in a small frontage of cavalry punch. Of course you don't have the swarm threat of his multiple units but an aggressive approach is likewise a good idea I think.
The Cavalry Prince - List Design, Tactics, Battle Reports
http://www.ulthuan.net/forum/viewtopic.php?f=76&t=33584
http://www.ulthuan.net/forum/viewtopic.php?f=76&t=33584
Re: The Cavalry Prince - List Design, Tactics, Battle Reports
TOURNAMENT TIMES
So, after the drubbing received the night before from Mal’s lizardmen, it was time to put some hard-earned lessons into practice. The tourney was a one-day, 2400 points set-up with relatively light comp trimming some of the sillier things (Teclis, Pendant of Kaleth on 1+ AS dreadlord, dual ironblaster etc), as well as allowing look out sir saves against all the big spells. I didn’t approve of this last bit at all, because it usually means I end up facing armies with stupid herobus units (I do get annoyed when people scream ‘Dwellers cheese’ and then the moment it’s nerfed put 3+ characters into one unit). Sure enough, there were a few of those present, but a decent selection of armies kept things pretty fresh. It was 10.30am, I was hungover and hadn’t had any breakfast. Game on.
Seredain
Prince – Dragon Armour, Shield, Barded Steed
Giant Blade, Helm of Fortune, Talisman of Loec, Plucker Pendant – 286
Lecalion
Level 4 Archmage - High Magic
Dispel Scroll – 280
Caradath
Battle Standard Bearer – Great Sword, Heavy Armour, Barded Steed
Dawnstone, Dragon Helm, Other Trickster’s Shard – 188
Core Units
30 Spearelves – Full Command – 295
15 Archers – Musician, Standard, Banner of Eternal Flame – 190
10 Archers – Musician – 115
Special Units
14 Swordmasters – Bladelord, Amulet of Light – 237
10 White Lions – Standard, Gleaming Pennant – 167
8 Silver Helms – Shields, Musician – 192
5 Dragon Princes – 150
Rare Units
2 Repeater Bolt Throwers – 200
2 Great Eagles – 100
2400 points
Game 1 – Daemons of Chaos
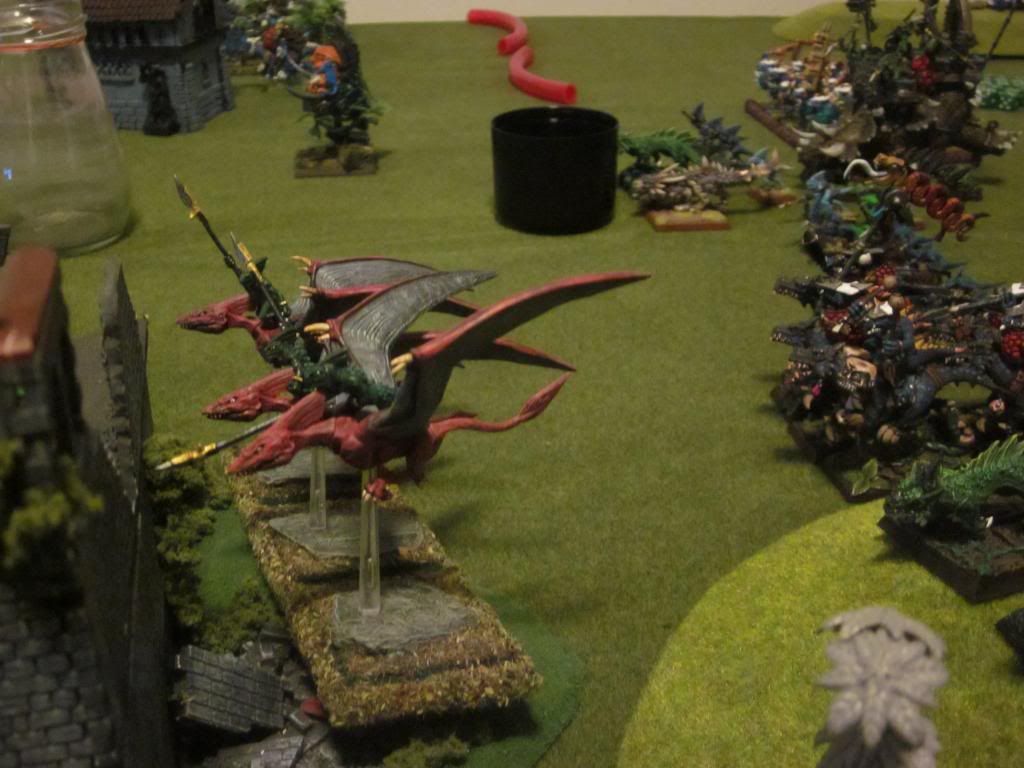
An interesting daemons list was stood opposite including some of the usual suspects but also (since they’d just got a new book) some new choices. First off, the oldies but goldies: bloodletter herald horde, plaguebearer herald horde and a horror bunker with loremaster Tzeentch caster, deployed respectively one behind the other. This struck me as an unusual deployment but, with a massive tower stood in the centre of the board, my opponent may have figured that any slow infantry unit deployed on the far side of it would never see a meaningful combat. The new toys filling the rest of the army included two units of screamers (who’ve received a significant boost, I am told), and the soulcrusher, a new T7 monstrosity with 6 wounds, a 4+ armour save (annoyingly good against arrows) and a Str 3 move-and-shoot catapult to boot, for about 300-odd points. Now, ordinarily you think I’d just charge my helm bus into that thing, win massively (it only has 4 attacks and can’t thunderstomp cavalry) and pop it in one round. Well I would have, except for the final unit of interest: a large bus of 10 or so flesh hounds. There was no way that any of my units – the helm hammer excepted – could stand up to this unit for any length of time without suffering for it, and the close support provided to it by the hordes (who in turn had their right flank covered by the tower and soulcrusher) precluded me from surrounding it with the infantry without inviting a terrible counter-charge. So, the helms would have to head the dogs off on the right flank, my infantry would meet his in the centre (allowing for as much delay as possible), and I would have to bodge something together with archers, dragon princes and (if necessary) the spears to hold up and eventually finish off the soulcrusher on my left flank. To make sure that the nearest screamers couldn’t do anything horrible to my repeaters (stood on a hill on the right flank), I deployed the white lions immediately in front of them, next to the helms. They’d be on support duty this game.
Early game
Having won the first turn, and having learned my lesson about passive cavalry the night before, I advanced the helms a little up the right table edge and wheeled them inward to threaten an early charge, keep the screamers away from my shooters and encourage the hounds to do something other than bomb forward and eat my infantry. As insurance for the latter, the eagles moved into contention – much closer than in my last game (where I’d carelessly forgotten that 20” isn’t that far). My opponent took the bait and, despite the fact that I hadn’t left them enough room to land, screamed at my helms and killed a couple.
The move my opponent performed was surprising but (according to the tournament organiser) completely legal. In effect, he used the screamers’ 20” movement to move forward about 17” onto the corner of my helms, then (since they were skirmishers) effectively wheel backwards 3” to land in open ground. As moved on the table, the screamer models themselves never passed over the knights, but they were still able to perform their attack and kill a knight or two before backing off and landing. This mechanic stinks from my point of view, but it was no biggie and we were playing by host’s rules, so I noted the move down in my list of ‘Things to Watch’ and left it alone (FYI, another strange mechanic at this place is that you’re only allowed to charge one character out of a unit at any one time, on the basis that the rulebook says that “a character may charge from his unit…”. Apparently “a” in this context means “only one”. I don’t buy it, at all).
On grounds of pure utility, magic favoured me slightly this game, but long-ranged shooting was much more partisan and massively favoured the High Elves as my longbows and repeaters poured fire into the bloodletters. They pretty much had no choice other than to trudge forward toward the swordmasters / archers deployed opposite whilst the plaguebearer horde, untouched and grindy, advanced patiently behind. In reply to my hail of death, the soulcrusher sucked hard, missing the spears on Turn 1 and then misfiring on Turn 2 and suffering an automatic wound. My 10 archers (I love the archer detachment / dragon prince combo), plinked on another wound, so the big daemon was now down to 4. Sweet. It was at about this point of the game that I started wondering: why would anyone pay 300 points for a Str 3 stone thrower? Big D needed to get into combat with infantry, and soon.
Since my opponent had got scared of my knights (already within charge range of lots of stuff by Turn 2) and tried to scream them, the overly-hasty screamers themselves were now within easy charge range of the white lions. They marched in like professionals (once the helms had charged off against a harassment unit to clear a path) and destroyed all of them. So, with the flesh hounds now covered by the silver helms and an eagle, my most immediate concern was to prevent the soulcrusher from getting into combat with my spearelves (the closest desirable target) and thunderstomping them alongside the bloodletters. I therefore swung the spears right and advanced them 10” straight toward the bloodletters. This got them safely out of Big D’s line of sight and, to discourage a long bloodletter charge, I covered them with the swordmasters. Another withering hail from my archers and machines reaped a load more khornite daemons and, on the left, another misfire took another wound off the soulcrusher! Big D was having no luck at all.

Mid game
Now my opponent took a good chance and flanked my spears with his second unit of screamers (I thought he’d just use the scream but, even so, getting charged like this was better odds than getting stuck against Big D and leaving the swordmasters all by themselves). A decent move from my opponent, this, but in the end the elf citizens held easily, reformed to face the enemy on my next turn and destroyed them, reforming once again after combat to re-present a solid front against the bloodletters.
Since my spears spent this short while showing their flank to the bloodletters, I charged the swordmasters in. Since they had only one full rank left I was intensely confident about this but, actually, the swords badly underperformed and took a walloping from the hatred-filled ‘letters return attacks. I won combat (they are swordmasters after all), but at this rate my elite elves would not survive the battle. Images of a smug SpellArcher taunting me about the usefulness of the Standard of Balance filled my mind and I wondered (for the briefest of moments) where I might find 57 points… But then the second round of combat went completely the swordmasters’ way, brought the down to only a few models and finished off the khornite herald. With the spearelves now ready and looking on, this unit was basically done.
It was at about this point that things went from bad to much worse for the daemons. On the left flank, my dragon princes declared a long charge against the soulcrusher, needing a roll of 10. Having the green archers on hand to act as an emergency stand-and-shoot eagle, I was happy to miss this, but I made it in and, helpfully, then scored a couple of wounds (rolling enough hits with ASF to get those two sixes). The 4+ save couldn’t take the lances and then my opponent couldn’t make his ward saves either, so the princes now had a total combat res of 3 - fantastic. My opponent then only scored 1 hit from Big D’s paltry 4 attacks and then incredibly, failed to wound. He lost combat by 3, failed his stability test badly and then popped! This was a disaster in itself for the daemons but, worse, Big D’s demise now left a clear path for the princes to wheel round the tower and into the Tzeentch caster’s now undefended (and small) horror bodyguard.
On my right flank, meanwhile, the flesh hounds had finally won an overrun into the helms, but magic had come good here and my cavalry were fully protected by both Shield of Saphery and Courage of Aenarion. They also had Caradath deployed in the centre of the unit, spreading his anti-ward save virus from the Other Trickster’s Shard. Unsurpriingly, then, with their ward saves nerfed the dogs died hard to all my ASF attacks. Then, after the onslaught, my knights’ armour and ward saves (albeit some of the latter were re-rolled too) prevented any serious backlash. The combat was a massive win for me, the hound unit was shattered by instability and, after it all, was only left with 1 or 2 models.
With both flanks suddenly gone, my opponent’s position had become untenable. Within the next couple of turns, pretty much everything in his army except the plaguebearers would be dead and all my units (excepting the eagles), were still extant and would shortly surround his position completely. Pretty upset by his poor dice, my opponent lost hope, conceded and by the end of Daemon Turn 4, the game was done for a High Elf 20-0.
Debrief
A weird game, this one. Ostensibly, the board wasn’t much good for me. The enormous tower in the centre split the battlefield into two small pieces but was, at the same time, so imposing that I didn’t feel comfortable wheeling my cavalry around it and relying on harassment to slow down the daemons’ advance on my right-hand shooting base. Chiefly, this was because of the hound bus: it was just too quick and too dangerous for me to take any chances about it reaching my infantry without my characters being there. With my opponent effectively forming his hordes up in column, my knights could very easily have flanked around the left only to find themselves so isolated that they would have been powerless to prevent the combined force of bloodletters and hounds from tearing great chunks out of my infantry. Not worth the risk.
So, in the end, I was forced in effect to deploy much of my army in a narrow confine and play another Battle for the Pass. This time, however, I got the silver helms up early into the enemy’s flank so as to force him to feed me his fast units (including the hounds themselves) rather than combine them against my weaker troops as he might have done had I stood back. In addition to the direct benefits of using the knights aggressively, my shooting was left completely free to punish the perfect target – the bloodletters – which in turn allowed my swordmasters to finish them single-handedly while the spears were (unfortunately) otherwise engaged. Getting the knights into the enemy’s special troops had, in effect, created a virtuous chain of support which flowed all along the rest of the line.
The one bit of the battle I hadn’t really planned for was how to deal with what sat at the far end of that line – the soulcrusher. Really, the plan amounted to shoot it a bit, charge it with dragon princes when it gets close and hope for a wound or two: if the DPs run away, sacrifice the green archers eagle-style and then use the blue archers and/or spears to finish it off. Hardly the stuff of Julius Caesar, you’ll agree, but since Big D had only 6 wounds I casually figured it was doable and just trusted to luck. At least with the dogs and bloodletters engaged, my magic phase, archers and repeaters could have combined quite effectively to finish this guy off if they had to. In the end, though, we’ll never know. I got lucky and Big D achieved nothing at all. Story of the game, really.
So, after the drubbing received the night before from Mal’s lizardmen, it was time to put some hard-earned lessons into practice. The tourney was a one-day, 2400 points set-up with relatively light comp trimming some of the sillier things (Teclis, Pendant of Kaleth on 1+ AS dreadlord, dual ironblaster etc), as well as allowing look out sir saves against all the big spells. I didn’t approve of this last bit at all, because it usually means I end up facing armies with stupid herobus units (I do get annoyed when people scream ‘Dwellers cheese’ and then the moment it’s nerfed put 3+ characters into one unit). Sure enough, there were a few of those present, but a decent selection of armies kept things pretty fresh. It was 10.30am, I was hungover and hadn’t had any breakfast. Game on.
Seredain
Prince – Dragon Armour, Shield, Barded Steed
Giant Blade, Helm of Fortune, Talisman of Loec, Plucker Pendant – 286
Lecalion
Level 4 Archmage - High Magic
Dispel Scroll – 280
Caradath
Battle Standard Bearer – Great Sword, Heavy Armour, Barded Steed
Dawnstone, Dragon Helm, Other Trickster’s Shard – 188
Core Units
30 Spearelves – Full Command – 295
15 Archers – Musician, Standard, Banner of Eternal Flame – 190
10 Archers – Musician – 115
Special Units
14 Swordmasters – Bladelord, Amulet of Light – 237
10 White Lions – Standard, Gleaming Pennant – 167
8 Silver Helms – Shields, Musician – 192
5 Dragon Princes – 150
Rare Units
2 Repeater Bolt Throwers – 200
2 Great Eagles – 100
2400 points
Game 1 – Daemons of Chaos
An interesting daemons list was stood opposite including some of the usual suspects but also (since they’d just got a new book) some new choices. First off, the oldies but goldies: bloodletter herald horde, plaguebearer herald horde and a horror bunker with loremaster Tzeentch caster, deployed respectively one behind the other. This struck me as an unusual deployment but, with a massive tower stood in the centre of the board, my opponent may have figured that any slow infantry unit deployed on the far side of it would never see a meaningful combat. The new toys filling the rest of the army included two units of screamers (who’ve received a significant boost, I am told), and the soulcrusher, a new T7 monstrosity with 6 wounds, a 4+ armour save (annoyingly good against arrows) and a Str 3 move-and-shoot catapult to boot, for about 300-odd points. Now, ordinarily you think I’d just charge my helm bus into that thing, win massively (it only has 4 attacks and can’t thunderstomp cavalry) and pop it in one round. Well I would have, except for the final unit of interest: a large bus of 10 or so flesh hounds. There was no way that any of my units – the helm hammer excepted – could stand up to this unit for any length of time without suffering for it, and the close support provided to it by the hordes (who in turn had their right flank covered by the tower and soulcrusher) precluded me from surrounding it with the infantry without inviting a terrible counter-charge. So, the helms would have to head the dogs off on the right flank, my infantry would meet his in the centre (allowing for as much delay as possible), and I would have to bodge something together with archers, dragon princes and (if necessary) the spears to hold up and eventually finish off the soulcrusher on my left flank. To make sure that the nearest screamers couldn’t do anything horrible to my repeaters (stood on a hill on the right flank), I deployed the white lions immediately in front of them, next to the helms. They’d be on support duty this game.
Early game
Having won the first turn, and having learned my lesson about passive cavalry the night before, I advanced the helms a little up the right table edge and wheeled them inward to threaten an early charge, keep the screamers away from my shooters and encourage the hounds to do something other than bomb forward and eat my infantry. As insurance for the latter, the eagles moved into contention – much closer than in my last game (where I’d carelessly forgotten that 20” isn’t that far). My opponent took the bait and, despite the fact that I hadn’t left them enough room to land, screamed at my helms and killed a couple.
The move my opponent performed was surprising but (according to the tournament organiser) completely legal. In effect, he used the screamers’ 20” movement to move forward about 17” onto the corner of my helms, then (since they were skirmishers) effectively wheel backwards 3” to land in open ground. As moved on the table, the screamer models themselves never passed over the knights, but they were still able to perform their attack and kill a knight or two before backing off and landing. This mechanic stinks from my point of view, but it was no biggie and we were playing by host’s rules, so I noted the move down in my list of ‘Things to Watch’ and left it alone (FYI, another strange mechanic at this place is that you’re only allowed to charge one character out of a unit at any one time, on the basis that the rulebook says that “a character may charge from his unit…”. Apparently “a” in this context means “only one”. I don’t buy it, at all).
On grounds of pure utility, magic favoured me slightly this game, but long-ranged shooting was much more partisan and massively favoured the High Elves as my longbows and repeaters poured fire into the bloodletters. They pretty much had no choice other than to trudge forward toward the swordmasters / archers deployed opposite whilst the plaguebearer horde, untouched and grindy, advanced patiently behind. In reply to my hail of death, the soulcrusher sucked hard, missing the spears on Turn 1 and then misfiring on Turn 2 and suffering an automatic wound. My 10 archers (I love the archer detachment / dragon prince combo), plinked on another wound, so the big daemon was now down to 4. Sweet. It was at about this point of the game that I started wondering: why would anyone pay 300 points for a Str 3 stone thrower? Big D needed to get into combat with infantry, and soon.
Since my opponent had got scared of my knights (already within charge range of lots of stuff by Turn 2) and tried to scream them, the overly-hasty screamers themselves were now within easy charge range of the white lions. They marched in like professionals (once the helms had charged off against a harassment unit to clear a path) and destroyed all of them. So, with the flesh hounds now covered by the silver helms and an eagle, my most immediate concern was to prevent the soulcrusher from getting into combat with my spearelves (the closest desirable target) and thunderstomping them alongside the bloodletters. I therefore swung the spears right and advanced them 10” straight toward the bloodletters. This got them safely out of Big D’s line of sight and, to discourage a long bloodletter charge, I covered them with the swordmasters. Another withering hail from my archers and machines reaped a load more khornite daemons and, on the left, another misfire took another wound off the soulcrusher! Big D was having no luck at all.
Mid game
Now my opponent took a good chance and flanked my spears with his second unit of screamers (I thought he’d just use the scream but, even so, getting charged like this was better odds than getting stuck against Big D and leaving the swordmasters all by themselves). A decent move from my opponent, this, but in the end the elf citizens held easily, reformed to face the enemy on my next turn and destroyed them, reforming once again after combat to re-present a solid front against the bloodletters.
Since my spears spent this short while showing their flank to the bloodletters, I charged the swordmasters in. Since they had only one full rank left I was intensely confident about this but, actually, the swords badly underperformed and took a walloping from the hatred-filled ‘letters return attacks. I won combat (they are swordmasters after all), but at this rate my elite elves would not survive the battle. Images of a smug SpellArcher taunting me about the usefulness of the Standard of Balance filled my mind and I wondered (for the briefest of moments) where I might find 57 points… But then the second round of combat went completely the swordmasters’ way, brought the down to only a few models and finished off the khornite herald. With the spearelves now ready and looking on, this unit was basically done.
It was at about this point that things went from bad to much worse for the daemons. On the left flank, my dragon princes declared a long charge against the soulcrusher, needing a roll of 10. Having the green archers on hand to act as an emergency stand-and-shoot eagle, I was happy to miss this, but I made it in and, helpfully, then scored a couple of wounds (rolling enough hits with ASF to get those two sixes). The 4+ save couldn’t take the lances and then my opponent couldn’t make his ward saves either, so the princes now had a total combat res of 3 - fantastic. My opponent then only scored 1 hit from Big D’s paltry 4 attacks and then incredibly, failed to wound. He lost combat by 3, failed his stability test badly and then popped! This was a disaster in itself for the daemons but, worse, Big D’s demise now left a clear path for the princes to wheel round the tower and into the Tzeentch caster’s now undefended (and small) horror bodyguard.
On my right flank, meanwhile, the flesh hounds had finally won an overrun into the helms, but magic had come good here and my cavalry were fully protected by both Shield of Saphery and Courage of Aenarion. They also had Caradath deployed in the centre of the unit, spreading his anti-ward save virus from the Other Trickster’s Shard. Unsurpriingly, then, with their ward saves nerfed the dogs died hard to all my ASF attacks. Then, after the onslaught, my knights’ armour and ward saves (albeit some of the latter were re-rolled too) prevented any serious backlash. The combat was a massive win for me, the hound unit was shattered by instability and, after it all, was only left with 1 or 2 models.
With both flanks suddenly gone, my opponent’s position had become untenable. Within the next couple of turns, pretty much everything in his army except the plaguebearers would be dead and all my units (excepting the eagles), were still extant and would shortly surround his position completely. Pretty upset by his poor dice, my opponent lost hope, conceded and by the end of Daemon Turn 4, the game was done for a High Elf 20-0.
Debrief
A weird game, this one. Ostensibly, the board wasn’t much good for me. The enormous tower in the centre split the battlefield into two small pieces but was, at the same time, so imposing that I didn’t feel comfortable wheeling my cavalry around it and relying on harassment to slow down the daemons’ advance on my right-hand shooting base. Chiefly, this was because of the hound bus: it was just too quick and too dangerous for me to take any chances about it reaching my infantry without my characters being there. With my opponent effectively forming his hordes up in column, my knights could very easily have flanked around the left only to find themselves so isolated that they would have been powerless to prevent the combined force of bloodletters and hounds from tearing great chunks out of my infantry. Not worth the risk.
So, in the end, I was forced in effect to deploy much of my army in a narrow confine and play another Battle for the Pass. This time, however, I got the silver helms up early into the enemy’s flank so as to force him to feed me his fast units (including the hounds themselves) rather than combine them against my weaker troops as he might have done had I stood back. In addition to the direct benefits of using the knights aggressively, my shooting was left completely free to punish the perfect target – the bloodletters – which in turn allowed my swordmasters to finish them single-handedly while the spears were (unfortunately) otherwise engaged. Getting the knights into the enemy’s special troops had, in effect, created a virtuous chain of support which flowed all along the rest of the line.
The one bit of the battle I hadn’t really planned for was how to deal with what sat at the far end of that line – the soulcrusher. Really, the plan amounted to shoot it a bit, charge it with dragon princes when it gets close and hope for a wound or two: if the DPs run away, sacrifice the green archers eagle-style and then use the blue archers and/or spears to finish it off. Hardly the stuff of Julius Caesar, you’ll agree, but since Big D had only 6 wounds I casually figured it was doable and just trusted to luck. At least with the dogs and bloodletters engaged, my magic phase, archers and repeaters could have combined quite effectively to finish this guy off if they had to. In the end, though, we’ll never know. I got lucky and Big D achieved nothing at all. Story of the game, really.
The Cavalry Prince - List Design, Tactics, Battle Reports
http://www.ulthuan.net/forum/viewtopic.php?f=76&t=33584
http://www.ulthuan.net/forum/viewtopic.php?f=76&t=33584
-
John Rainbow
- Posts: 3550
- Joined: Thu Mar 24, 2011 2:47 am
- Location: PA, USA
Re: The Cavalry Prince - List Design, Tactics, Battle Reports
Another win. Congratulations. Hopefully the rest of the tourney goes well for you too! I have also faced the Soulcrusher a couple of times and to be honest, I've found it underwhelming each time. It's just far too many points for what you get - especially if you take the artillery upgrades.
The other thing that struck me was the move you described with the screamers. I guess skirmishers are allowed to reform as many times as they want during a move but from your description it just doesn't seem right. I guess I'd need to be there or see a diagram to make a proper comment on it though.
The other thing that struck me was the move you described with the screamers. I guess skirmishers are allowed to reform as many times as they want during a move but from your description it just doesn't seem right. I guess I'd need to be there or see a diagram to make a proper comment on it though.
This one has come up with me before and it comes down to interpretation I guess - I've never found a satisfactory answer either way. The rules say a character may charge but then that his unit may not declare a charge of its own. I guess you have to decide if the other characters within the unit count as 'the unit' that the character is leaving, in which case they can't charge or that the unit is not inclusive of the characters (See actual wording in BRB pg.101).Seredain wrote:FYI, another strange mechanic at this place is that you’re only allowed to charge one character out of a unit at any one time, on the basis that the rulebook says that “a character may charge from his unit…”. Apparently “a” in this context means “only one”. I don’t buy it, at all
-
Bolt Thrower
- Posts: 2021
- Joined: Tue May 26, 2009 3:13 am
- Location: Illinois, USA
Re: The Cavalry Prince - List Design, Tactics, Battle Reports
Glad you won this one. That screamer bit sounds like a bunch of dragon dung to me. Skirmishes move, wheel, march and charge just like other units. The only exception being the reform. You can't wheel backwards--page 14. Silly.
Battle Standard Bearer. Don't leave home without it.
Bolt Thrower's High Elves
Bolt Thrower's High Elves
Re: The Cavalry Prince - List Design, Tactics, Battle Reports
Frankly I'm shocked at the Screamer thing... how many games have you posted vs Lizardmen in this thread? That same move works exactly the same with Terradons dropping rocks, so I am really shocked that you haven't had this happen to you about ten times already.
"...why would anyone pay 300 points for a Str 3 stone thrower?
 Indeed, it's really terrible! You can buy a S5 fire thrower upgrade for it which is much much much better. I've been using a Soulgrinder myself, but I've had the same luck as your opponent- three shots, two misfires. Each time I've misfired ANY result other than a misfire would have hit 300+ points of T3 model as well, making it even worse.
Odd tactics from your opponent but good win there! Personally I never worry too much about big Flesh Hound units, in proper, full-strength formation they only have 15 attacks, meaning they'll lose to almost any unit of ours.
"...why would anyone pay 300 points for a Str 3 stone thrower?
Odd tactics from your opponent but good win there! Personally I never worry too much about big Flesh Hound units, in proper, full-strength formation they only have 15 attacks, meaning they'll lose to almost any unit of ours.
-
SpellArcher
- Green Istari
- Posts: 13847
- Joined: Sat Sep 13, 2008 11:26 am
- Location: Otherworld
Re: The Cavalry Prince - List Design, Tactics, Battle Reports
Reading this report put me very much in mind of my last two games vs Daemons. In all three games a big Plaguebearer unit got left behind, with bad results for the Daemons. This army has so many fast units (including M5 Bloodletters because of their extra charge banner) that M4 infantry can easily get isolated. Eldria made a good case for them way back in this thread, they are a tough, reliable base for the army. If I did a Daemon army they'd be the first thing on my list. But they have to be used properly. I'd have been tempted to deploy them as centrally as possible and head straight for the enemy, flanked by faster stuff.
Now we all know how deadly Bloodletters can be and how they are the go-to choice. But a High Elf army has in Swordmasters a unit that can beat them. I am learning to have faith in these guys. Here this was helped by the HE shooting phase because as Seredain said, not enough pressure was put on elsewhere to lock down HE shooting resources. In my two games the Standard of Balance swung things for me. These factors make running a 'letter Horde straight at High Elves a two-edged play.
Just as Seredain was able to punish the Bloodletters here, my shooting was free in my last Daemons game to focus on an 8-wound chariot that was blocking my advance. My opponent deployed both his Hordes early on my extreme right. Which left me free to weight my left flank and rush his units there, once I'd dealt with the chariot. Exactly as with Seredain's game, not enough pressure was put on the HE army with the result that the Daemon units could be dealt with piecemeal. To do this against a competant elf player is fatal.
The crucial difference in my first game vs Daemons was that my opponent rushed me with most of his units turn 1, so the pressure was on and shooting resources were tied up fending off Fiends. But lacking the support of the Plaguebearers they couldn't break through and the Bloodletters were destroyed, exposing the Horror bunker behind. It's worth noting that finally getting the Plaguebearers into action saved a 7-13 for my opponent, as opposed to the 0-20's in my other game and Seredain's.
One to watch out for Mr S, Vauls' does not work vs Daemonic Icons where we play. I was surprised too!
A New Blog (Orcs and Goblins)
http://ulthuan.net/forum/viewtopic.php?f=5&t=70550
Cavalry Prince Reloaded
http://ulthuan.net/forum/viewtopic.php?f=80&t=70001
http://ulthuan.net/forum/viewtopic.php?f=5&t=70550
Cavalry Prince Reloaded
http://ulthuan.net/forum/viewtopic.php?f=80&t=70001
Re: The Cavalry Prince - List Design, Tactics, Battle Reports
Huh, that's odd, you mean at Og Games? I'll have to have a word, Vaul's certainly DOES work against Daemonic Icons (as we all know), and although they don't get everything right at the club, they're usually open to being convinced.
(The one-character-charge per unit ruling was one I never agreed with either, but it's not based upon the rules saying "a" character can charge out, it's based on the fact that once a character has charged out, the unit may not make a charge combined with any characters being subject to the unit's movement restrictions. So if unit can't charge, nor can a character trapped inside)
(The one-character-charge per unit ruling was one I never agreed with either, but it's not based upon the rules saying "a" character can charge out, it's based on the fact that once a character has charged out, the unit may not make a charge combined with any characters being subject to the unit's movement restrictions. So if unit can't charge, nor can a character trapped inside)
-
SpellArcher
- Green Istari
- Posts: 13847
- Joined: Sat Sep 13, 2008 11:26 am
- Location: Otherworld
Re: The Cavalry Prince - List Design, Tactics, Battle Reports
Don't worry Stormie, I chose Curse instead and shot the chariot. Dropped an eagle in front of the Bloodletters.
A New Blog (Orcs and Goblins)
http://ulthuan.net/forum/viewtopic.php?f=5&t=70550
Cavalry Prince Reloaded
http://ulthuan.net/forum/viewtopic.php?f=80&t=70001
http://ulthuan.net/forum/viewtopic.php?f=5&t=70550
Cavalry Prince Reloaded
http://ulthuan.net/forum/viewtopic.php?f=80&t=70001
Re: The Cavalry Prince - List Design, Tactics, Battle Reports
I don't agree!shoot it a bit, charge it with dragon princes when it gets close and hope for a wound or two: if the DPs run away, sacrifice the green archers eagle-style and then use the blue archers and/or spears to finish it off. Hardly the stuff of Julius Caesar, you’ll agree
I don't see what's so bad about blood letters in a combined arms list - shooting and magic seem to deal with them pretty nicely.
Thanks for the great read.
"I say the Eatainii were cheating - again." -Aicanor
"Eatainian jerks…" -Headshot
"It was a little ungentlemanly." -Aicanor (on the Eatainii)
"What is it with Eataini being blamed for everything?" -Aicanor
"Eatainian jerks…" -Headshot
"It was a little ungentlemanly." -Aicanor (on the Eatainii)
"What is it with Eataini being blamed for everything?" -Aicanor
Re: The Cavalry Prince - List Design, Tactics, Battle Reports
Thanks for the comments, guys.
I'm sensing a healthy amount of support on this screamers thing, I see! Good - I agree the mechanic smells funny. The characters thing could do with an FAQ. I actually think the "unit's" restriction might do it: when he's with the unit, the second character is part of it and therefore maybe couldn't charge. On the other hand, since the 2nd character is declaring out of that unit on his own account, the unit itself declares no charges, the the 2nd hero charge would work fine.
I'll obviously argue for the latter as much as possible.
Bloodletters don't scare me with the shooting phase I'm packing, but flesh hounds do. In one battle, I put my white lions into 6 hounds, bounced and got nailed. I think maybe I found this unnecessarily traumatic, because I've been very careful with Flesh Hounds ever since. I think I have infantry units which could take a block of 10 but they'd need support to do it, and I'd expect to suffer some damage what with the WS5, 2 wounds and 2 attacks on each dog. The helm hammer, with the OTS and high strength, will kill the dogs quickly, can take the hits back from the remainder and is faster to boot. Get the hounds out of the way quick enough and there'll be plenty of time for the knights to help out in the final combat against units like the plaguebearers.
Up next! Warriors of Chaos...
The Cavalry Prince - List Design, Tactics, Battle Reports
http://www.ulthuan.net/forum/viewtopic.php?f=76&t=33584
http://www.ulthuan.net/forum/viewtopic.php?f=76&t=33584
-
SpellArcher
- Green Istari
- Posts: 13847
- Joined: Sat Sep 13, 2008 11:26 am
- Location: Otherworld
Re: The Cavalry Prince - List Design, Tactics, Battle Reports
My 10 Lions dealt with 5 Flesh Hounds no problem, maybe I was lucky!
A New Blog (Orcs and Goblins)
http://ulthuan.net/forum/viewtopic.php?f=5&t=70550
Cavalry Prince Reloaded
http://ulthuan.net/forum/viewtopic.php?f=80&t=70001
http://ulthuan.net/forum/viewtopic.php?f=5&t=70550
Cavalry Prince Reloaded
http://ulthuan.net/forum/viewtopic.php?f=80&t=70001
Re: The Cavalry Prince - List Design, Tactics, Battle Reports
With the characters charging from units thing, imagine you had a special rule on a unit that said "may not declare a charge". Would a character be able to charge from the unit on his own account? Most would say "no"- and that's exactly the same principle as what happens when one character has declared a charge. It took me a long time to agree with this, but one day the rule just clicked and it made sense, even if I disagreed with it 
Flesh Hounds die to White Lions just as quickly as Bloodletters, but don't have Killing Blow, which makes it a lot safer to hit them with your characters and cavalry (as you say!). The only bad experience I've had with Flesh Hounds was doing 19 wounds to a unit of 10 and scoring zero VPs for my troubles
Flesh Hounds die to White Lions just as quickly as Bloodletters, but don't have Killing Blow, which makes it a lot safer to hit them with your characters and cavalry (as you say!). The only bad experience I've had with Flesh Hounds was doing 19 wounds to a unit of 10 and scoring zero VPs for my troubles
Re: The Cavalry Prince - List Design, Tactics, Battle Reports
Yeah that does actually make perfect sense. Damn.Stormie wrote:With the characters charging from units thing, imagine you had a special rule on a unit that said "may not declare a charge". Would a character be able to charge from the unit on his own account? Most would say "no"- and that's exactly the same principle as what happens when one character has declared a charge. It took me a long time to agree with this, but one day the rule just clicked and it made sense, even if I disagreed with it
The Cavalry Prince - List Design, Tactics, Battle Reports
http://www.ulthuan.net/forum/viewtopic.php?f=76&t=33584
http://www.ulthuan.net/forum/viewtopic.php?f=76&t=33584
-
Swordmaster of Hoeth

- Southern Sentinel
- Posts: 4480
- Joined: Thu Jul 01, 2004 9:01 am
- Location: On the path of an outcast
Re: The Cavalry Prince - List Design, Tactics, Battle Reports
HI Seredain,
Just wanted to say I am glad you are posting again but you have to forgive me for not commenting just yet. Hopefully I will find enough time to finish reporting on my own games (before I forget too much!) and post in all amazing blogs around before you vanish again.
Cheers!
Just wanted to say I am glad you are posting again but you have to forgive me for not commenting just yet. Hopefully I will find enough time to finish reporting on my own games (before I forget too much!) and post in all amazing blogs around before you vanish again.
Cheers!
Twitter @SwordOfHoeth
High Elves MSU - Observations
Rabidnid wrote:Are you seriously asking someone called Swordmaster of Hoeth why he has more swordmasters than white lions? Really?
Re: The Cavalry Prince - List Design, Tactics, Battle Reports
Powerful Seredain, thanks for the report. Looking forward to the next.
Re: The Cavalry Prince - List Design, Tactics, Battle Reports
Dude, no need to worry about that. It's not like I find loads of time even to write this thread, let alone comment on everyone else's - I've become properly rubbish at it! Read away at your leisure and chip in any time: no need to rush on my account!Swordmaster of Hoeth wrote:HI Seredain,
Just wanted to say I am glad you are posting again but you have to forgive me for not commenting just yet. Hopefully I will find enough time to finish reporting on my own games (before I forget too much!) and post in all amazing blogs around before you vanish again.
Cheers!
Cheers Jimmy! I'm on it now...Jimmy wrote:Powerful Seredain, thanks for the report. Looking forward to the next.
The Cavalry Prince - List Design, Tactics, Battle Reports
http://www.ulthuan.net/forum/viewtopic.php?f=76&t=33584
http://www.ulthuan.net/forum/viewtopic.php?f=76&t=33584
Re: The Cavalry Prince - List Design, Tactics, Battle Reports
Game 2 – Warriors of Chaos
Fighting on such a cramped board, I felt like I’d got off pretty lightly in the last game, so I was very pleased to see this board which contained a great deal of open space, the terrain features being largely spread out around the edges except for a waystone standing in the very centre. Warriors are also an army that I like fighting (albeit that I hate their magic phase and hell cannons), but here they were running with some interesting toys. The general was the run o’ the mill 1+ 3++ Tzeentch disc sorcerer lord with the Eye. I didn’t like him, but a combination of Vaul’s and bolt throwers would keep him on his toes just fine. Then there were 5 Khorne knights (Seredain food), two Slaaneshi giants (ASF giants? Nooo!), another disc character (BSB, 1+ save, 4+ ward and (I think) the Sword of Anti-Heroes), some dogs etc and… Throgg with two units of 8 trolls (ugh).
I’m no fan of Throgg lists but, with all these beasts running around, I did at least have a big advantage in deployment. It soon became clear that the trolls were going centre-left and the manoeuvreable stuff (knights, giants, sorcerer lord) was going opposite my right flank. So, to close them down I loaded that side with both units of cavalry, the white lions, spearelves and archmage. I deployed my shooting in the centre (first so as to keep my opponent guessing), around a large marsh sat (annoyingly) right in the middle of my zone. On the left, unusually, I placed the swordmasters out on the flank. They were there to act as a decoy just powerful enough to give the trolls something to think about. If, for example, the trolls swung toward my right and advanced that way, my swords would be in his rear- and I figured no-one wants that. If one unit came after the swordmasters, meanwhile, I had plenty of space to backtrack and drag that unit away from where the real fighting was happening, using an eagle when necessary. Obviously, whatever manoeuvres took place, my flaming blue archers would be doing their work on the trolls’ regeneration.
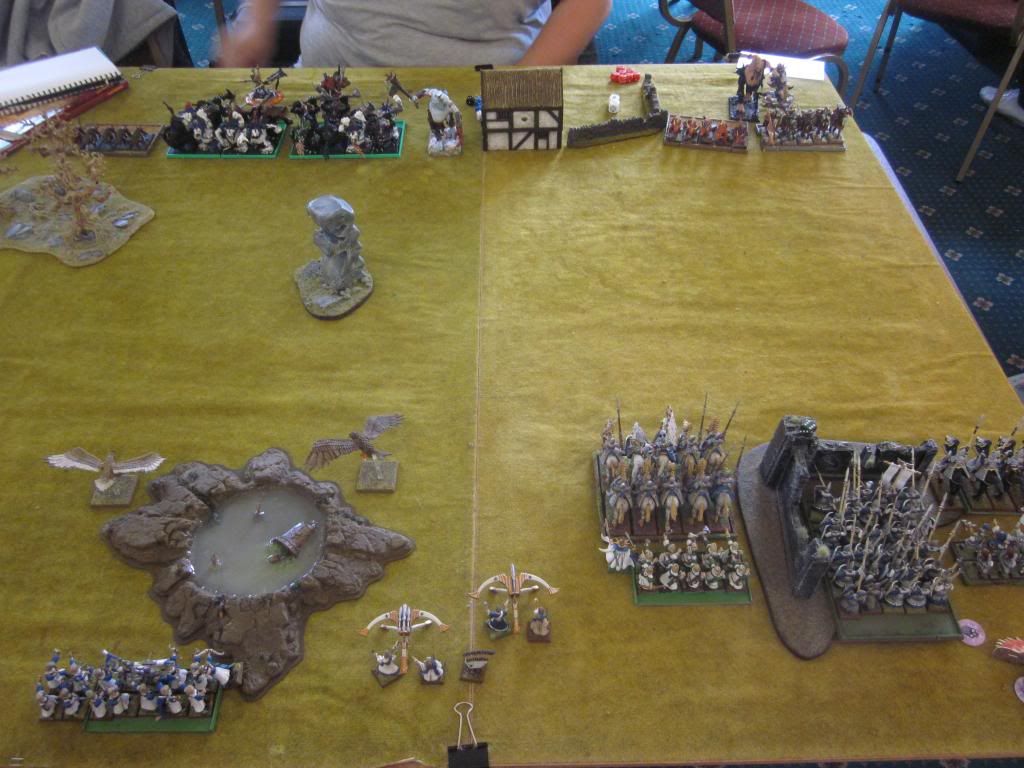
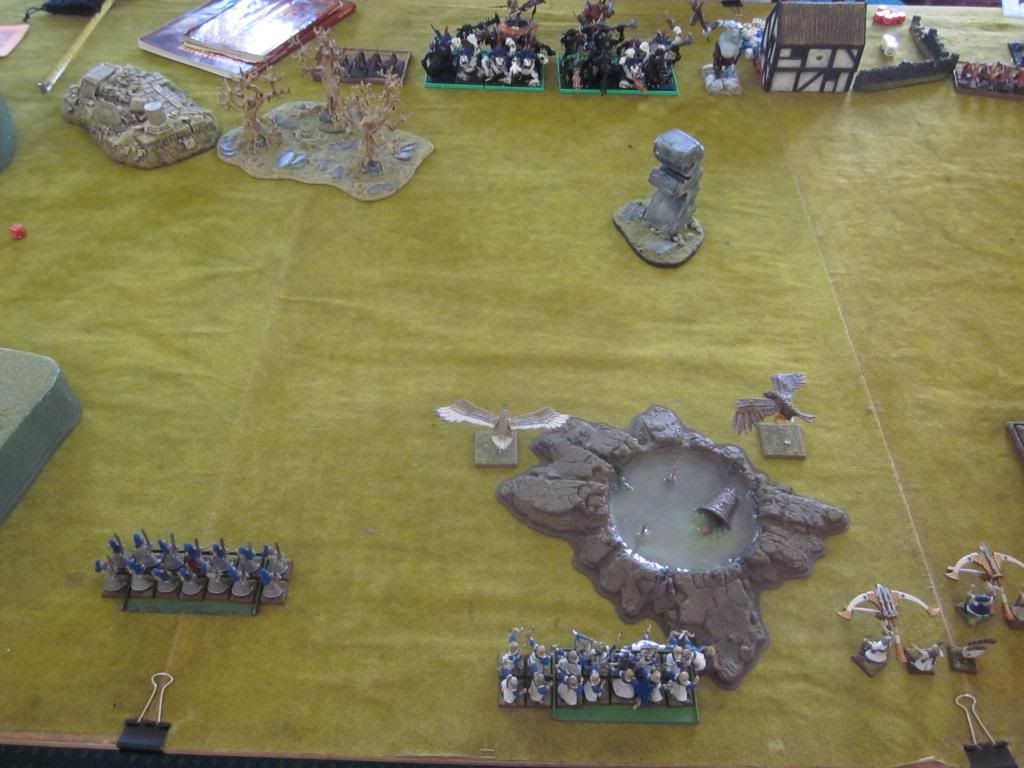
Early game
I won the first turn (again) and followed last game’s plan of shoving the helm hammer into the enemy’s face to see if he’d bite. In this case, Seredain led his bodyguard went straight forward and offered an easy charge to the knights of Khorne. In support of the helms I then moved up the spears (left, holding Lecalion), white lions and dragon princes (both right). In the magic and shooting phases I killed a knight or two and (importantly), the whole unit of warhounds stood opposite my helms. Now, given the sudden absence of his local harassment unit, my opponent had an undesirable choice to make: charge the silver helms, sit an ASF giant in front of them to act as an expensive eagle or let me charge the target of my choice and trust in a round of magic. He chose to charge with the Khorne knights.
In the magic phase, my opponent used the Eye to throw a 5 dice Vaul’s Unmaking at Lecalion. I scrolled it (no point letting him know my character had nothing else), and he laughed and said ”Damn! I thought he had the Book of Hoeth!”. Combat then showed him that I was in fact carrying the Giant Blade on the prince. I rolled brilliant dice (ASF is amazing) and the helm hammer destroyed their enemy completely. Much to my opponent’s surprise, I now had an easy charge on against the sorcerer lord.

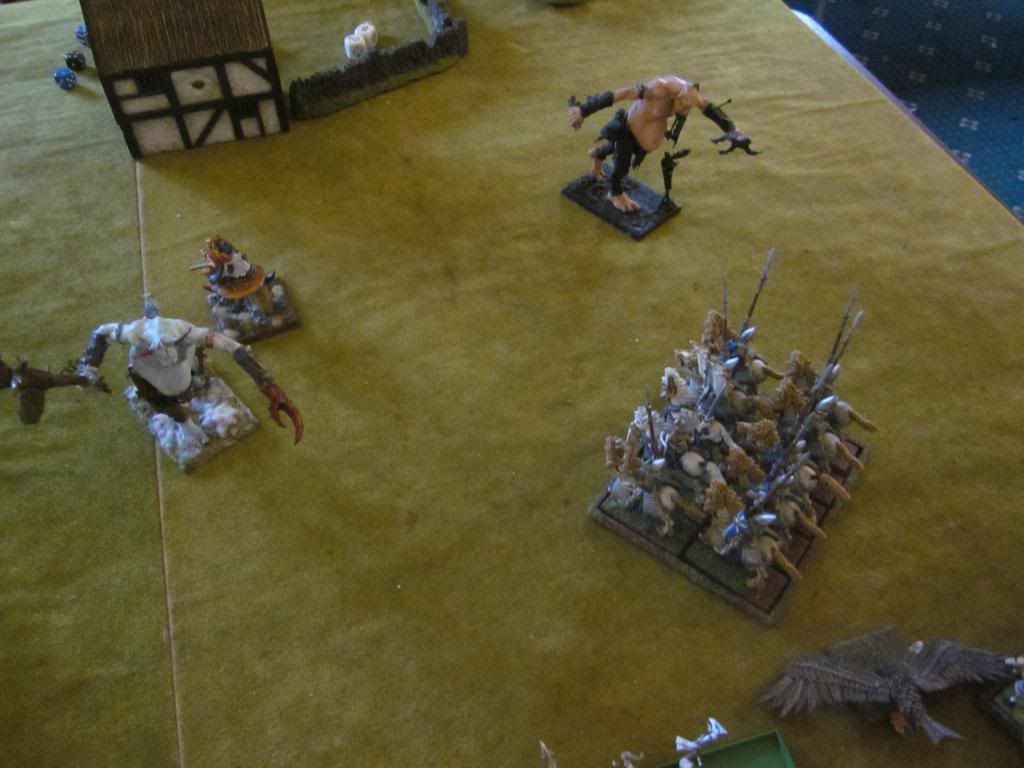
And much to my surprise, when I declared that charge my opponent chose to hold. Naturally, at this moment I said absolutely nothing and stood stock-still, like a chameleon watching a fly, but inside I was dancing the salsa. Obviously my opponent didn’t know I was toting the Talisman of Loec and figured he would tank the knights with his 3+ ward, hold on the BSB’s re-roll and counter-attack with one of the giants (my right) and disc BSB. Even so, this was in my view an amazing risk to take with his most important character (the level 4 was likely to lose combat by at least 2 res, and would you bet on rr Ld7?). Perhaps my opponent was worried that the table edge was too close behind him, or perhaps this guy was packing the Crown of Command? I don’t remember, in spite of what happened next. Vaul’s Unmaking kicked in, ripped off the level 4’s ward save and made the outcome certain. Seredain cleaved Elthrac the Damned (or whatever his name was) in half and led his knights on into the flank of the nearest (central) giant , which I’d already brought down to half wounds with a combination of archery and Fury of Khaine. Tasty.
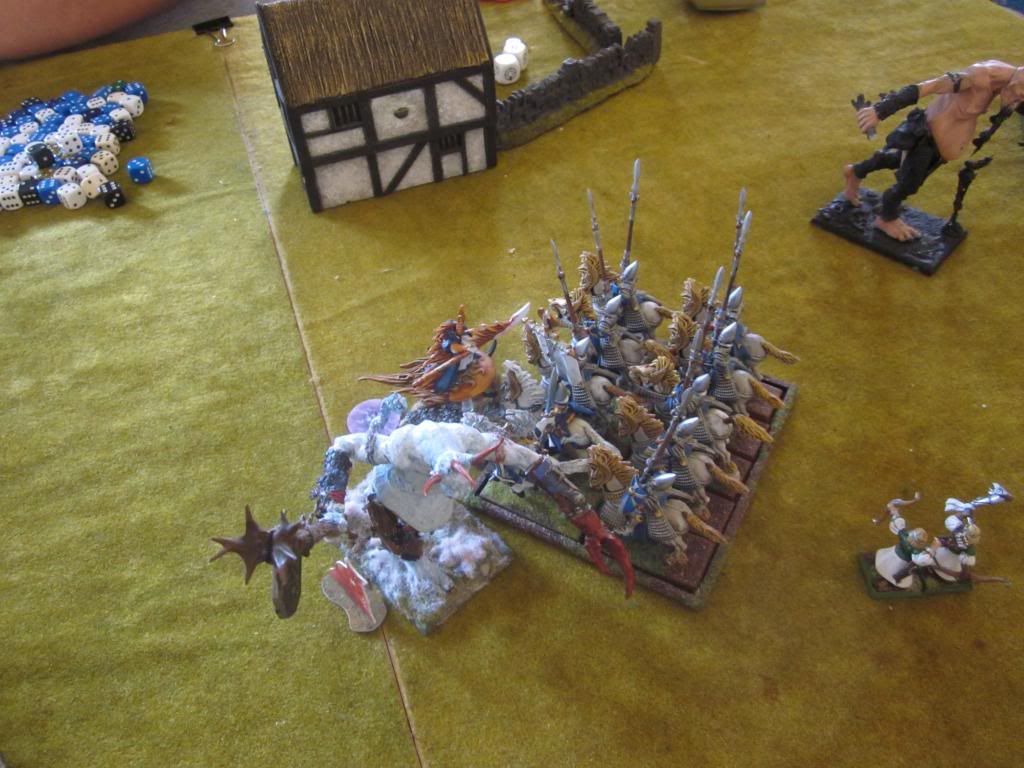
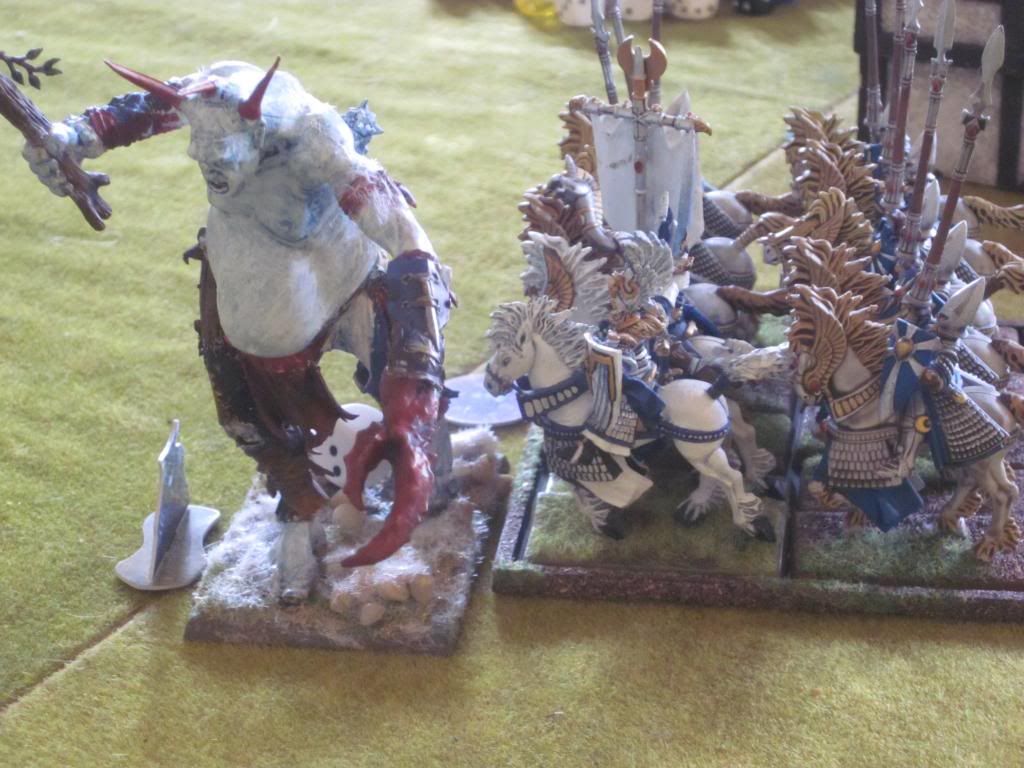
Mid game
My opponent responded to these terrible events by making a long charge into the white lions with his other giant (who could no longer see the helms), charging the helms with his BSB and scrambling one of the troll units over to his threatened left flank as fast as possible. However, with the central waystone proving awkward for these wide and musicianless units, this was a slow process and the pack of trolls on my far left was basically stuck out of it. It settled instead on making a beeline toward my left flank in order to squash the flaming archers.
Meanwhile, in another epic combat, Seredain accepted the chaos BSB’s challenge and, popping the talisman, destroyed him in spite of his 1+ armour save and 4+ ward. Caradath and the helms likewise performed well, getting enough hits to knock the last wounds off the ASF giant even without their re-rolls. Annoyingly, of course, the giant could still make its own ASF attack and, in a manner which must have been against all the laws of physics, managed to pick up and eat my BSB before expiring. Bloody hell. On my far right, the white lions and Slaaneshi giant had a pillow fight for a bit but, after a round of poor thunderstomps against shielded lions, the beast finally fell. In spite of poor Caradath, the result of all this was a triumph. By my turn 4, the enemy’s left flank was completely gone (warhounds, level 4, BSB, two giants and the knights of Khorne), his magic phase destroyed and his last three units (the trolls plus Throgg) desperately vulnerable to my shooting and magic.
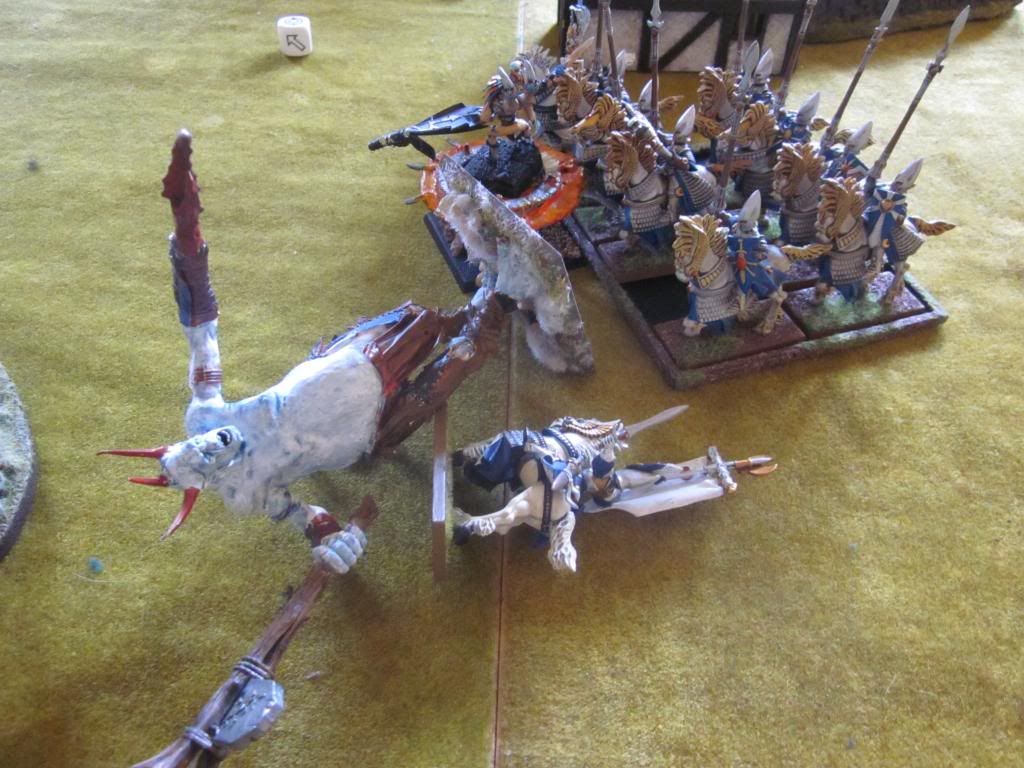
Balls!
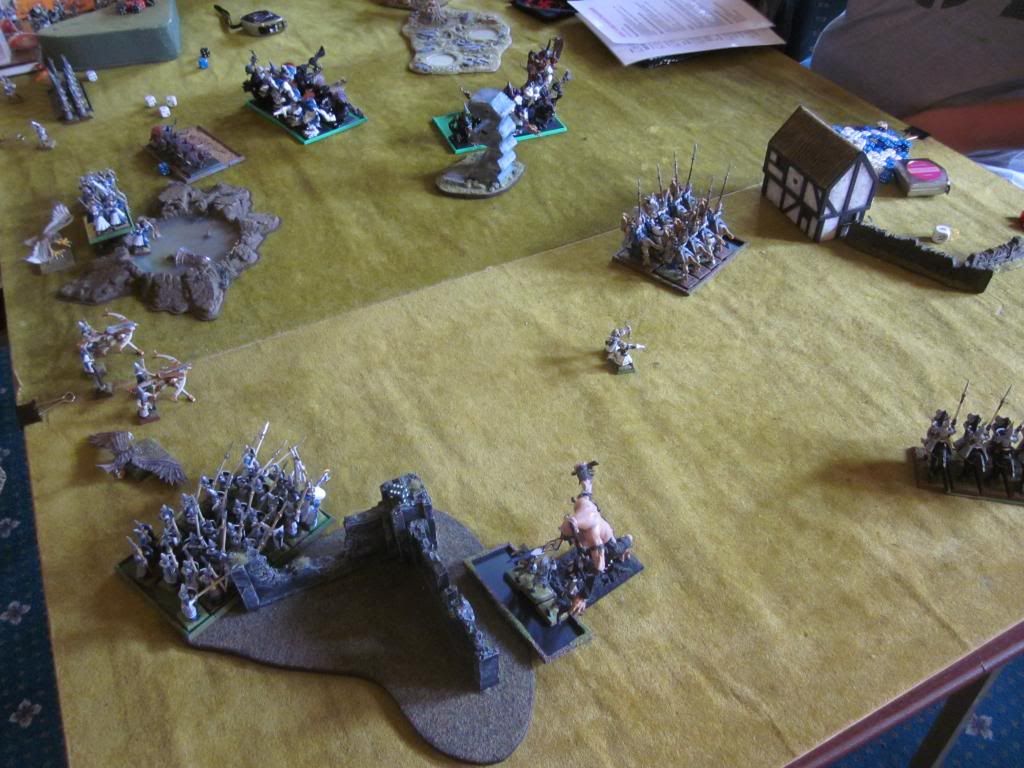
Late game
The plan now was to shoot the hell out of those trolls and charge them down as the opportunity arose. However, I’d only attempt this last part if I was sure I would kill almost all the trolls in one round. Since my swordmasters (only close to the unit I had not, as yet, shot at all) and lions were both far out on the flanks of the field, this task would be left to the knights; and I had no intention of letting anything vomit on my prince (who only had two wounds left, remember). So, principally, the plan was to shoot and bravely keep my distance.

This plan went well. Throgg’s unit (that nearest my cavalry on the right) was, after a few rounds of (actually very poor) shooting, completely destroyed. Although my shooting hadn't been accurate enough to allow me to quickly wipe one unit before passing onto the next, one unit's destruction did at least force the troll king toward the last trolls (my left) and away from anything expensive. Eventually, seeing his chance to get rid of the swordmasters (who’d by now swung left out of line of sight while the remaining trolls ran toward my archers), Throgg abandoned his last available bodyguard so he could vomit on some elves. Amazingly, he killed all but 2 of the swordmasters with his breath template, but he would pay dearly for it. Now stood out on his own, he was an easy target for my shooters. A low-dice magic phase was enough to put up the Arrow Curse, flaming arrows put a wound or two on him and the following hail of bolts brought him down. The last troll unit, harassed into uselessness by the eagles but still at full strength, watched these events unfold while standing precariously close to my board edge. Being stupid, however, they just picked their noses and watched their king die. Game over. 20-0.
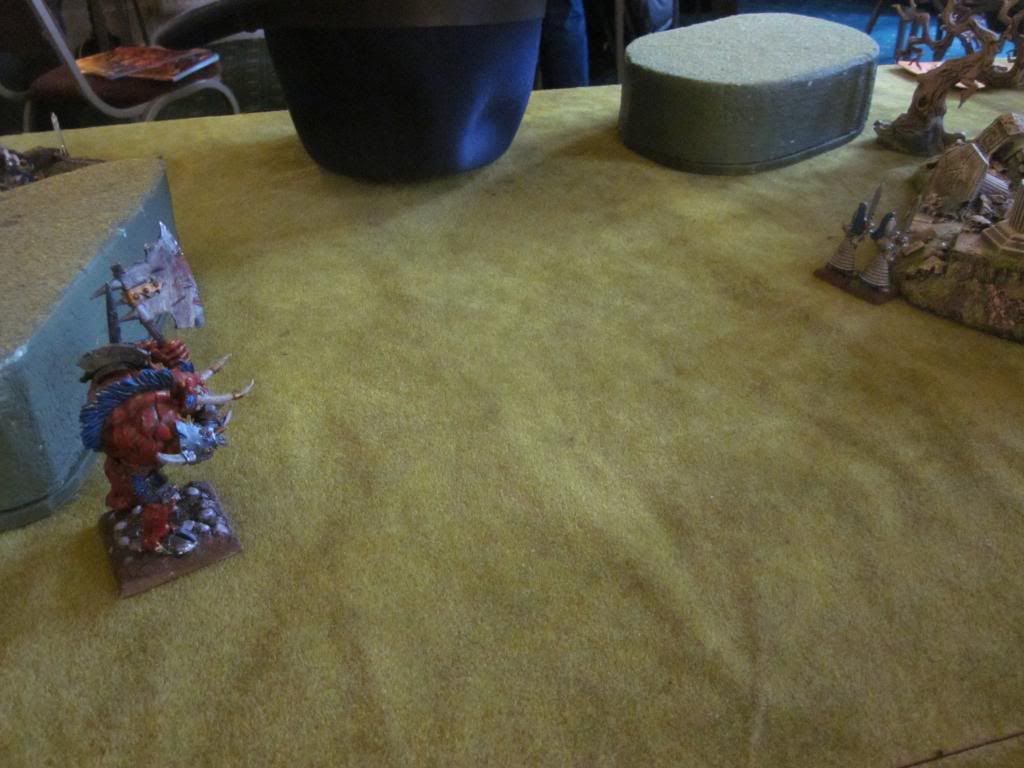
Pride...
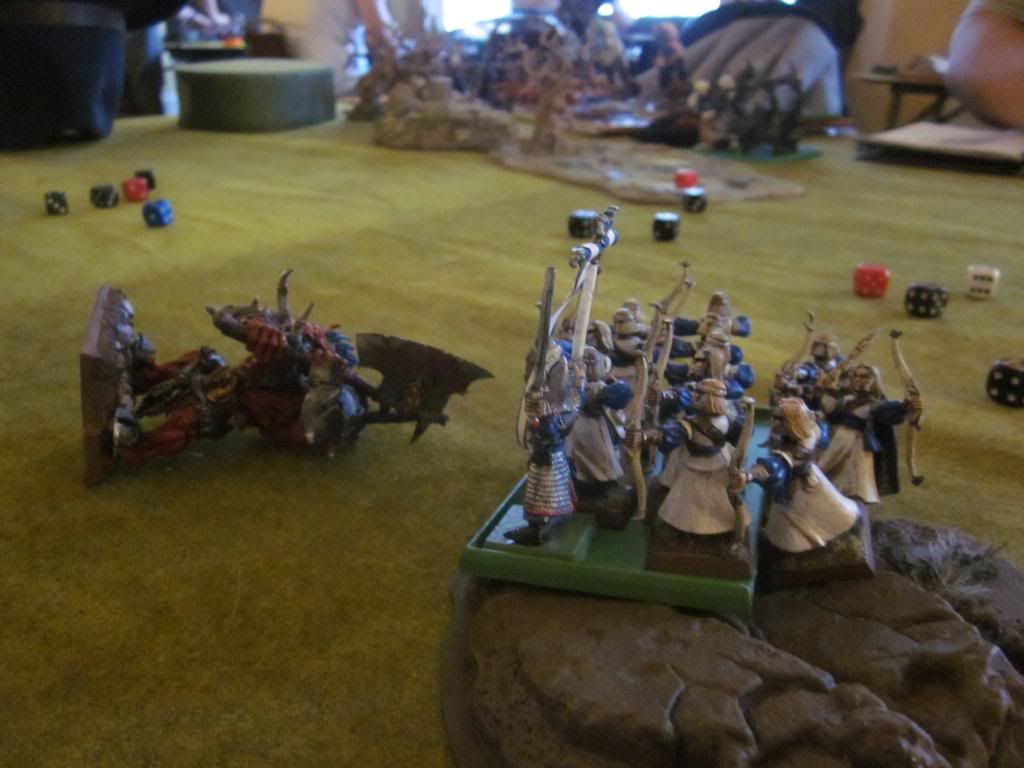
...comes before a fall.
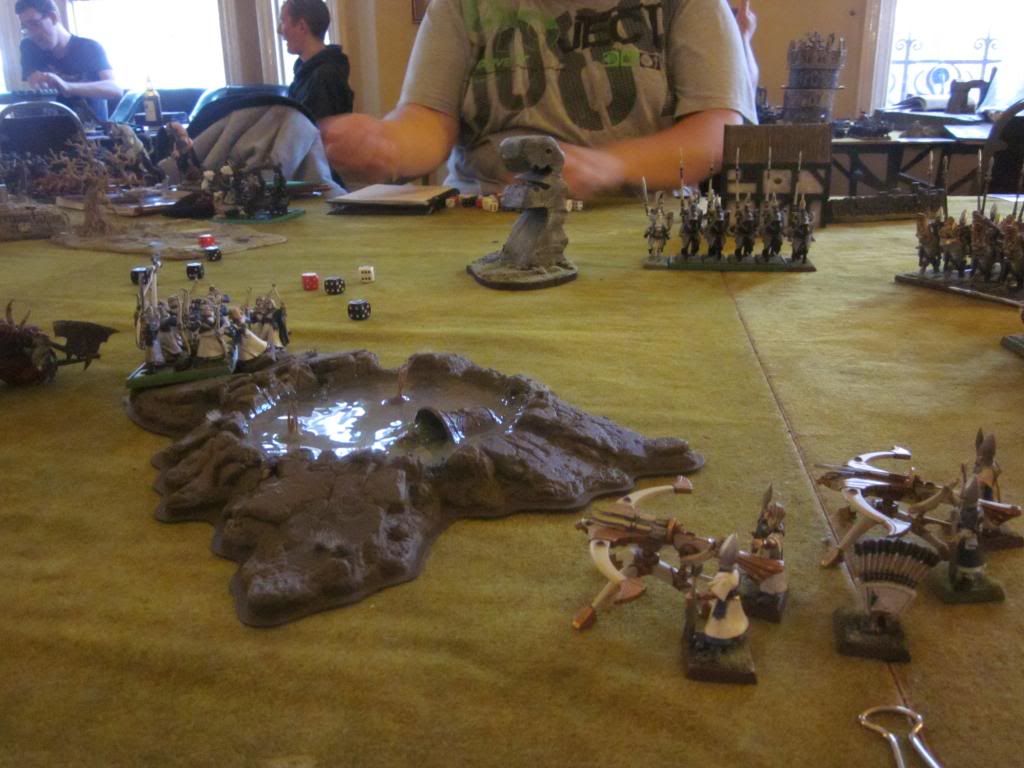

Debrief
Well, to be honest, I’m not sure this was a fair fight just because my opponent had absolutely no idea what was in my army list. A single rank of shot-up chaos knights should not be charging my helms. No sorcerer, even if he has a 3+ ward and stubborn, should take the risk of holding a charge from them either (even without Vaul’s, how many lists use the OTS these days?). That the Chaos BSB chose to get into combat with my prince, in spite of seeing his general slain with contemptible ease, was also quite surprising and betrayed his ignorance that I was packing the talisman.
In my defence, though, my concentrated deployment and aggressive advance across the right side of the field did, firstly, pose some awkward questions (killing the dogs on T1 was crucial here). Secondly, this deployment contained overwhelming force, especially considering the reach and influence of my shooting and magic, which brought the giants and knights down below strength, protected the helms and lions and removed my opponent’s ward saves. All of these tools working together was just too much for the units deployed against them. Latterly, flaming arrows made life impossible for the trolls once I’d established board control. It doesn’t get much more comfortable than this.
Fighting on such a cramped board, I felt like I’d got off pretty lightly in the last game, so I was very pleased to see this board which contained a great deal of open space, the terrain features being largely spread out around the edges except for a waystone standing in the very centre. Warriors are also an army that I like fighting (albeit that I hate their magic phase and hell cannons), but here they were running with some interesting toys. The general was the run o’ the mill 1+ 3++ Tzeentch disc sorcerer lord with the Eye. I didn’t like him, but a combination of Vaul’s and bolt throwers would keep him on his toes just fine. Then there were 5 Khorne knights (Seredain food), two Slaaneshi giants (ASF giants? Nooo!), another disc character (BSB, 1+ save, 4+ ward and (I think) the Sword of Anti-Heroes), some dogs etc and… Throgg with two units of 8 trolls (ugh).
I’m no fan of Throgg lists but, with all these beasts running around, I did at least have a big advantage in deployment. It soon became clear that the trolls were going centre-left and the manoeuvreable stuff (knights, giants, sorcerer lord) was going opposite my right flank. So, to close them down I loaded that side with both units of cavalry, the white lions, spearelves and archmage. I deployed my shooting in the centre (first so as to keep my opponent guessing), around a large marsh sat (annoyingly) right in the middle of my zone. On the left, unusually, I placed the swordmasters out on the flank. They were there to act as a decoy just powerful enough to give the trolls something to think about. If, for example, the trolls swung toward my right and advanced that way, my swords would be in his rear- and I figured no-one wants that. If one unit came after the swordmasters, meanwhile, I had plenty of space to backtrack and drag that unit away from where the real fighting was happening, using an eagle when necessary. Obviously, whatever manoeuvres took place, my flaming blue archers would be doing their work on the trolls’ regeneration.
Early game
I won the first turn (again) and followed last game’s plan of shoving the helm hammer into the enemy’s face to see if he’d bite. In this case, Seredain led his bodyguard went straight forward and offered an easy charge to the knights of Khorne. In support of the helms I then moved up the spears (left, holding Lecalion), white lions and dragon princes (both right). In the magic and shooting phases I killed a knight or two and (importantly), the whole unit of warhounds stood opposite my helms. Now, given the sudden absence of his local harassment unit, my opponent had an undesirable choice to make: charge the silver helms, sit an ASF giant in front of them to act as an expensive eagle or let me charge the target of my choice and trust in a round of magic. He chose to charge with the Khorne knights.
In the magic phase, my opponent used the Eye to throw a 5 dice Vaul’s Unmaking at Lecalion. I scrolled it (no point letting him know my character had nothing else), and he laughed and said ”Damn! I thought he had the Book of Hoeth!”. Combat then showed him that I was in fact carrying the Giant Blade on the prince. I rolled brilliant dice (ASF is amazing) and the helm hammer destroyed their enemy completely. Much to my opponent’s surprise, I now had an easy charge on against the sorcerer lord.
And much to my surprise, when I declared that charge my opponent chose to hold. Naturally, at this moment I said absolutely nothing and stood stock-still, like a chameleon watching a fly, but inside I was dancing the salsa. Obviously my opponent didn’t know I was toting the Talisman of Loec and figured he would tank the knights with his 3+ ward, hold on the BSB’s re-roll and counter-attack with one of the giants (my right) and disc BSB. Even so, this was in my view an amazing risk to take with his most important character (the level 4 was likely to lose combat by at least 2 res, and would you bet on rr Ld7?). Perhaps my opponent was worried that the table edge was too close behind him, or perhaps this guy was packing the Crown of Command? I don’t remember, in spite of what happened next. Vaul’s Unmaking kicked in, ripped off the level 4’s ward save and made the outcome certain. Seredain cleaved Elthrac the Damned (or whatever his name was) in half and led his knights on into the flank of the nearest (central) giant , which I’d already brought down to half wounds with a combination of archery and Fury of Khaine. Tasty.
Mid game
My opponent responded to these terrible events by making a long charge into the white lions with his other giant (who could no longer see the helms), charging the helms with his BSB and scrambling one of the troll units over to his threatened left flank as fast as possible. However, with the central waystone proving awkward for these wide and musicianless units, this was a slow process and the pack of trolls on my far left was basically stuck out of it. It settled instead on making a beeline toward my left flank in order to squash the flaming archers.
Meanwhile, in another epic combat, Seredain accepted the chaos BSB’s challenge and, popping the talisman, destroyed him in spite of his 1+ armour save and 4+ ward. Caradath and the helms likewise performed well, getting enough hits to knock the last wounds off the ASF giant even without their re-rolls. Annoyingly, of course, the giant could still make its own ASF attack and, in a manner which must have been against all the laws of physics, managed to pick up and eat my BSB before expiring. Bloody hell. On my far right, the white lions and Slaaneshi giant had a pillow fight for a bit but, after a round of poor thunderstomps against shielded lions, the beast finally fell. In spite of poor Caradath, the result of all this was a triumph. By my turn 4, the enemy’s left flank was completely gone (warhounds, level 4, BSB, two giants and the knights of Khorne), his magic phase destroyed and his last three units (the trolls plus Throgg) desperately vulnerable to my shooting and magic.
Balls!
Late game
The plan now was to shoot the hell out of those trolls and charge them down as the opportunity arose. However, I’d only attempt this last part if I was sure I would kill almost all the trolls in one round. Since my swordmasters (only close to the unit I had not, as yet, shot at all) and lions were both far out on the flanks of the field, this task would be left to the knights; and I had no intention of letting anything vomit on my prince (who only had two wounds left, remember). So, principally, the plan was to shoot and bravely keep my distance.
This plan went well. Throgg’s unit (that nearest my cavalry on the right) was, after a few rounds of (actually very poor) shooting, completely destroyed. Although my shooting hadn't been accurate enough to allow me to quickly wipe one unit before passing onto the next, one unit's destruction did at least force the troll king toward the last trolls (my left) and away from anything expensive. Eventually, seeing his chance to get rid of the swordmasters (who’d by now swung left out of line of sight while the remaining trolls ran toward my archers), Throgg abandoned his last available bodyguard so he could vomit on some elves. Amazingly, he killed all but 2 of the swordmasters with his breath template, but he would pay dearly for it. Now stood out on his own, he was an easy target for my shooters. A low-dice magic phase was enough to put up the Arrow Curse, flaming arrows put a wound or two on him and the following hail of bolts brought him down. The last troll unit, harassed into uselessness by the eagles but still at full strength, watched these events unfold while standing precariously close to my board edge. Being stupid, however, they just picked their noses and watched their king die. Game over. 20-0.
Pride...
...comes before a fall.
Debrief
Well, to be honest, I’m not sure this was a fair fight just because my opponent had absolutely no idea what was in my army list. A single rank of shot-up chaos knights should not be charging my helms. No sorcerer, even if he has a 3+ ward and stubborn, should take the risk of holding a charge from them either (even without Vaul’s, how many lists use the OTS these days?). That the Chaos BSB chose to get into combat with my prince, in spite of seeing his general slain with contemptible ease, was also quite surprising and betrayed his ignorance that I was packing the talisman.
In my defence, though, my concentrated deployment and aggressive advance across the right side of the field did, firstly, pose some awkward questions (killing the dogs on T1 was crucial here). Secondly, this deployment contained overwhelming force, especially considering the reach and influence of my shooting and magic, which brought the giants and knights down below strength, protected the helms and lions and removed my opponent’s ward saves. All of these tools working together was just too much for the units deployed against them. Latterly, flaming arrows made life impossible for the trolls once I’d established board control. It doesn’t get much more comfortable than this.
Last edited by Seredain on Sat Feb 16, 2013 11:04 pm, edited 1 time in total.
The Cavalry Prince - List Design, Tactics, Battle Reports
http://www.ulthuan.net/forum/viewtopic.php?f=76&t=33584
http://www.ulthuan.net/forum/viewtopic.php?f=76&t=33584
-
SpellArcher
- Green Istari
- Posts: 13847
- Joined: Sat Sep 13, 2008 11:26 am
- Location: Otherworld
Re: The Cavalry Prince - List Design, Tactics, Battle Reports
Pretty comprehensive, no?
I've tried that move putting the Swordmasters on a flank and it actually worked pretty well. This must have a satisying win Seredain, given the frustration of your last game vs Throgg. Your opponent's best stuff seemed to queue up for the chop almost.
I'm constantly surprised how players of other armies don't seem aware of the range of options at our disposal. High Magic is almost a secret weapon. As one of my opponents asked "Have you got Shadow magic and Book of Hoeth?" In particular, no one seems to see the Talisman of Loec coming at all.
A New Blog (Orcs and Goblins)
http://ulthuan.net/forum/viewtopic.php?f=5&t=70550
Cavalry Prince Reloaded
http://ulthuan.net/forum/viewtopic.php?f=80&t=70001
http://ulthuan.net/forum/viewtopic.php?f=5&t=70550
Cavalry Prince Reloaded
http://ulthuan.net/forum/viewtopic.php?f=80&t=70001
Re: The Cavalry Prince - List Design, Tactics, Battle Reports
Well done and thanks for a great read.
Even if he'd fled the lord and not charged the BSB, you could have finished off those giants pretty quickly and then been in the same position as you were in the late game here. Yes, you might have had to chase the characters a bit, but your cavalry didn't do anything against the trolls so it would be fine.
2 20-0 wins so far - this is looking very good.
"I say the Eatainii were cheating - again." -Aicanor
"Eatainian jerks…" -Headshot
"It was a little ungentlemanly." -Aicanor (on the Eatainii)
"What is it with Eataini being blamed for everything?" -Aicanor
"Eatainian jerks…" -Headshot
"It was a little ungentlemanly." -Aicanor (on the Eatainii)
"What is it with Eataini being blamed for everything?" -Aicanor
Re: The Cavalry Prince - List Design, Tactics, Battle Reports
I don't mind Throgg lists per se - I've got flaming arrows, better deployment and good harassment options but for sure if they get amongst it life gets uncomfortable (albeit last time the big problem wasn't the trolls themselves so much as (1) Galrauch and (2) me throwing my archmage away by forgetting about the effects of true line of sight). In this case, I think my opponent was just caught on the hop by in a way he wasn't used to. He was used to fighting heavy infantry lists ('march forward, hit them'), and wasn't expecting his faster units to get run over so quickly.SpellArcher wrote:Pretty comprehensive, no?
I've tried that move putting the Swordmasters on a flank and it actually worked pretty well. This must have a satisying win Seredain, given the frustration of your last game vs Throgg. Your opponent's best stuff seemed to queue up for the chop almost.
This is so true. This guy actually cast Vaul's on me just because he assumed I had Book of Hoeth! He wasn't expecting the giant blade, or the talisman, or bolt throwers, or cavalry or... any of it really. High magic was integral to this surprise: by the time I fought any of the major combats, arrow attraction and/or Vaul's had effectively made the enemy unit bite-size. The cumulative effect of all these unexpected weapons turned out to be devastating. With all my harassment units intact, the last troll unit just couldn't get back into it either. Good times.SpellArcher wrote:I'm constantly surprised how players of other armies don't seem aware of the range of options at our disposal. High Magic is almost a secret weapon. As one of my opponents asked "Have you got Shadow magic and Book of Hoeth?" In particular, no one seems to see the Talisman of Loec coming at all.
Thanks Elithmar. What could go wrong now, eh?Elithmar of Lothern wrote:Well done and thanks for a great read.
Even if he'd fled the lord and not charged the BSB, you could have finished off those giants pretty quickly and then been in the same position as you were in the late game here. Yes, you might have had to chase the characters a bit, but your cavalry didn't do anything against the trolls so it would be fine.
2 20-0 wins so far - this is looking very good.
Up next, Ogres...
The Cavalry Prince - List Design, Tactics, Battle Reports
http://www.ulthuan.net/forum/viewtopic.php?f=76&t=33584
http://www.ulthuan.net/forum/viewtopic.php?f=76&t=33584
Re: The Cavalry Prince - List Design, Tactics, Battle Reports
Ah, well ogres could be tough. Still, I'm pretty sure you can beat them, seeing as how I almost beat ogres with the cavalry prince.Seredain wrote:Thanks Elithmar. What could go wrong now, eh?
Up next, Ogres...
"I say the Eatainii were cheating - again." -Aicanor
"Eatainian jerks…" -Headshot
"It was a little ungentlemanly." -Aicanor (on the Eatainii)
"What is it with Eataini being blamed for everything?" -Aicanor
"Eatainian jerks…" -Headshot
"It was a little ungentlemanly." -Aicanor (on the Eatainii)
"What is it with Eataini being blamed for everything?" -Aicanor